3D Rendering for a Sales Center Display Board
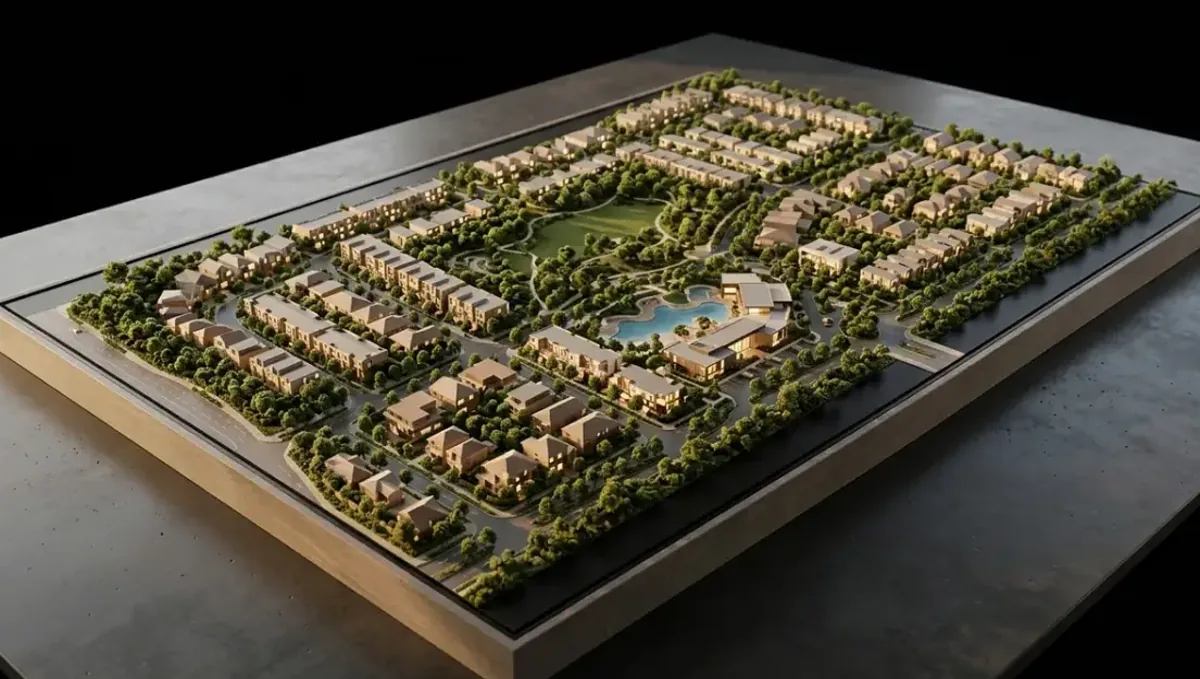
Quick answer: A 3D rendering for a sales center display board must be composed for reading distance, printed at the right resolution, proofed under real lighting and paired with labeled samples.
What a display board does in a sales center
A display board is a large printed panel in a sales center, a trailer or a temporary office. It lets visitors see the project at a glance while the sales team talks. It has to be readable from a few steps away and still hold up at close range. A rendering gives the board its center of gravity. This guide belongs to using a 3D rendering to pre-sell a property before construction.
Board types
- A hero board with the main exterior and the project name.
- A site plan board with the lots or units marked.
- A unit type board with plans and interiors.
- A finish board with material samples beside the images.
- An amenities or lifestyle board.
Reading distance and hierarchy
A board is read while standing, often from a meter or two away. Use one dominant image and a clear headline, then smaller supporting views. Keep text short and large enough to read comfortably. Avoid filling every corner: white space helps the eye. Ask the studio to compose views with calm areas where the layout can place text, so the image is not covered by labels.
Resolution and print size
Large prints need large files. Ask the printer for the final size and resolution required at that distance, and give it to the studio before rendering. A board printed from a small file looks soft and undermines the project. Confirm the material as well, such as foam board, rigid panel or fabric, since each handles color differently. A test print of a small section can reveal issues before the full run.
Color accuracy
Colors on a screen and colors on a large print rarely match exactly. Ask for a proof and view it under the lighting of the sales center, which is often different from daylight. Finishes such as stone, wood and paint are especially sensitive. If a color matters for the project, compare it to the physical sample board on site, and adjust the image or the print profile before the final run.
Site plan boards
For a community, the site plan board shows lots, streets, amenities and phases. A 3D aerial view with lot numbers helps buyers understand where they might live. Keep the numbering consistent with the plat and the contract. Mark available, reserved and sold lots with a system that can be updated, such as stickers or a digital overlay, rather than reprinting the whole board each week.
Pairing boards with samples
Buyers trust what they can touch. Place material samples on or beside the board: flooring, counter, cabinet door, exterior siding. Tie each sample to the image with a label. If the image shows an upgrade, mark it. The combination of image and sample makes the finish package tangible and reduces later disputes about what was chosen or included.
Lighting in the sales center
Spotlights can cause glare on glossy prints. Choose a matte finish for boards under strong lights, and position the boards at an angle that avoids reflections. Check the boards at different times of day. A board that looks perfect in the studio and washed out in the sales center wastes the image, so plan the location and the lighting together.
Keeping boards current
Designs change, units sell and prices move. Keep the board free of prices and availability that will age, or use removable elements. When the design changes, reprint the affected boards. Do not leave outdated boards on display, since visitors may take them as the current plan. A simple log of board versions and dates helps the team keep track.
Accessibility in the sales center
Place boards at a height that can be read from a standing or seated position, and leave clear space in front of them for wheelchairs and strollers. Use high contrast between text and background, and avoid tiny type. A sales center that welcomes every visitor makes the conversation easier, and it shows that the builder pays attention to detail, which is the same quality buyers hope to find in the finished home.
Scale models and boards together
Some projects add a physical scale model next to the boards. If so, make sure the model and the renderings show the same design, since visitors will compare them. Point out which elements are final and which may change. A model gives a sense of massing that a flat image cannot, and the board gives the finish and light that the model lacks. Used together, they cover each other weaknesses.
Bilingual boards
In many markets, boards need two languages. Tell the studio and the designer early so the layout has room for longer text, and keep the same hierarchy in both languages. Ask a fluent reviewer to read the final proof, since a wrong finish name or number in one language can create the same confusion as a wrong image. Keep the disclaimer in both languages as well.
Temporary versus permanent sales centers
A temporary trailer needs boards that are light, quick to install and easy to replace. A permanent sales center can support more elaborate displays, such as backlit panels or a scale model. Decide early how long the center will operate, and choose materials and budgets accordingly. Spending heavily on permanent displays for a short campaign is rarely useful, and thin boards in a long campaign will look tired.
Digital displays
Some sales centers add a screen or a tablet with the same images, plans and a simple availability tool. This can be updated without reprinting. Use the same approved images and versions, and avoid autoplay loops that distract from conversation. A screen supports the sales team, and it should never contradict the printed boards. Keep both in sync when the design changes.
Guiding the visitor flow
Arrange the boards in the order of the sales conversation: the project, the site, the unit types, the finishes and then the next steps. Visitors tend to follow the layout, so a clear path makes the presentation easier for the team. Add a simple sign for the next step, such as the reservation desk or the design center, to help visitors move on without confusion.
Budget and priorities
Do not spread the budget over too many boards. Start with the hero board and the site plan, which appear in most conversations, then add unit boards as the campaign grows. Reuse the same images across print and web to save cost. Ask the studio for a scope that lists each board and image, so you can decide where to invest first.
After the sales center closes
When the sales center closes, archive the final boards and keep the files. Some can be reused for the next phase or for the resale office. Record which version was on display at which date, in case a buyer asks later what they saw. Dispose of outdated boards responsibly, and keep the records with the project documentation.
Disclaimers on boards
A board should carry a short, readable notice that images are artist's impressions and subject to change. Ask your attorney or licensed broker for the wording and required size. Place it where a visitor can find it without effort. The studio can set the approved text in the layout, but it should not be asked to write it.
Working with the sign printer
The printer needs the final files, the size, the material and the color profile. Ask for a proof and confirm the installation method, such as easel, wall mount or stand. Agree on the delivery date with a buffer, since printing and mounting can take longer than expected. A clear brief to the printer saves reprints and keeps the grand opening on schedule.
What to send the studio
- Plans, elevations and the site plan.
- The finish schedule and material samples list.
- The board sizes and the printer specifications.
- Brand assets and layout references.
- The disclaimer text approved by counsel.
Questions to ask the studio
- Can you deliver files at the print resolution required?
- Can you leave space for text in the composition?
- Can you match colors to my samples?
- How many revision rounds are included?
- Can you supply web versions of the same images?
A checklist before printing
- Images match the final plans and finishes.
- The print size and resolution were confirmed.
- A proof was checked in the sales center light.
- Upgrades are labeled.
- The disclaimer is readable.
- Old boards were removed.
Revision rounds and how to keep them small
For a sales center display board, settle the big decisions in the first preview: massing, materials, colors, landscaping and camera. Afterwards, send changes as one consolidated list. Marketing images are also promises to buyers, so each correction should keep the image consistent with the plans and the specification sheet. See how revision rounds affect timelines.
Timing
Sales dates are usually tied to a launch, an event, a listing date or a construction milestone. Count backward from that date, leave room for one revision round and answer the studio quickly. See how long a 3D rendering takes. Rendimension offers an express option, subject to the queue, when a launch date is fixed.
Common mistakes
- Using a low resolution file for a large print.
- Overloading the board with text.
- Skipping the color proof.
- Ignoring glare from the lights.
- Printing prices that will change.
- Leaving outdated boards on display.
A worked example
A developer opens a sales trailer for a townhome community. The studio prepares a hero exterior, an aerial site plan and interiors for two unit types, all sized for the boards. The developer checks a proof under the trailer lights, places samples beside the finish board, and reprints only the site plan when a phase is released.
Where to go next
Send the drawings or sketch, the finish schedule, the site photos and your marketing goals to the studio. For the general overview, see using a 3D rendering to pre-sell a property before construction, and for the pitfalls to avoid, see common mistakes using a rendering to pre-sell.
Frequently asked questions
What boards does a sales center need?
Usually a hero, a site plan, unit types and a finish board.
What resolution do I need?
It depends on the print size. Ask the printer and tell the studio first.
Should boards show prices?
Prices change, so use removable elements or leave them to the team.
How do I handle glare?
Choose a matte finish and position the boards to avoid reflections.
Do I need a disclaimer?
Usually. Ask your attorney or broker.
Can I reuse the images online?
Yes, from the same approved set.
What about samples?
Place them beside the board and label them.
Is there a faster option?
Rendimension offers an express option, subject to the queue.
Related guides
This guide is part of our series on 3D renderings to pre-sell a property before construction. Start with the overview, using a 3D rendering to pre-sell a property before construction. Related: rendering for a social media presale campaign, rendering for a buyer presentation deck, rendering for a floor plan and availability sheet. When you are ready, send what you have through our quote request.