Proven on 1,000 Projects: White Model Rendering Workflow for Design Teams

Proven on 1,000 Projects: White Model Rendering Workflow for Design Teams

White model rendering strips a 3D model of color, texture, and material detail so reviewers see only form, massing, and proportion. It’s the right deliverable whenever a project needs fast stakeholder alignment before material decisions are locked in. The quickest way to get there: neutralize every material to a uniform gray or white, drop in a flat neutral background, and light the scene with soft directional light that reveals edges without casting hard shadows.
TL;DR:
- White-model renders are most effective for early design reviews focused solely on shape, massing, and proportions, before material and texture decisions are finalized.
- Achieving the whitest possible render requires neutralizing all surfaces, disabling textures, and using diffuse gray or white materials, while avoiding emissive properties and environment reflections.
- Proper lighting, including a large diffuse key light and subtle shadows, enhances the perception of form and depth in digital white-model images.
- For physical models, matte white surfaces and controlled lighting ensure clear, noise-free photographs suitable for documentation and presentation.
- Use digital white-model renders for quick, remote, or massing reviews, and reserve physical models for tactile stakeholder engagement or on-site discussions.
Table of Contents
- How Do You Create a White Model Rendering?
- How Do You Light a White Model to Show Form?
- Best Practices for Photographing Physical White-Card Models
- What Files and Views Should You Deliver for Review?
- How Rendimension Uses White-Model Renders on Real Projects
- When Should You Commission a White-Model Render Instead of a Full Material Study?
- Rendimension’s Approach to Early-Stage Visualization
- Sources
- FAQ
How Do You Create a White Model Rendering?
Two digital methods dominate this work, and they solve different problems. Shaded white renders apply soft ambient occlusion and gradient lighting across surfaces, which makes them the better pick when a client needs to read volume and depth at a glance. Hidden-line renders skip shading entirely and show crisp outline geometry instead, which renders faster and lets you select individual objects by their linework rather than by color or material tag, according to Vectorworks’ documentation on white-model rendering. Use shaded renders for massing reviews and hidden-line for technical coordination meetings where someone needs to click on a wall or a window frame.
The core technical move behind both methods is the same: turn off colors and textures in your render options so every surface reads as neutral white or gray, a step Vectorworks’ render settings guide calls out directly, and one that’s been a consistent recommendation across multiple software versions for years.
A repeatable sequence looks like this:
- Strip or override materials so every surface uses a neutral diffuse value, no textures.
- Set the environment to a flat, neutral background (light gray reads better than pure white on most monitors).
- Enable a light ambient occlusion pass so corners and recesses show subtle depth.
- Adjust global exposure until highlights don’t blow out and shadows stay readable.
- Save the view with a descriptive name before exporting.
Watch for these traps:
- Emissive materials left active will glow through the neutralization and pull focus.
- Environment reflections on glazing or polished surfaces can reintroduce color from the sky or surrounding geometry.
- Layered materials (a painted panel over a substrate, for example) sometimes keep a tint even after the top layer goes neutral. Check each layer, not just the visible one.
For deliverables, export at a resolution that holds up on a shared screen or printed board, typically 3000 pixels on the long edge for review decks. Name saved views with the camera angle and intent baked in, something like “north_elevation_massing_v2,” so nobody has to guess what they’re looking at six weeks later.
Pro Tip: Before you export anything, zoom into glazing and metal trim at full resolution. Those two material types are the most common source of leftover color that slips past a quick visual check.
How Do You Light a White Model to Show Form?
Lighting is what separates a white model that reads as a real object from one that looks like a flat cutout. A large, diffused key light at a raking angle, roughly 30 to 45 degrees from the surface, creates the gradient that lets a viewer’s eye separate one plane from the next. Add a soft fill from the opposite side to keep shadow areas from going completely black, and a gentle edge light or rim light to pull the silhouette away from the background.
A few compositional habits make this easier:
- Use negative fill (a dark card or panel just out of frame) to deepen shadows slightly and add contrast without introducing any color.
- Keep backgrounds on a subtle gradient rather than flat white; total flatness makes it harder to judge where the model ends and the void begins.
- Match focal length to intent. A longer lens with the camera farther back keeps verticals honest for elevation-style views; a wider lens at eye level suits interior or occupant walkthroughs.
- Set camera height around 5 to 6 feet for occupant perspective, or well above the roofline for a massing overview.
A small dose of ambient occlusion or soft shadowing is what keeps a white render from reading as a flat silhouette rather than a three-dimensional object, a point Vectorworks makes directly about why shaded approaches outperform pure outline views for form review. If you need scale reference, add a minimal human figure or a simple context block in matching neutral tone. Skip anything with pattern or color; it will pull every eye in the room away from the building.
Best Practices for Photographing Physical White-Card Models
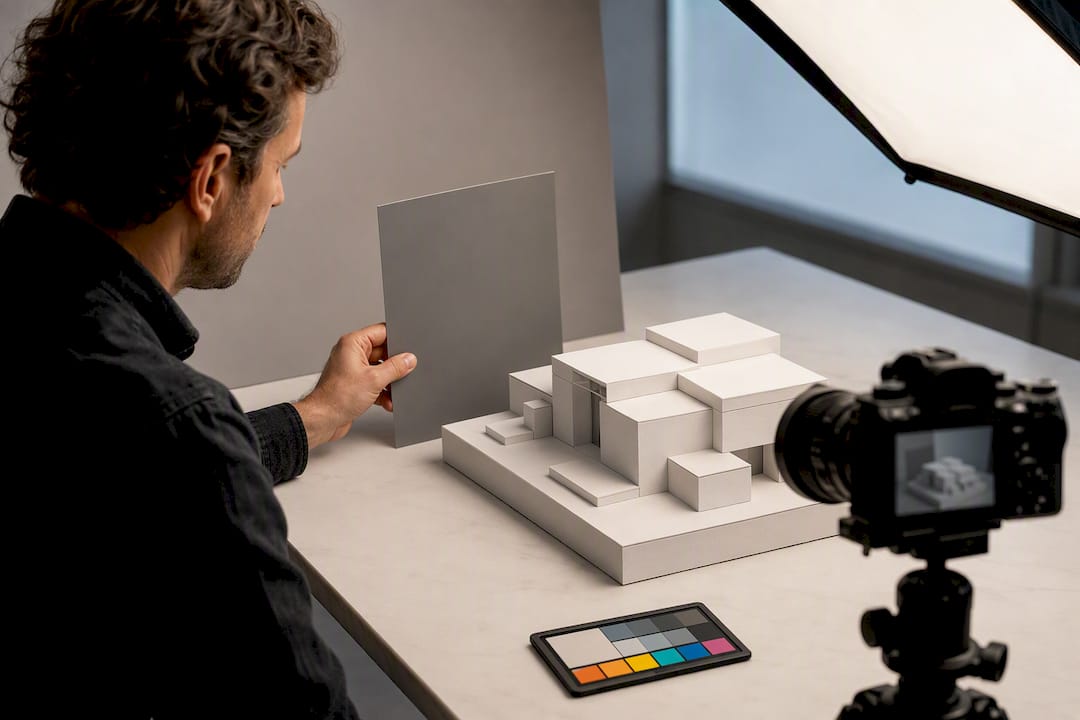
Plenty of design teams still build physical study models alongside digital ones, and the photography rules are different but related. Matte white card or foam board is the standard surface. Skip glossy varnishes and clear coats; they throw specular highlights that read as noise rather than form. If part of the model comes from a 3D print, a light matte primer coat evens out layer lines so the printed sections match the card sections under the same light.
A simple sequence works for most setups:
- Build a repeatable “light architecture”: diffusion frames on both sides, negative fill opposite the key, and a small flagged edge light for separation.
- Lock white balance with a gray card before the first shot, and don’t adjust it between frames.
- Shoot with a mid-range focal length (roughly 50 to 85mm equivalent) to avoid the distortion a wide lens introduces on small objects.
- Vary camera height deliberately: low and level for an occupant’s-eye view, high and angled down for a site-context overview.
- In post, remove dust specks, correct minor perspective skew, and export a full-resolution TIFF for archive alongside a compressed version for sharing.
This structured approach to light, form, and scale is exactly what separates a usable model photo from a muddy one, according to guidance on architectural model photography. When a model mixes materials, painted card next to printed acrylic, for instance, feathering the light source and rotating the model in tiny increments between frames helps tame hotspots on the glossier sections while keeping detail visible on the matte ones.
Pro Tip: Shoot a test frame with the gray card in view, then leave it out of frame for the rest of the session. That gives you a white-balance reference to correct against later without a gray card cluttering every image.
What Files and Views Should You Deliver for Review?
Match the export format to what happens next with the file.
- 16-bit TIFF for archive copies and anything that might need color grading or heavy retouching later.
- High-resolution JPEG or TIFF for printed boards and formal presentations.
- Compressed JPEG or PNG for review decks, email threads, and quick sign-off rounds.
Naming conventions save real time on multi-round projects. A saved view labeled with camera height, lighting setup, and intent, something like “aerial_60ft_soft_massing_review”, tells the next person on the project exactly what they’re looking at without opening the file. Named camera states carry forward into later presentations and walkthroughs, so a naming habit set at the white-model stage keeps paying off through design development.
Decide upfront whether an image needs annotation. Pure, untouched renders work best for gut-check massing reviews. Add simple linework or callout labels only when a specific dimension or relationship needs pointing out. Attach a short note with each delivery covering the lighting setup, the material neutralization method used, and the exposure settings, so a reviewer six weeks later can ask for a comparable follow-up render.
How Rendimension Uses White-Model Renders on Real Projects
White-model renders sit early in Rendimension’s visualization workflow, right after a base 3D model exists and before material decisions get locked in. They’re what let an architect, developer, and contractor look at the same massing study and agree on scale and proportion before anyone spends time on finish selections. Rendimension has completed over 1,000 projects globally using a collaborative process that keeps clients involved from concept through final delivery.
On a typical project, clients get a first round of white-model or hidden-line views within days, review them together with the design team, then move into material studies once the massing gets a sign-off. That review cadence keeps costly late-stage material changes rare, because the shape decisions happened first.
When Should You Commission a White-Model Render Instead of a Full Material Study?
White models earn their keep whenever a decision hinges on shape, not finish, early concept reviews, zoning submissions, or internal massing comparisons. A reasonable schedule runs concept as white-model, design development as material studies once finishes are chosen, and marketing as full photorealistic renders once everything is locked. Bundle the white-model saved views into the same review set as later material passes; reusing camera angles makes side-by-side comparison far easier for everyone in the room.
, Rendimension
Rendimension’s Approach to Early-Stage Visualization
Rendimension handles white-model renders as one stage in a full visualization pipeline that runs from early massing studies through photorealistic marketing imagery. If you’re weighing whether to start with a study or jump straight to a finished render, Rendimension’s 3D rendering services can scope both, depending on where your project sits.
![CTA image placeholder]
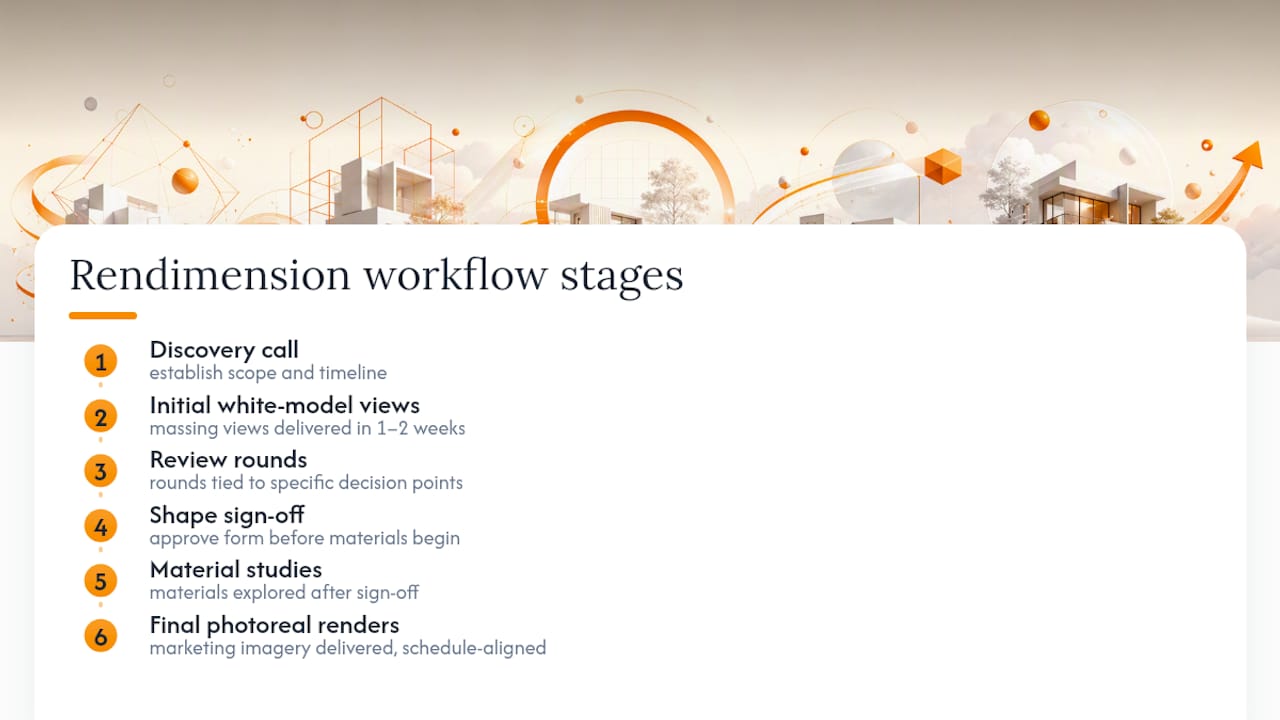
Projects typically start with a short discovery call to establish scope and timeline, followed by an initial set of massing or white-model views for review within the first week or two. From there, review cycles move in rounds, each tied to a specific decision point rather than an open-ended revision loop, so material studies only start once the shape has been signed off. That collaborative rhythm mirrors how Rendimension’s architectural visualization projects run more broadly, with the client weighing in at each stage instead of receiving a single finished image at the end. Coordination-heavy teams working alongside construction schedules may also want to loop in tools like CivroBuild to keep visualization milestones aligned with build timelines. If your next project needs a fast, form-focused study before anyone commits to materials, reach out to Rendimension to scope a white-model deliverable and timeline.
Sources
For render-option specifics, see Vectorworks’ custom render settings. For on-set photography setups, this guide to model photography covers lighting rigs in detail. For how physical study models get used in practice, see this overview of architectural model uses.
- White-Model Rendering in Vectorworks Spotlight
- Custom Renderworks options
- Architectural model photography: light, form, scale
FAQ
Is White Rendering a Good Idea for Early Design Review?
Yes. Removing color and texture keeps reviewers focused on form, massing, and proportion instead of getting distracted by finish choices that haven’t been made yet.
What Are the Three Types of Rendering Used for White Models?
The three common approaches are shaded white rendering (soft shadows and volume), hidden-line rendering (fast, crisp outline geometry), and physical white-card model photography, each suited to different review needs.
What Is the “Whitest” Render Setting?
The whitest result comes from disabling all colors and textures in render options and setting every material’s diffuse value to a neutral white or light gray, the standard technique behind most white-card renders.
What Is a Render Model in This Context?
A render model, in white-model terms, is a 3D model prepared specifically for a neutralized, colorless render, stripped of material detail so form and structure carry the entire presentation.
When Should You Choose a Physical White-Card Model Over a Digital Render?
Choose a physical model when stakeholders benefit from handling a tangible object in a room together; digital white renders work better for fast iteration and remote review across a distributed team.
Recommended
- How Renderings Speed Project Approvals For Architects
- Rendering Workflow for Presentations: Advanced Guide
- How To Create 3D Renderings For Professional Projects
- Rendering Workflow Explained For Photorealism 2026
Frequently asked questions
Is White Rendering a Good Idea for Early Design Review?
Yes. Removing color and texture keeps reviewers focused on form, massing, and proportion instead of getting distracted by finish choices that haven't been made yet.
What Are the Three Types of Rendering Used for White Models?
The three common approaches are shaded white rendering (soft shadows and volume), hidden-line rendering (fast, crisp outline geometry), and physical white-card model photography, each suited to different review needs.
What Is the "Whitest" Render Setting?
The whitest result comes from disabling all colors and textures in render options and setting every material's diffuse value to a neutral white or light gray, the standard technique behind most white-card renders.
What Is a Render Model in This Context?
A render model, in white-model terms, is a 3D model prepared specifically for a neutralized, colorless render, stripped of material detail so form and structure carry the entire presentation.
When Should You Choose a Physical White-Card Model Over a Digital Render?
Choose a physical model when stakeholders benefit from handling a tangible object in a room together; digital white renders work better for fast iteration and remote review across a distributed team.