Minutes, Not Days: Revit to Unreal for Studios with Datasmith+Dataprep

Minutes, Not Days: Revit to Unreal for Studios with Datasmith+Dataprep
Datasmith is the recommended route for getting a Revit model into Unreal Engine, and which mode you pick depends on where the project stands. Use Datasmith Direct Link when the design is still moving and you need Unreal to reflect Revit changes in minutes. Export a static .udatasmith file for a finished handoff. Either way, expect to trim the Revit view first and lean on Visual Dataprep to fix materials and colliders once the geometry lands.
TL;DR:
- Always match Revit and Unreal versions and install the correct Datasmith plugin to prevent import failures.
- Use static
.udatasmithexports for finalized models and Direct Link for ongoing design updates to minimize re-exporting.- Limit geometry during export by filtering worksets, reducing lights, and splitting large scenes into sublevels to maintain real-time performance.
- Standardize material names and automate their setup with Visual Dataprep to improve visual polish and reduce manual adjustments.
- Verify scale, textures, and colliders after import to quickly fix common issues like size mismatches, missing textures, or collision data.
Table of Contents
- Revit To Unreal Prerequisites: Versions, Plugins, And Cleanup
- How Do You Export A Revit Model To Unreal?
- Importing A Datasmith File Into Unreal Engine
- Cutting Geometry Complexity For Real-Time Performance
- Fixing Materials And Automating Setup With Visual Dataprep
- Keeping Custom Unreal Work Intact Through Model Updates
- Common Revit To Unreal Import Errors And Fast Fixes
- How Rendimension Approaches A Revit To Unreal Handoff
- Where To Go Deeper On Datasmith And Dataprep
- Sources
- FAQ
Revit To Unreal Prerequisites: Versions, Plugins, And Cleanup
Before touching the export button, match your versions. Epic publishes compatibility windows for each Datasmith release on the Datasmith Exporter Plugins page, and mismatched Revit and Unreal versions are the single most common reason an import fails outright.
Get your environment right with these steps:
- Install the Datasmith Exporter plugin matching your Revit version, and confirm the Datasmith Importer is enabled inside Unreal Editor under Plugins.
- Restart both applications after installation. Datasmith buttons often don’t appear until you do.
- In Revit, purge unused families and materials before export. Fewer unique assets means a cleaner material list on the Unreal side.
- Confirm your Revit project units and note them. You’ll need this to catch scale mismatches later.
- Set up worksets if you haven’t already. They become your export filter in the next step.
How Do You Export A Revit Model To Unreal?
Two paths cover almost every project: a one-time .udatasmith export, or a live Direct Link connection. Datasmith preserves geometry, materials, and metadata through either method, which is why it beats generic exchange formats for architectural work.
- Set the active 3D view. Datasmith exports what’s visible in your current view, so hide anything you don’t want in Unreal, first, using view filters, worksets, or category visibility, before you click export.
- Export the static file. Find the Datasmith export button on the Revit add-in ribbon, choose a tessellation level appropriate to the model (finer for close-up hero shots, coarser for site-wide walkthroughs), and save the
.udatasmithfile. - Or connect Direct Link instead. Launch Direct Link from the same ribbon, name your connection, and it stays live between Revit and Unreal.
- Push updates as you work. Direct Link sends incremental changes, so you’re not re-exporting and re-importing the whole model every time someone moves a wall.
- Choose based on project phase. Reserve
.udatasmithexports for a finalized handoff or archival snapshot. Use Direct Link for anything still in design review, where Datasmith with Revit in Unreal Engine is built specifically for that kind of ongoing sync.
Importing A Datasmith File Into Unreal Engine
Once the export exists, Unreal needs its own plugin enabled before anything shows up in the content browser.
- Go to Edit > Plugins, search for “Datasmith Importer,” enable it, and restart Unreal Editor.
- Use Add > Datasmith > Import File for a
.udatasmithfile, or Import via Direct Link if you set up a live connection. - Choose a dedicated content folder per project. Mixing multiple Datasmith imports into one folder gets messy fast once you’re managing revisions.
- Review the import options dialog. It’s worth leaving geometry, materials, and metadata flags on for a first pass, then tightening them once you know what the model actually needs.
- Check the resulting hierarchy. Datasmith maps Revit levels and categories into Unreal’s Layers and actor hierarchy, so a well-organized Revit model produces an equally organized Unreal scene, and a messy one produces a flat pile of actors you’ll spend hours sorting.
Cutting Geometry Complexity For Real-Time Performance
A Revit model built for construction documentation is not built for a real-time frame rate. It’s carrying detail that matters on a drawing set and means nothing to Unreal’s renderer.
Start trimming before export, not after:
- Export by workset. Isolate architecture, structure, and MEP into separate passes and only bring in what the current deliverable needs. Practitioners report this as the single biggest lever for avoiding performance problems on complex imports.
- Uncheck Lights on export. Revit models can carry thousands of light fixtures as individual light objects, and importing all of them will crush your frame rate. Place a smaller, purpose-built set of Unreal lights instead.
- Split large buildings into sublevels by floor or zone, then use level streaming so Unreal only loads what’s near the camera.
- Apply Nanite selectively on dense architectural elements like ornate facades or repeated structural members, rather than globally across the whole scene.
- Watch for duplicate instanced families. Revit’s own instancing usually carries through, but verify draw calls after import rather than assuming.
Pro Tip: Run a quick actor count check right after import, before you touch materials. If a single floor is pushing tens of thousands of actors, fix the workset export now. Cleaning up geometry after you’ve already built lighting and materials on top of it means redoing that work twice.
Fixing Materials And Automating Setup With Visual Dataprep
Materials are where most Revit to Unreal imports lose their polish. Revit material names rarely map cleanly to a PBR workflow, and generic “Revit Material” labels are common enough to be a running joke among visualization teams.
- Standardize material names in Revit before export where you can. Materials named consistently against a PBR naming convention import into Unreal with far less manual reassignment.
- Build a Visual Dataprep recipe that auto-assigns your studio’s material library, generates colliders, and groups instanced geometry. Test the recipe with Execute before committing it permanently, since Dataprep’s import customization lets you preview results without altering the actual level.
- Check UV scale and texture tiling once the recipe commits. Stretched brick or repeating stone patterns almost always trace back to a UV scale mismatch between Revit’s default mapping and your material’s tiling settings, and it’s a five-minute fix in Unreal once you spot it.
Keeping Custom Unreal Work Intact Through Model Updates
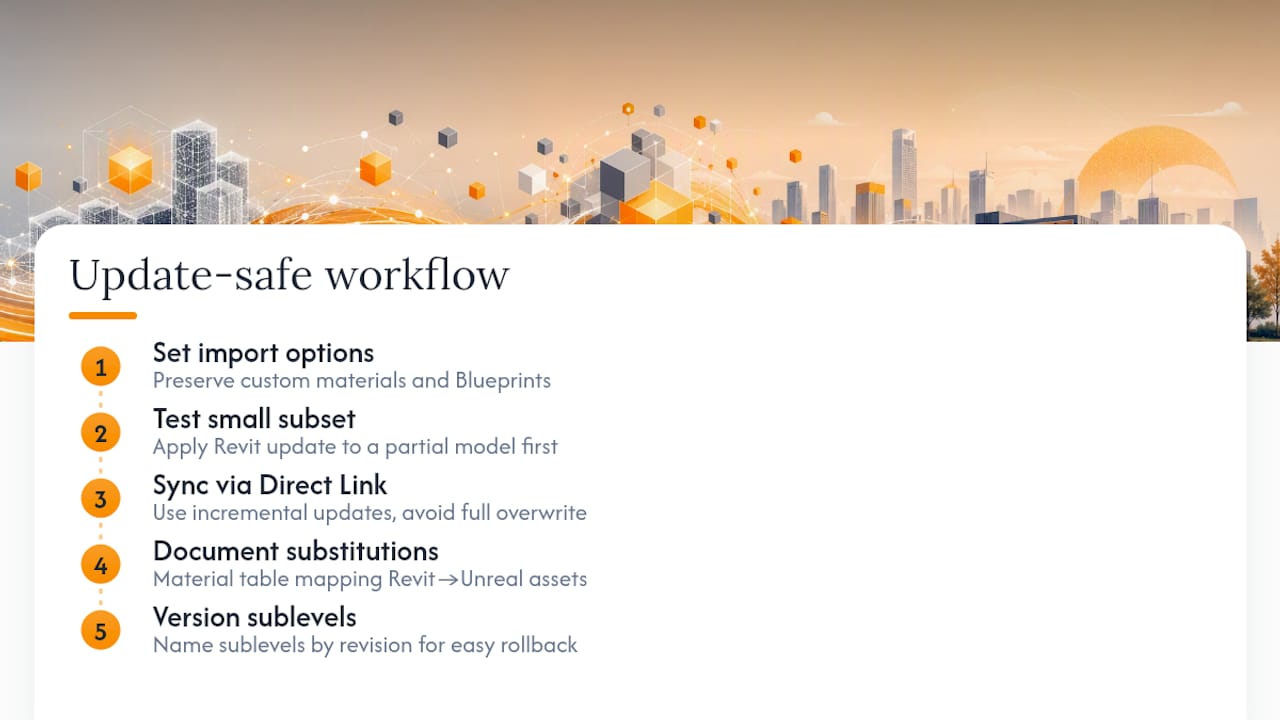
Nobody wants to rebuild lighting and materials every time an architect tweaks a floor plan. Direct Link’s incremental updates exist specifically to prevent that, but only if you configure the import settings correctly.
Set import options to Preserve custom materials and Blueprints before your first sync, not after you’ve already lost work to an overwrite. Test any Revit update against a small subset of the model first, rather than pushing a full sync straight into a scene with hours of Unreal-side polish already in it. A visualization team weighing Direct Link against manual re-exports generally lands on Direct Link precisely because it avoids that rework. Keep a material substitution table documenting which Revit material maps to which Unreal asset, and name your sublevels by revision so a bad sync is easy to isolate and roll back.
Common Revit To Unreal Import Errors And Fast Fixes
Most import problems trace back to one of three causes, and all three have quick diagnostic paths.
- Missing textures: check that materials were packaged with the export and that names weren’t stripped during a prior file conversion. Forum reports on Datasmith exports confirm this is a recurring, well-documented issue, not something you’re doing uniquely wrong.
- Scale mismatches: Unreal works in centimeters. If your model looks miniature or gigantic, verify Revit’s project units before assuming Unreal is at fault.
- Missing colliders: Datasmith doesn’t always generate collision automatically. Run a Dataprep collider pass, or set the mesh’s collision complexity to “use complex as simple” for detailed architectural geometry.
How Rendimension Approaches A Revit To Unreal Handoff
A studio pipeline runs the same core steps, just with more curation up front. Model curation comes first: stripping unused families, isolating worksets, and confirming the view before anything gets exported. From there it’s Datasmith or Direct Link into Unreal, a Dataprep pass to standardize materials and colliders, then manual polish on lighting and camera work before final delivery as a walkthrough or VR experience.
Rendimension has run this pipeline across BIM-heavy architectural visualization projects, and the pattern holds: the projects that go smoothly are the ones where model cleanup happened before export, not after. Complex mixed-use models, phased builds needing level streaming, or a tight marketing deadline are exactly the cases where handing the pipeline to a specialist saves more time than it costs.
, Rendimension
Where To Go Deeper On Datasmith And Dataprep
Epic’s own documentation covers the exact mechanics: installation and export steps for Revit, Dataprep recipe automation, and the export SDK guidelines for hierarchy and metadata behavior. For a broader AEC-specific walkthrough covering Nanite and Lumen on real building projects, the AECbytes write-up on bringing BIM into Unreal Engine is worth the read.
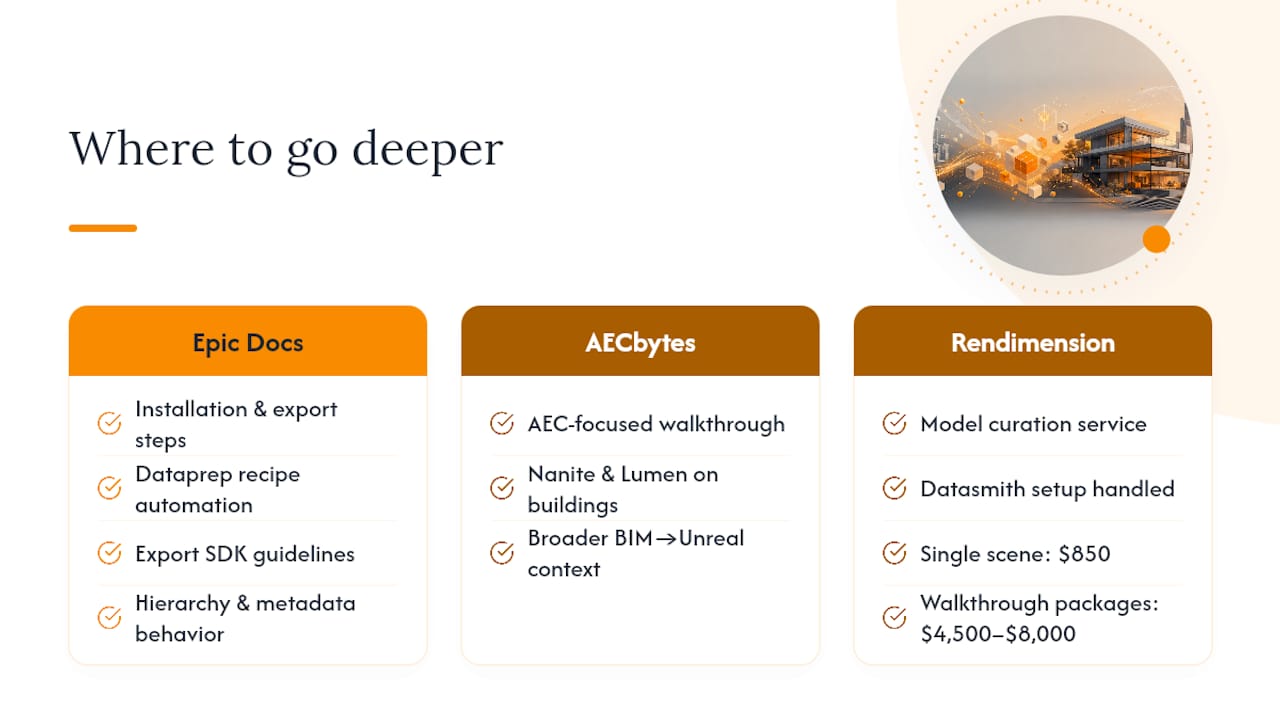
Ready to skip the trial-and-error and get a polished walkthrough or VR deliverable from your Revit model? Rendimension’s architectural rendering services start with model curation and Datasmith setup handled for you, with pricing for a single scene starting at $850 per scene and full walkthrough packages running $4,500 to $8,000.
FAQ
Does the Revit To Unreal Workflow Support Direct Link Updates?
Yes. Datasmith Direct Link pushes incremental changes from Revit into Unreal without a full re-export, which is why Epic recommends it for any project still in active design.
Is Unreal Engine 5 Killing Games?
No. Unreal Engine 5 remains one of the most widely used real-time engines across games, film, and architectural visualization, and its adoption in AEC has grown specifically because of tools like Datasmith and Nanite handling heavy BIM geometry well.
Does NASA Use Unreal Engine?
NASA and several aerospace contractors have used Unreal Engine for visualization and simulation work, though it’s a small slice of the engine’s broader use, which spans architecture, product design, film, and interactive training far more heavily than aerospace.
Is Unreal Engine Harder Than Unity?
Unreal Engine has a steeper initial learning curve because of its Blueprint visual scripting system and more elaborate rendering pipeline, but for architectural visualization work built around Datasmith imports, most of that complexity stays hidden behind the import and Dataprep tools.
Can You 3D Print From A Revit File?
Not directly. You’d need to export the Revit geometry to a mesh format like OBJ or STL first, and clean up any non-manifold geometry, since Revit’s native format isn’t built for the watertight meshes 3D printing requires.