Studios: Displacement for 2–3 Heroes, Normal Maps for Micro Detail
Studios: Displacement for 2–3 Heroes, Normal Maps for Micro Detail
Use displacement when geometry and silhouette accuracy matter. Use normal maps when you need rich surface detail without the render-time cost. Displacement physically reshapes a mesh, so it’s the right call for hero elements, close-ups, and anything that breaks the camera’s edge. Normal maps fake the lighting response instead, which makes them the default for nearly everything else. The two aren’t competitors. On a well-built asset, they work together: displacement for macro shape, normal maps for the micro detail riding on top.
TL;DR:
- Displacement is ideal for macro shape and silhouette accuracy on hero assets, especially when geometry deformation and correct shadows are necessary.
- Normal maps are suitable for surface microdetail on distant or background objects, significantly reducing render time and memory usage.
- Use 16-bit or higher displacement maps to avoid banding on curved surfaces, and ensure normal map format matches the target engine’s conventions to prevent inverted details.
- Reserve displacement for the closest assets and highest level of detail, deploying normal maps for scene-wide efficiency and maintaining a clear LOD plan.
- Properly bake and standardize displacement and normal maps, and focus on camera distance and silhouette exposure when deciding which technique to use.
Table of Contents
- Displacement Vs Normal Maps: What Each One Actually Stores
- Render Cost, Memory, and When Displacement Earns Its Keep
- Bit Depth, Format Mismatches, and Baking Pitfalls
- From Sculpt to Engine: A Practical Workflow
- How a Visualization Studio Applies This On Real Projects
- The Decision Checklist Worth Pinning to Your Desk
- Get Displacement and Normal Workflows Built Right the First Time
- Sources
- FAQ
Displacement Vs Normal Maps: What Each One Actually Stores
The confusion between these two techniques comes from a simple fact: they solve different problems that happen to look similar in a still frame.
Normal maps store surface direction data in the red, green, and blue channels of an image, and a renderer reads that data to fake how light bounces off a surface. Nothing about the underlying mesh changes. The polygon count stays flat, the silhouette stays flat, and the trick works beautifully until the camera catches the edge of the object, where the illusion falls apart because there’s no actual geometry backing it up.
Displacement maps (sometimes called height maps, though the two terms describe slightly different things) store grayscale or vector data that physically pushes vertices around. That requires subdivision or tessellation at render time, breaking a surface into far more triangles than exist in the base mesh. This is what makes normal maps encode lighting direction, while displacement reshapes geometry the core technical split between them.
A few things follow from that difference:
- Normal maps come in three flavors: tangent space (the most common, used for baked detail), object space, and world space, each suited to different pipeline needs.
- Displacement changes the actual silhouette, so mortar lines, carved trim, or rocky terrain will read correctly from a grazing angle.
- Self-shadowing only works correctly with displacement. A normal map can shade a bump but can’t cast a real shadow from it.
- Normal maps fail visibly at extreme angles and along edges. Displacement fails when tessellation is too coarse, producing blocky or faceted results instead of smooth curvature.
Render Cost, Memory, and When Displacement Earns Its Keep
Displacement is expensive because the renderer has to generate new geometry, often millions of additional faces, before it can even start calculating light. Displacement mapping requires subdivision or tessellation at render time, and that cost multiplies fast across a full scene rather than a single object. A cobblestone courtyard rendered with true displacement can take dramatically longer than the same courtyard using normal maps, for a difference viewers may not even notice from a wide shot.
Normal maps are the right call almost everywhere else: distant assets, tiled surfaces like brick or siding, and any prop you’re duplicating dozens of times across a scene. The lighting trick holds up fine at typical viewing distances, and it costs almost nothing in render time or memory.
A few heuristics keep this decision fast during production:
- Camera distance. If the asset won’t fill more than a small fraction of the frame, normal maps are enough.
- Silhouette exposure. If the object’s edge is visible against open sky or a contrasting background, lean toward displacement.
- Level of detail (LOD) plan. Reserve displacement for the highest LOD tier and drop to normals for anything mid-range or background.
- Render budget. Allocate displacement to the two or three hero assets that actually justify the time, not the whole scene.
Pro Tip: Chaos’s own V-Ray documentation recommends breaking large surfaces into separate pieces and adding noise before applying displacement to selected areas rather than an entire object, which avoids the uniform tessellation patterns that cause visible artifacting on flat regions.
Bit Depth, Format Mismatches, and Baking Pitfalls
Precision matters more for displacement than most artists expect. An 8-bit displacement map only has 256 possible height values, and on a smooth curved surface that shows up as visible stepping or banding once the geometry deforms. Storing displacement maps in 16-bit or 32-bit EXR avoids that problem and should be the default for anything beyond a rough test render.
Normal maps carry a different trap: format orientation. OpenGL and DirectX interpret the green channel of a normal map in opposite directions, and loading the wrong convention into a renderer produces inverted lighting detail, most often bumps that read as dents or vice versa.
A short checklist prevents most baking headaches:
- Bake displacement to 16-bit minimum, 32-bit EXR for hero assets.
- Confirm whether your target engine expects DirectX (Y minus) or OpenGL (Y plus) normals before baking, not after.
- Flip the green channel if imported detail looks inverted rather than re-baking from scratch.
- Standardize one convention across the whole team so assets don’t need per-file fixes.
Mismatched green-channel orientation is one of the most common causes of “my normal map looks wrong” complaints in production pipelines, and it’s almost always a five-minute fix once identified correctly.
From Sculpt to Engine: A Practical Workflow
A displacement and normal map workflow follows a predictable order, and skipping steps is where most artifacts creep in.
- Sculpt the high-poly asset with all the detail you want, macro and micro alike.
- Bake the macro shape, deep grooves, and anything affecting silhouette into a displacement or height map.
- Bake the fine surface texture, pores, scratches, and fabric grain into a normal map.
- Author the material so displacement drives the base mesh deformation while the normal map layers on top for lighting response.
Converting a normal map back into displacement almost never works well, since a normal map has no actual height information to recover, only direction data. Going the other way, generating a normal map from a height or displacement map, is standard practice and produces reliable results.
For engine-ready assets, plan multiple map resolutions per LOD tier, tile smaller normal maps across repeating surfaces like brick or wood grain, and fall back to parallax or virtual displacement techniques only when true tessellation isn’t available on the target platform.
Pro Tip: Keep a single source high-poly sculpt and bake both map types from it in the same session. Baking displacement and normals from different mesh versions is a common source of subtle misalignment between silhouette and surface detail.
How a Visualization Studio Applies This On Real Projects
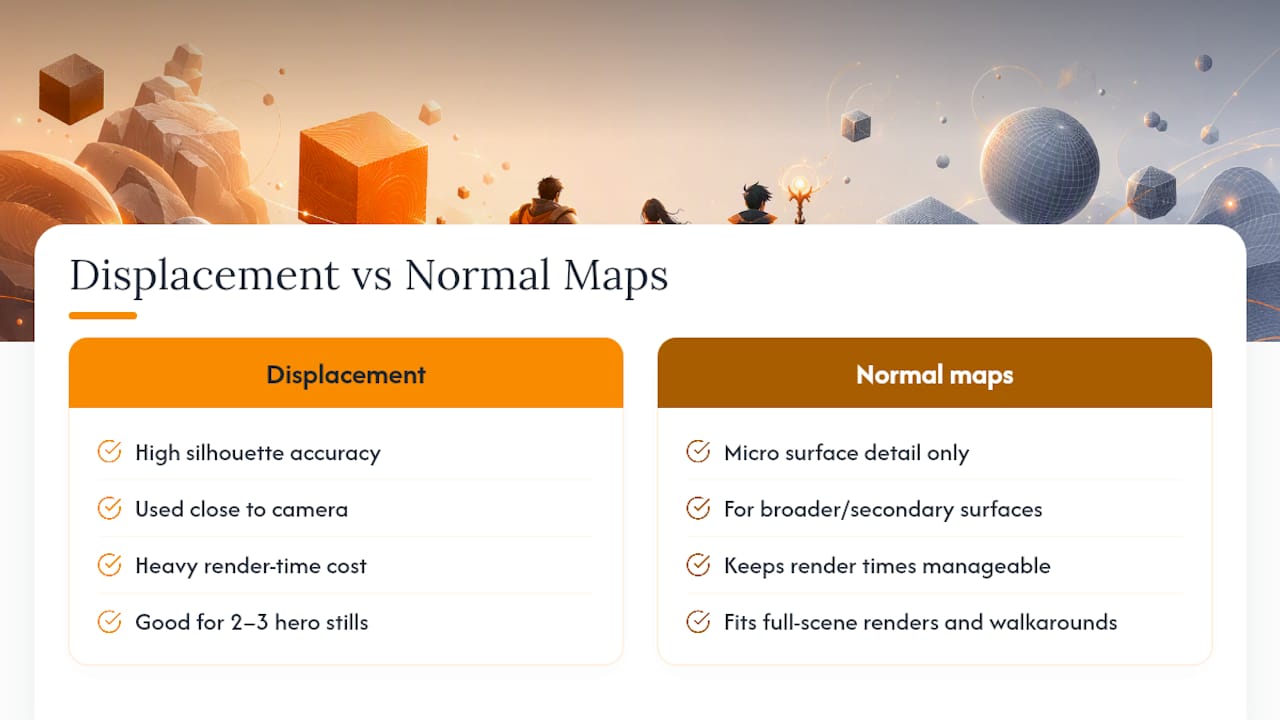
On architectural projects, displacement for macro geometry paired with normal maps for micro surface detail tends to govern the whole asset budget. Rendimension applies displacement selectively: ornate trim, cut stone, and any element sitting close to camera in a hero still. Broader facade textures, stucco grain, and secondary surfaces run on normal maps, which keeps render times manageable across a full scene.
Deliverable type changes the budget. A single marketing still can afford heavy displacement on two or three key assets. A real-time walkthrough can’t, so the same building might rely almost entirely on normal maps. Scoping a project means answering three questions upfront: which passes need silhouette-accurate geometry, how close the camera gets to each surface, and what render time the deliverable can tolerate.
The Decision Checklist Worth Pinning to Your Desk
Most disputes over displacement versus normal maps disappear once you separate the question by what the camera actually sees. Silhouette exposure means displacement. Surface grain the camera won’t isolate means normal maps. A hero asset shot in close-up usually means both, layered the way Substance 3D’s own guidance on combining macro and micro detail describes.
Before locking a scene, run it against four questions: How close does the camera get to this asset? What’s the LOD plan across the sequence? Is the displacement map stored at 16-bit or higher? Does the normal map format match what the render engine or game engine expects? Answer those four honestly, and most of the guesswork in scoping a render disappears.
, Rendimension
Get Displacement and Normal Workflows Built Right the First Time
Getting this balance wrong costs either render time or visual quality, and most in-house teams don’t have the bandwidth to test both on every project. Rendimension builds photoreal 3D rendering around exactly this trade-off: selective displacement on the trim, stonework, and hero elements that need silhouette accuracy, normal maps handling everything else efficiently.

That approach fits marketing stills, cinematic walkthroughs, and product visualization projects where the client needs a building or product to hold up under close scrutiny without blowing the render budget on every brick. If your next deliverable needs that kind of precision, whether it’s a single hero still or a full 3D walkthrough, request a quote from Rendimension and describe the camera distances and silhouette priorities upfront. That single detail shapes how the whole asset pipeline gets built.
Sources
- Normal vs. Displacement Mapping & Why Games Use Normals - CG Cookie
- Differences between Displacement, Bump and Normal Maps - Pluralsight
- Displacement mapping - Chaos documentation
- What is the difference between the OpenGL and DirectX normal format - Adobe Substance 3D
FAQ
What is a displacement map?
A displacement map is a grayscale or vector image that physically alters mesh geometry at render time, changing an object’s actual silhouette and shadow behavior rather than just simulating light response.
Are displacement and height maps the same thing?
They’re closely related but technically distinct: a height map is the image data itself, while displacement is the technique that uses that data to deform geometry. In practice, most artists use the terms interchangeably.
Should I use normal DX or normal GL?
It depends entirely on your target engine. DirectX and OpenGL read the green channel of a normal map in opposite directions, and using the wrong one produces inverted surface detail that’s fixed by flipping the green channel or baking straight to the engine-native format.
How can I convert a normal map to a displacement map?
You generally can’t, because a normal map only stores direction data, not actual height values needed for displacement. Generating a normal map from an existing height or displacement map works reliably and is the standard direction for that conversion.
When should I use displacement instead of normal maps?
Use displacement whenever an object’s silhouette is visible to the camera, when self-shadowing needs to read correctly, or on hero assets close to the lens, such as the carved stone and ornate trim prioritized on architectural hero stills.
Recommended
Frequently asked questions
What is a displacement map?
A displacement map is a grayscale or vector image that physically alters mesh geometry at render time, changing an object's actual silhouette and shadow behavior rather than just simulating light response.
Are displacement and height maps the same thing?
They're closely related but technically distinct: a height map is the image data itself, while displacement is the technique that uses that data to deform geometry. In practice, most artists use the terms interchangeably.
Should I use normal DX or normal GL?
It depends entirely on your target engine. DirectX and OpenGL read the green channel of a normal map in opposite directions, and using the wrong one produces inverted surface detail that's fixed by flipping the green channel or baking straight to the engine-native format.
How can I convert a normal map to a displacement map?
You generally can't, because a normal map only stores direction data, not actual height values needed for displacement. Generating a normal map from an existing height or displacement map works reliably and is the standard direction for that conversion.
When should I use displacement instead of normal maps?
Use displacement whenever an object's silhouette is visible to the camera, when self-shadowing needs to read correctly, or on hero assets close to the lens, such as the carved stone and ornate trim prioritized on architectural hero stills.