Interior Design Presentation Workflow 2026

Interior Design Presentation Workflow: A 2026 Guide

TL;DR:
- A well-structured interior design presentation workflow transforms concepts into actionable approvals, reducing delays and errors. It seamlessly links visual storytelling with item-level approvals, specifications, and procurement, ensuring smooth project execution. Using digital portals, realistic visuals, and clear documentation enhances client understanding and accelerates sign-offs.
An interior design presentation workflow is a structured sequence of steps that moves clients from initial concept through visual approval to procurement-ready decisions. When built correctly, this process eliminates the back-and-forth that stalls projects, reduces misunderstandings over materials and finishes, and connects every client approval directly to a specification document. Tools like Planify, Houzz Pro, and Photoshop now make it possible to run the entire approval cycle inside a single shareable link. The result is faster sign-offs, cleaner budgets, and a studio that looks as organized as its designs.
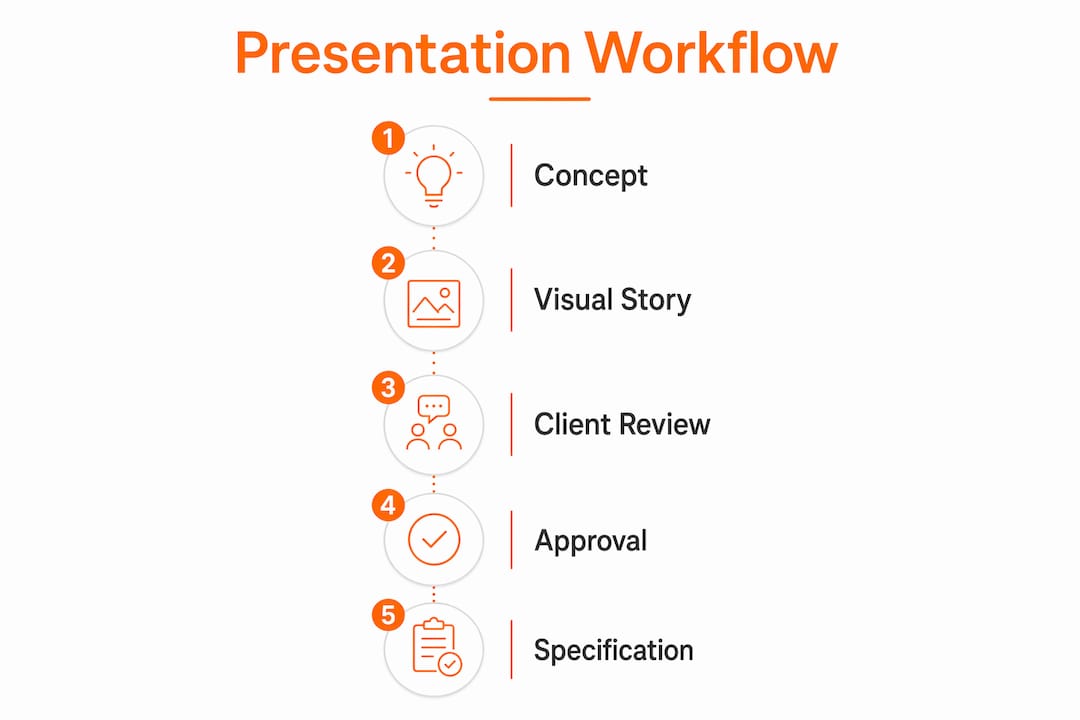
What are the essential components of an interior design presentation workflow?
A well-structured interior design presentation workflow functions as a narrative, not a catalog. Each section builds on the last, moving the client from emotional buy-in to practical commitment. DesignFiles recommends organizing presentations as a story that progresses from vision to execution, using at least ten distinct slide types to cover every decision point.
The sequence that works across residential and commercial projects follows this order:
- Project overview. Restate the client’s goals in their own language. This slide proves you listened and sets the filter for every decision that follows.
- Design direction and concept narrative. Introduce the mood, style references, and spatial philosophy. Use imagery that evokes feeling before showing any specific product.
- Color palette and material board. Present colors, finishes, and textures together so the client reads them as a system, not isolated choices.
- Floor plans and layouts. Ground the concept in spatial reality. Clients who cannot read technical drawings need annotated plans with furniture scaled correctly.
- Lighting plan and elevations. Show how light changes the room across morning, afternoon, and evening. Elevations clarify wall treatments and built-in details that floor plans cannot communicate.
- FF&E schedule preview. Introduce key furniture, fixtures, and equipment items with images, not just names. This is where the concept becomes purchasable.
- Timeline and phasing. Give the client a realistic picture of when decisions are needed and what happens if approvals are delayed.
- Budget breakdown. Present costs by category, not as a single number. Clients who see line items feel in control and approve faster.
- Next steps. End with a clear call to action: what needs approval today, what gets decided next week, and who is responsible for each item.
The logic behind this sequence is deliberate. Emotional engagement comes first, practical details come last. Clients who feel understood in slide one are far more receptive to budget conversations in slide eight.
Pro Tip: Build a master template in Photoshop or Canva with locked brand elements and swappable content zones. This cuts deck production time by roughly half and keeps every presentation visually consistent.
How to integrate digital tools and client portals into your workflow
The biggest friction point in most design workflows is not the design itself. It is the approval process. Clients miss emails, lose PDF attachments, and forget which version they approved. Digital client portals solve this by centralizing every project asset in one place.

Planify’s no-login Magic Links give clients instant access to all project materials without requiring account setup. The client clicks one URL and sees mood boards, FF&E schedules, contracts, and proposals in a single view. This approach has been shown to compress approval cycles from several days down to under 48 hours. That compression matters because every delayed approval adds cost and scheduling risk to a live project.
Key capabilities to look for in any client portal:
- Item-level approval controls. Clients should be able to approve, decline, or comment on individual products, not just the presentation as a whole.
- Audit trail generation. Every approval and comment should be timestamped and attributed to a specific person. This protects the design team from disputes later.
- Budget visibility. Clients who can see running totals alongside individual selections make faster decisions because they understand the financial context.
- Controlled information display. You decide what the client sees. Trade pricing, internal notes, and vendor contacts stay hidden by default.
Houzz Pro’s Selections Board takes a similar approach. Clients can approve or decline each item individually, leave comments, and see budget summaries. The platform also sends automatic notifications when a client acts on a selection, so the designer knows exactly where each item stands without sending a follow-up email.
Pro Tip: Send the client portal link with a short voice note or video walkthrough explaining how to use it. Clients who understand the tool engage with it immediately rather than waiting for a call.
What visual presentation techniques improve client understanding and approval?
Visual miscommunication is the leading cause of client hesitation in interior design presentations. More data does not fix this problem. Better visuals do. The goal is to make the client feel the space before they commit to it.
Several techniques separate presentations that generate confident approvals from those that generate questions:
- Multiple lighting scenarios per key space. Show the living room at 8 a.m. with natural light flooding in, at 6 p.m. with warm ambient lighting, and at night with accent lighting active. Clients who see how a room shifts across the day understand the design intent far more clearly than clients who see a single static render.
- Material texture and surface depth. Flat renders make expensive materials look cheap. Photorealistic material texture rendering communicates the difference between honed limestone and polished marble in a way that a material sample board alone cannot.
- Detailed joinery in high-stakes spaces. Kitchens and primary bathrooms are where clients spend the most emotional energy. Showing detailed cabinetry profiles, hardware choices, and countertop overhangs in these spaces builds confidence that the designer has thought through every detail.
- Labeled conceptual visuals. When using AI-generated imagery or early-stage concept renders, label the fidelity level clearly so clients understand they are seeing a direction, not a finished product. Unlabeled AI visuals create expectations the final build cannot meet.
- 3D walkthroughs for spatial experience. Static renders show a moment. A 3D walkthrough shows a sequence, which is how people actually experience a room. Clients who walk through a space virtually before construction begins ask fewer revision questions after it.
The underlying principle is that depth, context, and realistic materials communicate design intent more persuasively than any amount of written specification. A client who can see and feel the space will approve it. A client who has to imagine it will hesitate.
How does the presentation workflow connect to specification and procurement?
The presentation workflow does not end at client approval. It feeds directly into the specification and procurement process, and the quality of that handoff determines whether a project runs smoothly or generates expensive rework. SpecSources identifies 12 workflow stages that tightly couple presentation approvals with detailed FF&E specifications, treating each approved item as a data point that flows forward into procurement documents.
Every item a client approves in a presentation should carry the following attributes before it moves to procurement:
- Product name and manufacturer code
- Quantity and unit of measure
- Vendor contact and lead time
- Unit price, trade discount, and retail price
- Installation notes or coordination requirements
When this data is captured at the approval stage, the specification document writes itself. When it is not, the designer or project manager has to reconstruct it from memory, emails, and PDF attachments. That reconstruction is where errors enter the project.
The connection between presentations and procurement also protects the studio legally. Item-level approvals with timestamped records create an audit trail that resolves disputes over what was approved, when, and by whom. This is particularly important on commercial projects where multiple stakeholders are involved and change orders are common.
Budget tracking must run in parallel with approvals, not as a separate exercise. When a client approves a sofa that pushes the living room budget over target, the designer needs to know immediately, not at the next invoice review. Platforms that connect approval status to live budget totals give designers the information they need to have that conversation in real time.
Pro Tip: Build your FF&E schedule template before the first client presentation, not after. Populating it as approvals come in is far faster than building it retroactively from a completed deck.
Key takeaways
A structured interior design presentation workflow that connects visual storytelling to item-level approvals and procurement-ready specifications is the single most effective way to reduce project delays and protect studio revenue.
| Point | Details |
|---|---|
| Structure as a narrative | Sequence slides from emotional concept to practical budget so clients commit at each stage. |
| Use no-login client portals | Tools like Planify Magic Links cut approval cycles from days to under 48 hours by removing access friction. |
| Lead with lighting and texture | Multiple lighting scenarios and realistic material renders resolve client hesitation faster than additional data. |
| Connect approvals to specs | Every approved item should carry product codes, quantities, and lead times before moving to procurement. |
| Label conceptual visuals clearly | AI-generated or early-stage renders must be marked as such to prevent unrealistic client expectations. |
Why most presentation workflows break down before procurement
After working on over 1,000 visualization projects at Rendimension, the pattern is consistent. Studios invest heavily in beautiful presentations and then lose the value of that work in the handoff to procurement. The presentation becomes a PDF that sits in an email thread while the designer rebuilds the specification from scratch. That gap is where budgets blow out and timelines slip.
The studios that avoid this problem treat every presentation as an approval-to-spec pipeline. They do not present a sofa without a product code attached. They do not show a tile without a vendor and lead time already confirmed. This discipline feels like extra work at the presentation stage, but it eliminates two to three weeks of administrative recovery at the procurement stage.
The other mistake I see repeatedly is over-relying on photorealistic renders without managing client expectations about fidelity. A render that looks like a photograph creates the assumption that the finished space will look identical. When it does not, the client feels misled, even if the design is excellent. Labeling renders with their fidelity level and showing the client a real-world reference alongside the render closes that gap before it becomes a dispute.
The best presentation workflows are not the most elaborate ones. They are the ones where every visual decision maps to a real product, every approval generates a record, and every client leaves the meeting knowing exactly what they said yes to.
— Rendimension
How Rendimension’s visualizations strengthen your presentation workflow

Photorealistic 3D renderings and immersive walkthroughs are the fastest way to close the gap between what a client imagines and what a designer intends. Rendimension’s 3D rendering services deliver high-resolution visuals with accurate material textures, lighting scenarios, and spatial context that integrate directly into your existing presentation decks. For projects where spatial experience drives approval, Rendimension’s 3D walkthrough services let clients move through a space before a single wall goes up. With over 1,000 projects completed globally across residential and commercial sectors, Rendimension provides the visual assets that turn concept presentations into confident client approvals.
FAQ
What is an interior design presentation workflow?
An interior design presentation workflow is a structured sequence of steps that organizes design concepts, client approvals, and specification data into a single connected process. It covers everything from the initial concept deck through item-level approvals to procurement-ready FF&E schedules.
How many slides should an interior design presentation have?
DesignFiles recommends at least ten slide types covering project overview, design direction, color palette, materials, floor plans, lighting, elevations, FF&E preview, timeline, and budget. The exact count depends on project complexity, but each section should serve a distinct decision-making purpose.
What tools are best for managing client approvals in design presentations?
Planify and Houzz Pro are two widely used platforms for managing client approvals. Planify’s Magic Links provide no-login access to all project materials, while Houzz Pro’s Selections Board enables item-level approval with automatic notifications and budget tracking.
Why do clients hesitate to approve interior design presentations?
Visual miscommunication is the primary cause of client hesitation, not lack of information. Flat renders, missing lighting context, and unlabeled AI-generated visuals create uncertainty that delays decisions. Realistic materials and multiple lighting scenarios resolve this more effectively than additional written detail.
How does a presentation workflow connect to procurement?
Each client approval in a presentation should carry product codes, quantities, vendor details, and lead times so the data flows directly into specification documents without reconstruction. Connecting approvals to procurement eliminates rework, reduces errors, and creates an audit trail that protects the design team from disputes.