Master the interior walkthrough process for stunning results

TL;DR:
- Interior walkthroughs provide immersive, first-hand experiences of spaces before construction begins, aiding approval and stakeholder buy-in. They are distinct from flythroughs, focusing on interior eye-level perspectives ideal for pre-sales and design validation, thus reducing costly revisions. Using proper tools and a disciplined workflow ensures impactful presentations that foster early feedback and project success.
Imagine presenting a luxury residential tower to a room full of investors. You pull up flat floor plans and static renderings. Within minutes, eyes glaze over, questions pile up, and someone asks whether the living spaces actually feel spacious enough. The meeting ends without a single approval. Interior walkthroughs bridge blueprints to reality, accelerating approvals and stakeholder buy-in by giving decision-makers a visceral, first-person experience of a space before a single brick is laid. This guide walks you through every stage of the process, from defining objectives and building your toolkit to delivering a presentation that wins commitments.
Table of Contents
- What is the interior walkthrough process?
- Essential tools and materials: What you need to get started
- Step-by-step interior walkthrough process
- Common mistakes and how to avoid them
- Delivering, presenting, and maximizing impact
- What everyone gets wrong about interior walkthroughs
- Bring your designs to life with expert walkthrough solutions
- Frequently asked questions
Key Takeaways
| Point | Details |
|---|---|
| Start walkthroughs early | Early integration helps spot design issues and streamlines approvals before costly changes arise. |
| Choose the right visualization | Walkthroughs are better for interiors and marketing, while flythroughs suit site planning and exteriors. |
| Prepare the right tools | Gather the proper software, hardware, and assets for a successful walkthrough and smoother process. |
| Avoid late-stage mistakes | Involve stakeholders early and use hybrid visualization to minimize late revisions and risks. |
| Focus on impactful delivery | Present walkthroughs using audience-focused formats and gather feedback to maximize marketing and stakeholder engagement. |
What is the interior walkthrough process?
Now that you see what’s at stake in your project presentations, let’s clarify what the interior walkthrough process actually covers and how it stands apart from other visualization methods.
An interior walkthrough is an animated, first-person video or real-time simulation that guides a viewer through the inside of a building at human eye level. Unlike a static rendering, which captures a single frozen moment, a walkthrough creates continuous spatial storytelling. The viewer experiences how rooms connect, how light shifts from one area to the next, and how a finished material palette will actually feel. That experiential quality is exactly what makes walkthroughs in design presentations so effective for closing deals and securing planning approvals.
The most common point of confusion for developers and architects is the difference between a walkthrough and a flythrough. They are not interchangeable, and choosing the wrong one wastes budget and undermines your message.
| Feature | Interior walkthrough | Flythrough |
|---|---|---|
| Perspective | Eye-level, first-person | Aerial or elevated exterior |
| Primary use | Lifestyle sales, interior marketing | Site planning, massing, urban context |
| Emotional impact | High, personal, immersive | Broad, contextual, site-scale |
| Ideal stage | Pre-sales, tenant pitches | Planning applications, master planning |
| Typical runtime | 2 to 4 minutes | 1 to 3 minutes |
As the distinction makes clear, interior spaces (eye-level) are ideal for lifestyle sales, while flythroughs address exterior site context and large-scale planning narratives. A residential developer pre-selling apartments benefits from a walkthrough. A municipality reviewing a mixed-use master plan benefits from a flythrough. Many projects ultimately need both.
Key objectives a walkthrough should accomplish:
- Translate design intent into an emotional connection for buyers or tenants
- Reveal spatial proportions, ceiling heights, and flow that blueprints obscure
- Surface material and lighting conflicts before costly construction begins
- Provide a reusable marketing asset for digital campaigns, social media, and sales center displays
- Align internal teams, contractors, and clients on a single visual reference
Essential tools and materials: What you need to get started
Understanding what an interior walkthrough is, the next step is ensuring you have the necessary tools and resources to execute the process efficiently.
Creating a professional-grade interior walkthrough requires investment in the right combination of hardware, software, and source data. Cutting corners at this stage almost always produces results that underperform during critical presentations.
Hardware essentials:
- A high-performance workstation with a dedicated GPU (NVIDIA RTX series or equivalent)
- Minimum 64 GB RAM for handling complex scenes without slowdowns
- Fast NVMe storage for large texture libraries and project files
- Dual monitors to manage viewport and timeline editing simultaneously
- A 4K display for accurate color grading and final output review
Software stack:
- 3D modeling tools such as Autodesk 3ds Max, SketchUp, or Rhino for geometry
- Rendering engines such as V-Ray, Lumion, or Unreal Engine for photorealistic output
- Adobe Premiere Pro or DaVinci Resolve for post-production color correction and sound
- Cloud-based review platforms for structured client feedback cycles
Source data requirements:
- Fully coordinated architectural drawings (CAD or Revit BIM models preferred)
- Material specifications, furniture schedules, and finish boards
- Lighting strategy documentation from the lighting designer
- Brand guidelines if the walkthrough is destined for marketing campaigns
| Visualization type | Approximate cost range | Best use case |
|---|---|---|
| 3D walkthrough | $2,500 to $15,000+ | Unbuilt conceptual spaces, pre-sales |
| 360 virtual tour | $800 to $4,000 | Existing or photo-captured spaces |
| Static renderings | $300 to $2,500 per image | Quick approvals, print marketing |
The 3D visualization benefits versus cost argument is real. 3D walkthroughs cost more than 360 virtual tours but deliver deeper emotional engagement and are far better suited for communicating unbuilt, conceptual spaces where no physical location yet exists to photograph.

Pro Tip: Match your tool choice to your client’s technical sophistication. A global institutional investor viewing a file on a tablet needs a lightweight MP4 export. An on-site sales team demonstrating a luxury penthouse benefits from real-time navigation in Unreal Engine. Knowing the delivery environment before you start production prevents expensive last-minute format conversions.
Step-by-step interior walkthrough process
With the right tools in place, it’s time to walk through each step, ensuring a high-impact interior walkthrough that impresses stakeholders.
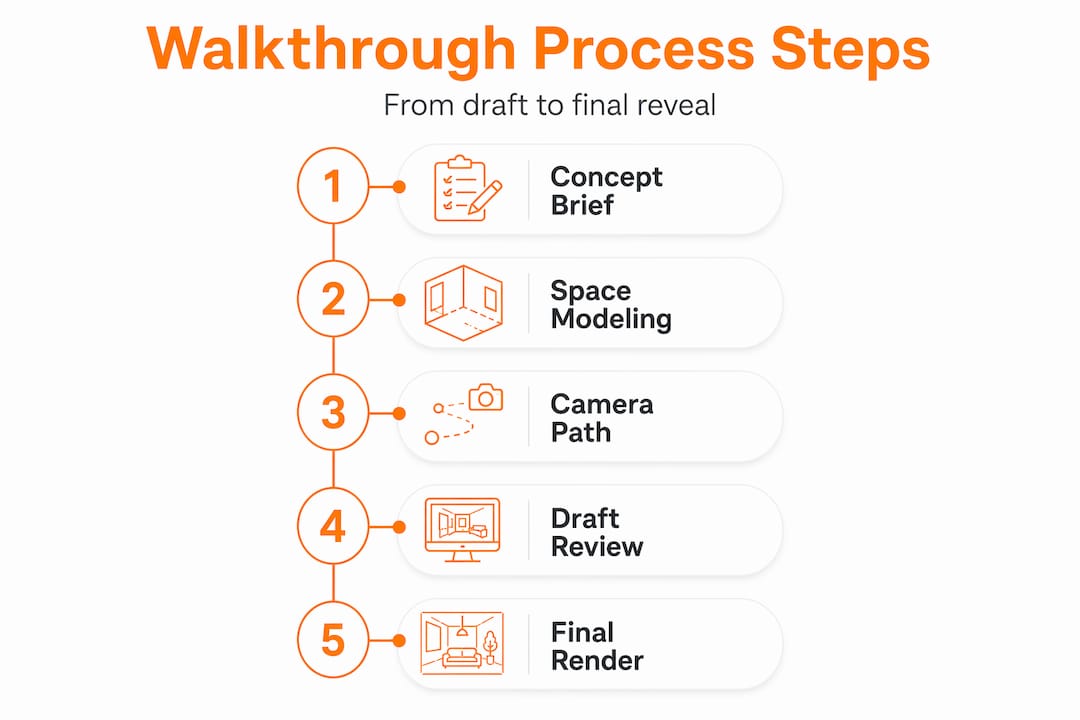
A disciplined workflow separates polished, approval-winning walkthroughs from rushed productions that require expensive revisions. Follow this sequence consistently across every project.
-
Define objectives and audience. Before opening any software, document who will watch the walkthrough, what decision you need them to make, and what emotional response you want to trigger. A first-time homebuyer needs warmth and aspiration. A commercial tenant needs efficiency and brand alignment.
-
Gather and audit all assets. Request the most current CAD or BIM files, material schedules, furniture catalogs, and finish samples. Audit the drawings for completeness. Missing ceiling heights or unresolved column locations discovered mid-production cost significant time.
-
Build and optimize the 3D model. Import or rebuild geometry to a level of detail appropriate for the camera paths you have planned. Focus polygon density where the camera lingers and simplify areas it passes through quickly. Efficient models render faster and reduce revision costs.
-
Apply materials, lighting, and atmosphere. This stage is where the space comes alive. Photorealistic materials require correct UV mapping, realistic reflectance values, and layered lighting that mimics natural and artificial sources accurately. Poor lighting is the single fastest way to make a high-quality model look unconvincing.
-
Plan and animate the camera path. The camera is the viewer’s surrogate. Move it at a natural walking pace (roughly 1.2 to 1.5 meters per second), avoid abrupt directional changes, and frame each shot to tell a deliberate story. A skilled camera operator thinks like a cinematographer: lead rooms with light, linger on hero features, and cut between spaces at natural transition points like doorways.
-
Conduct an internal review render. Generate a draft render at reduced quality for internal review. This stage catches obvious issues such as material misassignments, lighting anomalies, and camera path awkwardness before committing to full-quality production time.
-
Share with the client for structured feedback. Present the draft walkthrough with a simple timestamp-based feedback form. Structured feedback prevents vague commentary and ensures every note can be actioned precisely. Walkthroughs accelerate project approvals and pre-sales by enabling early issue detection that would otherwise surface only during costly construction phases.
-
Execute revisions and finalize production. Implement approved changes and produce the full-quality render. For a 3-minute walkthrough at 1080p, expect render times of 12 to 48 hours depending on scene complexity and hardware.
-
Post-production and delivery. Apply color grading, add music and narration if required, and export in formats appropriate for each delivery channel: 1080p or 4K MP4 for presentations, compressed versions for email or social, and project files archived for future updates. Review the detailed walkthrough creation guide for additional production depth.
Pro Tip: Invite key stakeholders to review the camera path story at Step 5, before any rendering begins. A 30-minute live session at this stage eliminates the most common late-stage requests, such as “Can you show the master bedroom view from the window?” Those changes are trivial before rendering and expensive after.
For residential pre-sales specifically, walkthroughs for real estate at this level of detail measurably reduce buyer hesitation and increase reservation conversion rates.
Common mistakes and how to avoid them
Even with a solid workflow, mistakes can derail your interior walkthrough. Here’s how to spot and prevent the most common ones.
The most expensive mistake in any interior walkthrough project is approving materials and finishes before the walkthrough is reviewed and signed off. Changes made after material libraries are built and lighting is calibrated can require rebuilding significant portions of a scene.
Critical warning: Late-stage revisions after material approval multiply project costs and timelines disproportionately. Every round of changes at final render stage costs three to five times more than the same change at the modeling or camera path stage.
Common mistakes and their solutions:
- Skipping a detailed brief: Teams that begin modeling without documented objectives consistently face mid-project scope changes. Fix this by requiring a written brief signed by all stakeholders before any asset production starts.
- Over-engineering unnecessary complexity: Adding intricate background details that the camera never focuses on inflates render times without improving audience impact. Audit every complex asset against whether the camera actually sees it.
- Misaligned client expectations on style: If your team interprets “warm and contemporary” differently from the client, you will rebuild materials after delivery. Share reference image mood boards and get written approval before building material libraries.
- Ignoring hybrid visualization opportunities: Some projects need both an interior walkthrough and a site flythrough. Avoid late revisions after material approval by planning hybrid deliverables upfront so both visualization types share assets and a unified production timeline.
- Presenting without a structured narrative: A walkthrough that moves randomly through spaces without a clear sequence confuses viewers. Map the camera journey to a story: arrival, discovery, hero spaces, supporting spaces, final impression.
The most preventable of all issues is failing to involve stakeholders early. Early involvement insights consistently show that teams who engage decision-makers during concept stages spend less time on revisions and arrive at approvals faster than teams that treat visualization as a final-stage deliverable.
Comprehensive project presentation transformation tips can help you build a presentation strategy that sidesteps these issues from the outset.
Delivering, presenting, and maximizing impact
With mistakes avoided, your walkthrough is ready for its most important role: compelling presentations that drive maximum impact.
The format in which you deliver a walkthrough matters as much as the quality of the production itself. A stunning walkthrough presented from a low-resolution laptop on a poorly lit conference table loses most of its impact.
Delivery best practices by context:
- Live investor or developer meetings: Use a large display, 65 inches or larger, and present at full 4K resolution. Prepare a 90-second highlight cut in addition to the full walkthrough, since decision-makers often request a shorter version for board packs.
- Remote stakeholder demos: Share a high-quality stream link using a platform that supports HD video without compression artifacts. Brief participants in advance on what they are about to see so they arrive mentally prepared to engage rather than orient.
- Sales center and property marketing: Loop a curated version on high-brightness display screens. Embed interactive hotspots if the platform supports them so visitors can explore individual rooms independently.
- Digital marketing campaigns: Export a 60-second teaser optimized for social platforms and embed the full walkthrough on a dedicated project landing page for qualified lead follow-up.
3D walkthroughs excel for emotional persuasion in marketing unbuilt conceptual spaces, and that persuasive power extends directly into how you present them. The presentation context shapes whether the emotional response you engineered in production actually lands with your audience.
After every presentation, gather structured feedback. Rate each viewer’s level of conviction on a simple 1 to 5 scale, record specific objections verbatim, and log which spaces generated the most questions. This data directly informs the next revision cycle and improves future productions.
Pro Tip: Before any major stakeholder presentation, conduct a full technical rehearsal including screen resolution checks, audio levels, and internet bandwidth if streaming. One technical failure in a live investor meeting can permanently undermine confidence in a project. Treat the presentation environment like a production element, not an afterthought.
Integrating VR walkthroughs for real estate into high-value presentations adds another layer of immersion that standard video simply cannot replicate, particularly for luxury residential and premium commercial projects where buyers expect a premium sales experience.
What everyone gets wrong about interior walkthroughs
Most architects and developers treat interior walkthroughs as a late-stage polish activity. The project is nearly complete in design terms, approvals are already pending, and someone decides it would be useful to have “something visual for the presentation.” That is the most expensive misunderstanding in the industry.
The reality is that a walkthrough created at concept stage is not just a sales asset. It is a design tool. When clients and stakeholders see a photorealistic, navigable version of a space early in the process, they respond with feedback that is specific, actionable, and grounded in spatial reality rather than abstract plan reading. That feedback catches problems while they are still cheap to fix.
Walkthroughs bridge blueprints to reality, enabling early issue detection and genuine stakeholder engagement rather than late-stage rubber-stamping. We have seen projects where a single early-stage walkthrough review session surfaced corridor width issues, inadequate natural light in key living areas, and a misaligned furniture layout, all corrected within days at the 3D modeling stage. The same discoveries made on a physical mock-up or, worse, during construction would have cost tens of thousands of dollars.
There is also an underappreciated psychological dimension. Stakeholders who participate in shaping a walkthrough at the concept stage develop ownership of the design. They become advocates rather than critics. That shift in dynamic is worth more to a project timeline than almost any other single investment. If you want to understand why walkthroughs matter at a strategic level, start thinking of them as a collaboration platform, not a marketing tool.
Bring your designs to life with expert walkthrough solutions
Ready to put your walkthrough process on expert footing? Collaborate with a specialist to streamline your journey from vision to approval.
Rendimension has completed over 1,000 architectural visualization projects globally, working directly with architects and real estate developers to produce walkthroughs that do more than look impressive. They convert. Whether you need a professional walkthrough service for a residential pre-launch, a commercial leasing campaign, or a planning authority submission, the team brings both technical precision and storytelling expertise to every frame.

Explore 3D walkthrough solutions built specifically for unbuilt environments, or broaden your presentation toolkit with complementary 3D rendering services that ensure every material, light source, and spatial detail is communicated with photorealistic accuracy. The Rendimension team collaborates with clients from the initial brief through final delivery, minimizing revisions and maximizing stakeholder impact. Contact us to discuss your next project.
Frequently asked questions
What’s the difference between a walkthrough and a flythrough?
Walkthroughs showcase interior spaces from a human eye perspective, ideal for lifestyle marketing, while flythroughs focus on exterior site context. The walkthrough vs. flythrough distinction comes down to perspective and purpose: interior eye-level versus aerial exterior.
How early in the design process should walkthroughs be created?
The earlier the better. Walkthroughs at conceptual stages help catch spatial and design issues when changes are inexpensive, and they support significantly faster stakeholder approvals by giving decision-makers a concrete visual reference.
Are 3D walkthroughs expensive compared to other visualization options?
Yes, 3D walkthroughs cost more than 360 virtual tours, but they offer deeper emotional engagement and are far better suited for unbuilt, conceptual spaces where no physical location exists to photograph or scan.
How can walkthroughs reduce costly changes late in a project?
By presenting walkthroughs to stakeholders at concept and schematic design stages, design issues surface while the model can still be adjusted quickly. Early stakeholder walkthroughs consistently accelerate approvals and reduce the volume of change orders during later construction phases.