Garden Render Guide: Transform Your Outdoor Space in 2026
Imagine stepping into your garden in 2026 and being welcomed by a space that feels like a designer retreat. This garden render guide will help you transform any outdoor area, blending innovative rendering techniques with creative landscaping. Explore the latest trends, learn step-by-step processes, discover smart material choices, and get expert inspiration to make your vision a reality. Outdoor spaces are now an extension of your home—do not let yours fall behind. Unlock your garden’s full potential with practical tips and future-focused ideas in this guide.
Understanding Garden Rendering: What It Is and Why It Matters
Imagine stepping into a garden that perfectly reflects your vision—whether it is a modern oasis or a rustic retreat. Achieving this level of design precision is possible through the thoughtful use of garden render. In 2026, the concept of garden render has evolved to become a cornerstone of both landscape design and outdoor construction.

Defining Garden Rendering
Garden render refers to two interconnected approaches: the process of visualizing a garden design before construction, and the application of a protective, decorative finish to outdoor walls and features. Digital garden render uses advanced software to create lifelike 3D models, allowing homeowners to see their garden plans in detail before a single plant is set or wall is built.
Physical garden render, on the other hand, is a time-tested technique that covers walls, planters, and structures with a smooth or textured finish. The demand for garden render solutions has surged in 2026, as more people look to personalize and upgrade their outdoor living spaces.
Benefits of Garden Rendering
Why should you consider garden render for your next project? The benefits are both aesthetic and practical:
- Enhances curb appeal: A rendered wall or feature gives gardens a polished, designer look.
- Boosts property value: Well-rendered spaces are attractive to buyers.
- Provides weather protection: Quality render protects against rain, frost, and UV, extending wall life.
- Customization: Choose from colors, textures, and finishes to match any design.
- Supports sustainability: Eco-friendly renders help create greener gardens.
These advantages make garden render a smart investment for both new builds and renovations.
Types of Garden Render
There are several types of garden render, each with distinct properties:
| Type | Pros | Cons |
|---|---|---|
| Cement-based | Durable, cost-effective | Less flexible, can crack |
| Lime-based | Breathable, eco-friendly | Requires skilled application |
| Acrylic | Flexible, weather-resistant | More expensive |
| Digital Render | Visualizes design, flexible edits | Not a physical finish |
Digital garden render includes static images, 3D walkthroughs, and even VR tours. Each type serves different needs, from enhancing durability to streamlining the planning process. For a deeper dive into the range of rendering methods, see types of architectural renderings.
Trends Shaping Garden Rendering in 2026
In 2026, the garden render landscape is influenced by several key trends. There is a surge in 3D design and virtual reality tools, making it easier to experiment with layouts and finishes. Textured and colored renders are gaining popularity, adding depth and personality to modern gardens.
Homeowners are investing more in outdoor upgrades, with a 70% increase since 2022. This reflects a shift toward treating garden spaces as true extensions of the home, driving innovation in both digital and physical garden render techniques.
Common Garden Render Applications
Garden render is incredibly versatile. It is used for:
- Boundary walls and fences
- Planters and raised beds
- Outdoor kitchens and BBQ areas
- Feature walls and seating
- Digital visualizations for planning and presentations
Whether you are renovating an old wall or planning a new outdoor kitchen, garden render adapts to your needs.
Key Arguments and Insights
The true power of garden render lies in its ability to bridge your vision and reality. Both DIY enthusiasts and professionals rely on rendering to make informed decisions early in the design process. Before-and-after transformations—such as reviving a tired wall with a fresh render—demonstrate its impact.
Integrating garden render at the start of a project ensures the final result is cohesive, durable, and visually striking. By embracing both the physical and digital sides of garden render, you unlock the full potential of your outdoor space.
Step-by-Step Guide: How to Render Your Garden Walls and Features
Transforming your outdoor space with a garden render is both an art and a science. By following a structured, methodical approach, you can ensure your garden walls and features are durable, stylish, and built to last. This step-by-step guide will take you through each essential phase, from preparation to finishing touches, so your project delivers professional results.
Step 1: Assess and Prepare Surfaces
Proper preparation is the foundation of any successful garden render project. Begin by thoroughly inspecting your existing garden walls for damage such as cracks, spalling, or remnants of old render. Addressing these issues early ensures the new finish will adhere correctly and last for years.
Remove any loose or damaged render using a hammer and masonry bolster. Next, clean the surface with a wire brush to eliminate dust, algae, and debris. Any structural issues, like crumbling bricks or mortar, should be repaired at this stage. Apply an SBR (Styrene Butadiene Rubber) sealer to promote adhesion and prevent water ingress.
Essential tools for this step include:
- Hammer and masonry bolster
- Wire brush
- SBR sealer
- Protective gloves and goggles
Careful surface preparation maximizes the lifespan of your garden render and sets the tone for a flawless finish. For a more detailed breakdown of each phase, consider referencing this architectural rendering step-by-step guide.
Step 2: Choose the Right Render Material
Selecting the ideal render material is crucial for achieving your desired look and ensuring durability. There are several types of render to consider, each with unique properties suited to different garden environments.
Premixed renders offer convenience and consistency, making them popular for DIYers. Custom-mixed renders, combining sand, cement, and lime, allow for tailored ratios depending on your wall type and climate. For large garden walls, using render sand can help manage costs without sacrificing quality.
When planning your garden render, evaluate:
- Local climate (wet, dry, frosty)
- Wall material (brick, block, stone)
- Desired finish (smooth, textured, colored)
Cement-based renders provide strength, while lime-based options offer breathability for older walls. Acrylic renders excel in flexibility and color retention. Assessing these factors will help you choose a material that enhances both the appearance and longevity of your outdoor features.
Step 3: Mixing Render Correctly
Achieving the perfect garden render mix is about precision and consistency. For most garden walls, a recommended base coat ratio is 6 parts sand, 1 part cement, and 1 part hydrated lime. Hydrated lime is essential as it increases flexibility and reduces the risk of cracking over time.
Use clean water and mix gradually to form a workable, lump-free paste. Consistency should be smooth but firm enough to hold shape on a trowel. Mixing small batches ensures freshness and makes application more manageable.
Tips for a successful render mix:
- Always use sharp, clean render sand
- Avoid over-watering, which weakens the mix
- Use a mechanical mixer for large areas
Proper mixing is a critical step in garden render application, directly impacting the final finish and wall durability.
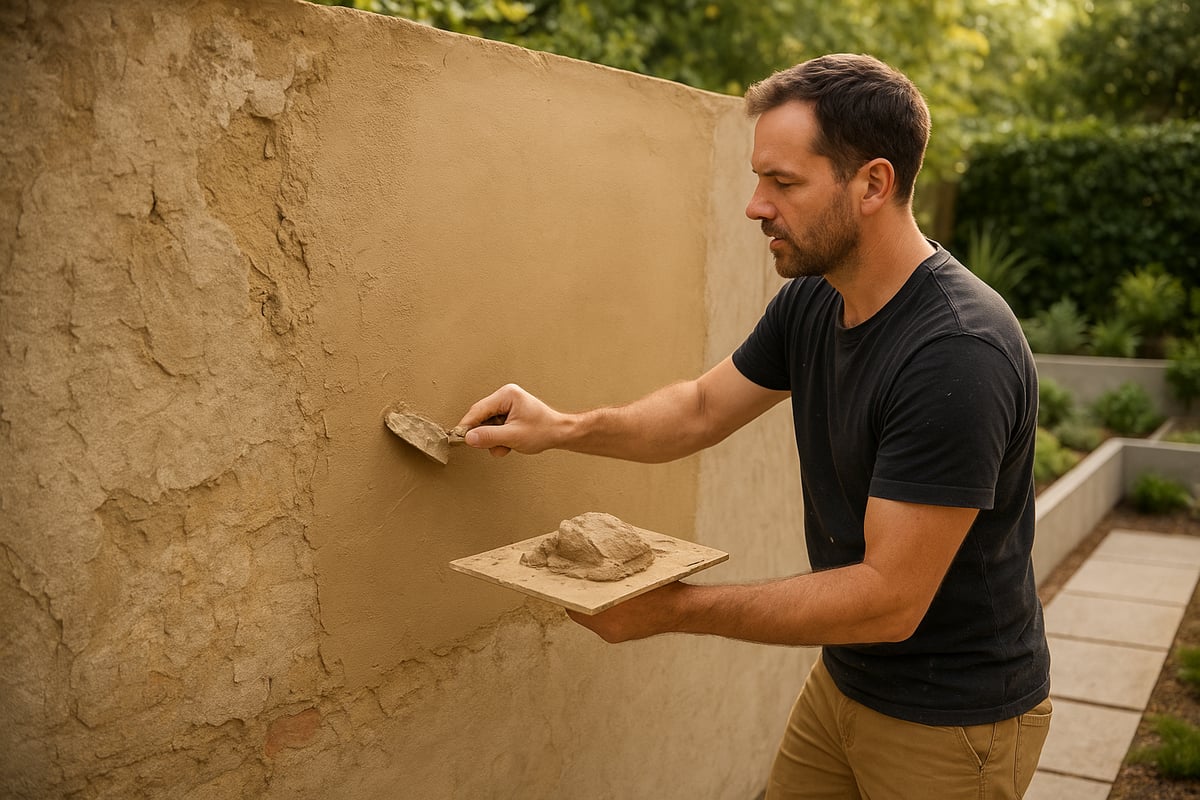
Step 4: Applying the Base (Scratch) Coat
Start by installing corner beads to ensure sharp, straight edges on your garden render features. This step is vital for professional-looking results, especially around corners and openings.
Apply a 5mm thick base coat (scratch coat) evenly across the prepared wall. Use a notched trowel or comb to score horizontal lines into the wet render, creating a textured surface that helps the next layer bond securely. Allow the base coat to dry thoroughly, typically at least two days, depending on weather conditions.
Key points for a successful base coat:
- Maintain consistent thickness
- Ensure full coverage over all surfaces
- Allow adequate drying time before proceeding
A well-executed scratch coat forms the backbone of your garden render, ensuring longevity and adhesion for the finish coat.
Step 5: Applying the Finish Coat
With the scratch coat fully cured, lightly dampen the surface using a diluted SBR solution. This step helps the finish layer bond seamlessly to the base. Apply a second coat of render, again at about 5mm thickness, smoothing it evenly with a steel float.
For a flawless finish, use a damp sponge float in gentle circular motions once the render begins to firm up. This technique achieves a flat, uniform surface that is ready for further decoration. Take care to feather edges and maintain a consistent appearance across all garden render features.
Tips for the finish coat:
- Work in manageable sections to maintain a wet edge
- Avoid overworking the surface, which can cause patchiness
- Check for evenness under natural light
A well-applied finish coat transforms your garden render into a sleek, visually appealing backdrop for planting and outdoor living.
Step 6: Finishing Touches and Decoration
Now that your garden render has cured, it’s time to add personality and protection. Use weather-resistant masonry paints, such as Sandtex or Dulux Weathershield, to achieve vibrant, long-lasting color. For a unique look, consider adding colored pigments or custom textures directly to the render.
Integrate rendered features with your overall garden design by pairing them with lush planting schemes, contemporary lighting, or decorative patterns. Raised beds, planters, and outdoor kitchens can all benefit from a cohesive garden render finish.
Benefits of thoughtful finishing:
- Boosts curb appeal and property value
- Enhances weather resistance
- Creates a unified outdoor aesthetic
A garden render not only revitalizes tired walls but can also add 5 to 10 years of life to your structures. With careful planning and attention to detail, you can transform a crumbling wall into a designer focal point, elevating your entire outdoor space.
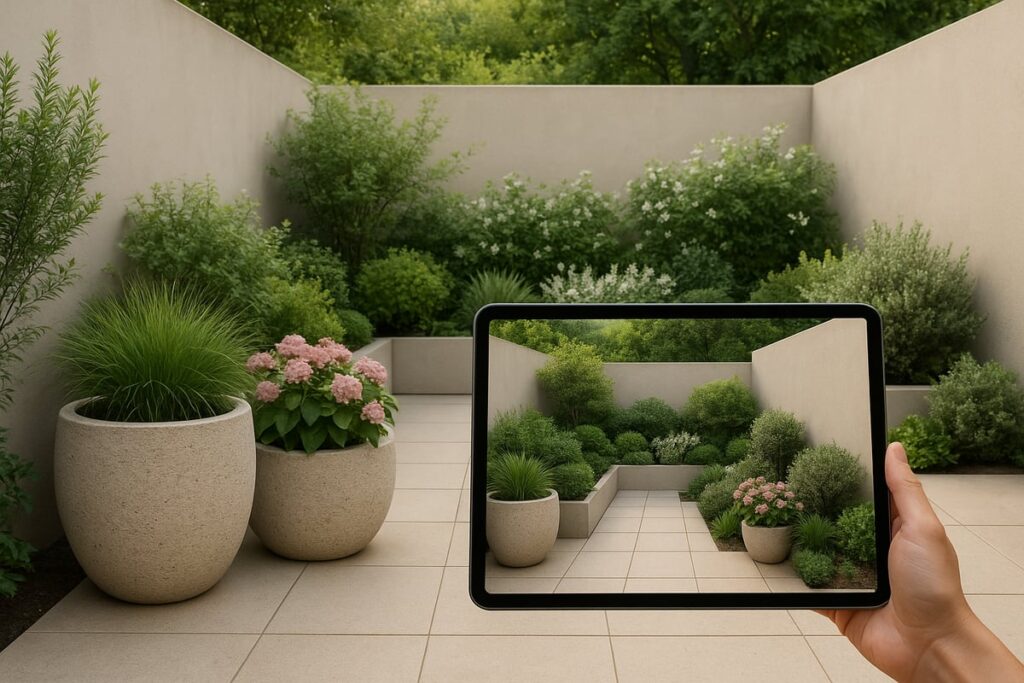
Digital Garden Rendering: Planning and Visualizing Your 2026 Outdoor Space
Imagine being able to step into your future garden before a single plant is placed or wall is built. Digital garden render techniques are revolutionizing how homeowners and professionals visualize, plan, and perfect outdoor spaces for 2026. By blending advanced visualization with practical landscaping, you can avoid costly mistakes and achieve a truly bespoke environment.
The Role of 3D Visualization in Garden Design
3D visualization is transforming how garden render projects are planned and executed. Instead of relying on flat sketches or guesswork, you can immerse yourself in a realistic preview of your outdoor space. This approach allows for precise positioning of features, from rendered walls to bespoke planters, before any physical work begins.
With a digital garden render, you can experiment with materials, textures, and layouts. Want to see how a modern white render compares to a warm terracotta finish? 3D visualization makes it possible to test ideas instantly. According to industry reports, homeowners using digital visualization spot potential issues early, saving both time and budget.
For an in-depth look at these techniques, review 3D visualization for gardens, which highlights how digital tools streamline outdoor planning. A recent case study showed a family previewing several garden render styles in 3D before settling on a minimalist design, leading to a smoother build and higher satisfaction.
Tools and Technologies for Digital Garden Rendering
A wide range of digital tools now support garden render planning. Popular software includes SketchUp for easy modeling, Lumion and Twinmotion for photorealistic renders, and VR platforms for immersive walkthroughs. These tools enable you to view your future garden from every angle, making design choices with confidence.
Integration with landscape design apps and AR tools is becoming common, allowing you to overlay digital features onto your actual garden using a tablet or smartphone. The trend toward VR experiences is accelerating, with more homeowners requesting virtual tours before committing to a design. This technological shift is making digital garden render planning accessible to everyone, not just professionals.
Here is a quick comparison of leading software for garden render projects:
| Software | Key Feature | Best For |
|---|---|---|
| SketchUp | Easy modeling | Beginners, DIYers |
| Lumion | Photoreal visuals | High-end presentation |
| Twinmotion | Real-time editing | Fast design iterations |
| VR Platforms | Immersive tours | Client engagement |
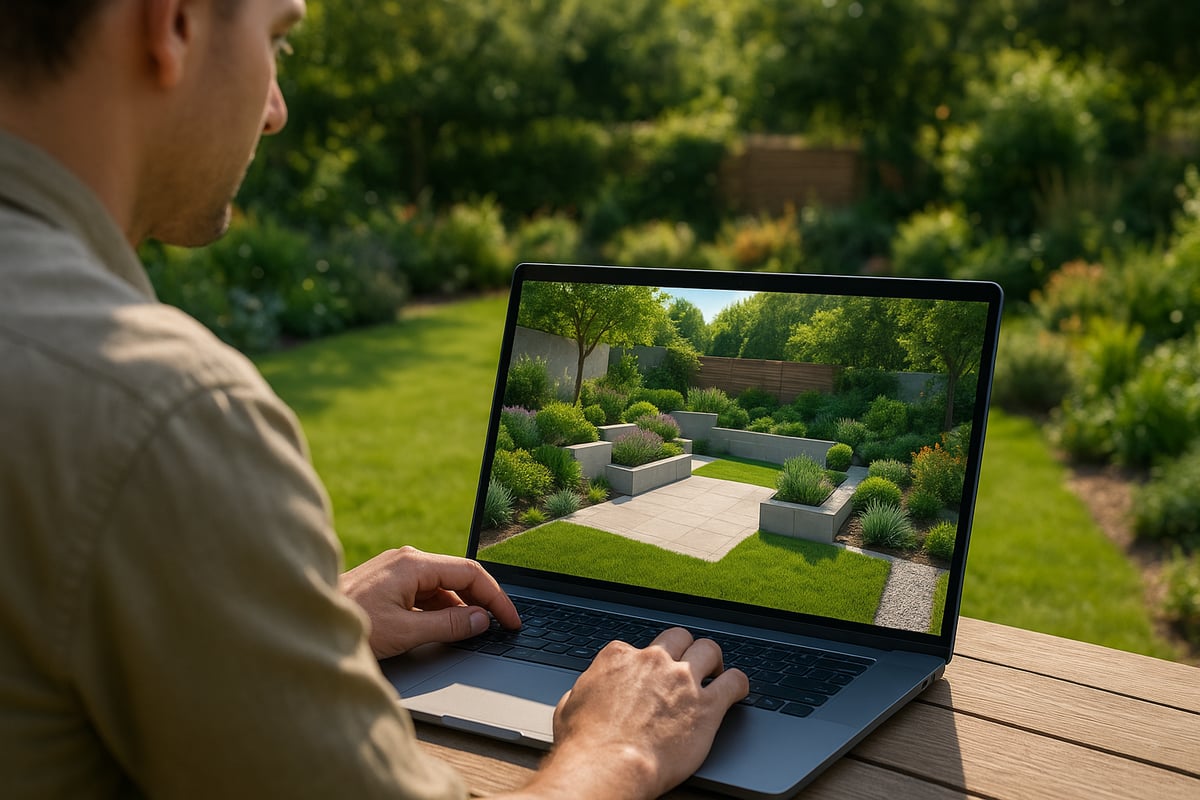
Creating a Digital Render: Step-by-Step
Building a digital garden render starts with gathering accurate site measurements, clear photographs, and your design preferences. This foundational data ensures that your 3D model reflects the true dimensions and character of your outdoor space.
Next, use your chosen software to construct models of the garden’s terrain, existing structures, and potential new features. Rendered walls, raised beds, and custom planters can all be visualized to scale. Applying textures, realistic lighting, and environmental effects will add depth and authenticity to your garden render.
For best results, follow this typical workflow:
- Collect site data and reference images.
- Build a detailed 3D model, including all features.
- Apply materials, colors, and finishes.
- Adjust lighting to simulate different times of day.
- Render static images, create 3D walkthroughs, or generate VR experiences.
With a completed digital garden render, you can share plans with contractors, compare options, and refine your vision before construction starts. This proactive approach helps ensure your investment results in a space that meets your expectations and lifestyle needs.
Collaborating with Professionals for Best Results
While DIY digital garden render projects are possible, partnering with a 3D rendering expert or landscape architect often yields superior outcomes. These professionals bring photorealistic quality, practical insights, and the ability to revise designs quickly based on your feedback.
Hiring an expert is especially valuable for complex projects or when marketing a property. Real estate agents increasingly use digital garden render images to showcase outdoor potential, attracting more buyers and maximizing value.
Industry surveys reveal that 62% of landscaping professionals now rely on 3D visualization to secure client approvals. This collaborative process bridges communication gaps and ensures everyone shares the same vision for the finished space.
By integrating a garden render into your design process, you reduce the risk of miscommunication and costly changes. The right partnership can transform your outdoor space into a personalized retreat, ready for the future.
Design Inspiration: Top Garden Render Ideas and Trends for 2026
Imagine stepping outside to a garden render that not only elevates your landscape but also reflects the latest styles for 2026. Whether your taste leans modern, rustic, or sustainable, there is a garden render approach to match every vision. Explore these fresh ideas and trends to inspire your next outdoor transformation.
Modern Minimalist Gardens
Modern minimalist gardens are leading the way in garden render trends for 2026. These spaces feature crisp lines, smooth rendered walls, and a restrained color palette. The garden render acts as a canvas, highlighting sculptural plants and architectural elements.
Key features include:
- White or pale rendered boundary walls for a clean backdrop
- Integrated rendered planters and built-in seating
- Subtle textures for depth without clutter
For those seeking inspiration, the Warm Minimalism Garden Trend showcases how soft earth tones and tactile finishes are shaping modern outdoor spaces. This approach offers a welcoming twist on minimalism, blending comfort with sophistication.
Mediterranean and Rustic Styles
A garden render can bring Mediterranean and rustic charm to life with warm, textured finishes. Earthy colors like ochre, terracotta, and sand create a sun-baked ambiance reminiscent of southern Europe.
Consider these ideas:
- Lime-based renders for breathability and a natural patina
- Curved rendered walls, arches, and alcoves for visual interest
- Rendered water features or planters for a cohesive look
A Tuscan-inspired courtyard with textured render instantly transports you to the Mediterranean, adding timeless character and warmth to your garden.
Urban Retreats and Small Spaces
For city dwellers, the garden render offers privacy and function in compact spaces. High rendered walls block out noise and create seclusion, while multi-use elements maximize every inch.
Popular solutions include:
- Rendered raised beds that double as benches
- Outdoor kitchens or BBQ areas with rendered backsplashes
- Vertical rendered features for climbing plants or lighting
A well-planned garden render turns a small urban plot into a tranquil escape, balancing practicality with style.
Sustainable and Eco-Friendly Gardens
Sustainability is at the forefront of garden render design in 2026. Eco-conscious homeowners are choosing materials and finishes that support long-term environmental health.
Trends and practices:
- Breathable lime-based renders to reduce trapped moisture
- Incorporating recycled aggregates for a lower carbon footprint
- Blending rendered structures with living walls or green roofs
Data shows that 48% of UK homeowners now prioritize eco-friendly upgrades in their garden render projects. These choices not only benefit the planet but also extend the life of rendered features.
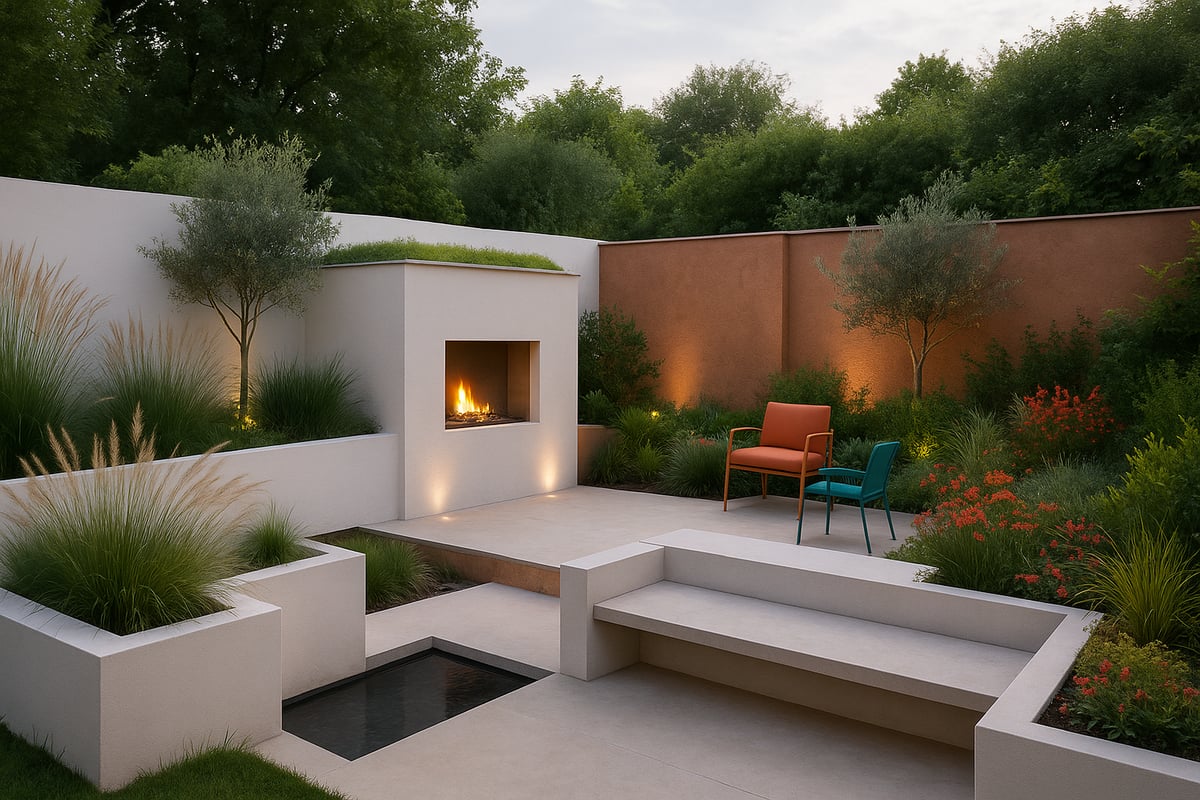
Statement Features and Focal Points
A bold garden render can transform ordinary elements into dramatic focal points. From fireplaces to art walls, rendered features offer both function and flair.
Inspiring ideas:
- Rendered outdoor fireplaces as gathering hubs
- Accent walls with custom textures or colored pigments
- Integrated lighting to highlight features after sunset
Before-and-after photos reveal how a strategic garden render can completely redefine an outdoor space, making it both beautiful and memorable.
Maintenance, Repairs, and Long-Term Care for Rendered Gardens
Keeping your garden render in top condition is essential for long-lasting beauty and structural protection. Proper care ensures your outdoor features stay vibrant, weather-resistant, and free from costly issues. With a few proactive steps each year, you can maximize the lifespan and impact of your rendered surfaces.
Routine Maintenance Tips
Regular maintenance is the foundation of a healthy garden render. Start by gently cleaning surfaces every few months to remove moss, algae, and dirt. Use a soft brush and mild detergent to avoid damaging the finish.
- Inspect the render annually for cracks, chips, or areas where paint is peeling.
- Clear away vegetation touching the wall to prevent moisture buildup.
- Repaint or reseal your garden render every 5 to 10 years to maintain weather protection.
Timely attention to these small tasks helps prevent bigger problems and preserves the fresh, modern look of your garden render.
Repairing Damaged Render
Even with care, garden render can develop issues due to settling, moisture, or accidental impact. Identifying the cause is the first step.
- If you spot cracks or loose render, remove any unstable sections with a masonry bolster.
- Fill gaps with a compatible render mix, smoothing the surface to match the original texture.
- Allow repairs to dry fully before repainting.
For extensive damage, such as widespread cracking or deep structural issues, consult a professional. Prompt repairs ensure your garden render remains strong and attractive for years.
Weatherproofing and Longevity
Protecting your garden render from the elements is vital. High quality masonry paints and sealers create a barrier against water, frost, and UV rays. Modern additives like SBR (Styrene Butadiene Rubber) improve water resistance and flexibility.
A well-maintained garden render can last over 20 years, making it a sound investment. When choosing products, look for those specifically formulated for external use and check manufacturer guidelines for application.
Regular upkeep and the right materials extend both the lifespan and appearance of your garden render.
Preventing Common Issues
Moisture is the main enemy of garden render. Address drainage around walls and avoid water splashback by redirecting downspouts and laying gravel at the base.
On older walls, use breathable lime-based renders to prevent trapped damp. Always fix leaks or faulty gutters promptly to minimize water exposure.
By integrating these simple strategies, your garden render will resist staining, cracking, and the growth of algae, keeping it looking pristine.
Key Arguments and Insights
Proactive care is the best way to protect your investment in garden render. Annual checks and small repairs prevent minor flaws from becoming major problems.
For example, a quick spring inspection can spot early signs of wear, allowing you to act before moisture penetrates the surface. This routine helps avoid expensive repairs and ensures your garden render remains a standout feature in your outdoor space.
Budgeting, Cost Factors, and Choosing the Right Professionals
Budgeting for a garden render project in 2026 means balancing creativity with cost control. Whether you are planning a full garden redesign or a simple wall refresh, understanding the financial side is crucial. A clear budget ensures you achieve quality results without overspending.
Cost Breakdown of Garden Rendering Projects
A garden render project includes several key expenses. Material costs can vary widely, depending on whether you use premixed or custom-mixed products. Labor charges differ based on your choice to DIY or hire professionals. There are also extra costs for scaffolding, specialty tools, paint, and design consultation fees.
| Cost Element | DIY Estimate | Professional Estimate |
|---|---|---|
| Materials | £15–£30/m² | £20–£40/m² |
| Labor | £0 (DIY) | £25–£60/m² |
| Tools/Equipment | £100–£300 | Usually included |
| Paint/Finishes | £5–£15/m² | £10–£20/m² |
| Design Fees | £0–£400 | £200–£1,000+ |
Choosing the right budget for your garden render helps avoid hidden surprises and ensures your project stays on track.
Factors Affecting Price
Several factors influence the final cost of a garden render. The size and complexity of the area, whether you are rendering walls, planters, or intricate garden features, play a major role. Surface preparation needs, such as removing old render or repairing cracks, can add to expenses.
Accessibility is another consideration, especially for hard-to-reach spots or multi-level gardens. The type of finish you select, from smooth to textured or colored, also affects the overall cost. For digital render projects, sophisticated 3D modeling or virtual walkthroughs may require additional investment. Staying informed about the latest innovations in garden render can help you budget more accurately.
Tips for Saving Money
There are practical ways to reduce costs on your garden render project without sacrificing quality. Sourcing materials in bulk, especially for larger areas, can result in significant savings. If you are comfortable with basic tasks, handling preparation or painting yourself can lower labor expenses.
Always compare quotes from several contractors to find the best value for your investment. Focus on essential upgrades first, and consider phased improvements if your budget is tight. Choose durable, weather-resistant finishes to avoid frequent repairs and maximize the lifespan of your garden render.
Choosing the Right Rendering Contractor or Designer
Selecting the ideal professional for your garden render project is key to achieving a high-quality finish. Look for contractors with proven experience, a strong portfolio of completed work, and positive client references. Clear contracts, detailed timelines, and transparent pricing protect you from unexpected issues.
For digital garden render solutions, consider specialists with expertise in 3D landscape modeling and visualization. According to recent industry insights, 3D landscape modeling is gaining popularity in landscape design for 2026, making it even more important to choose designers familiar with the latest tools. Investing in quality professionals can increase your property value and ensure your outdoor space stands out for years to come.
Frequently Asked Questions About Garden Rendering in 2026
Addressing Common Queries
Wondering if a garden render is right for your project in 2026? These frequently asked questions will help you make informed decisions and avoid common pitfalls.
| Question | Answer |
|---|---|
| How long does a garden render last? | With proper maintenance, a garden render can last over 20 years. Quality materials and correct application are essential for longevity. |
| Can I render over old bricks or blocks? | Yes, but the surface must be sound. Remove any loose material and repair damage before applying new garden render for best results. |
| What’s the best render for my climate? | Cement-based renders suit wet climates, while lime-based renders are ideal for older walls needing breathability. Acrylic renders offer flexibility and crack resistance for most gardens. |
| Is rendering suitable for DIY? | Many homeowners tackle garden render projects themselves, especially smaller features. For large or intricate designs, hiring a professional ensures a flawless finish. |
| How do I match render to my garden style? | Garden render is highly customizable. Choose colors and textures that complement your planting scheme and hardscape. Explore trends like desert modernism for inspiration, as seen in Desert Modernism in Garden Design. |
| Are digital renders worth the investment? | Digital garden render visualizations allow you to preview designs and materials before building. They help spot issues early and streamline planning. For future-focused homeowners, learn more about the Future of 3D rendering and how it shapes outdoor spaces. |
| What maintenance is required post-installation? | Clean your garden render annually to prevent moss and algae. Inspect for cracks or chips, and repaint or reseal every 5–10 years for lasting protection. |
Quick Tips for Troubleshooting Garden Render Issues:
- Check for moisture problems before repairing cracks.
- Always use breathable render on older structures.
- Consult a professional for large-scale damage.
- Match new render patches in color and texture for a seamless finish.
Clear answers empower you to maintain your garden render effectively. Following expert advice and industry standards will ensure your outdoor space remains beautiful for years to come.