Step by Step Space Planning Visualization

Step by Step Space Planning Visualization Guide
TL;DR:
- Effective space planning visualization involves precise measurement, deliberate zoning, accurate drafting, and thorough physical verification before furniture selection. Using digital tools and 3D renders enhances accuracy and client understanding, but physical tape tests remain essential for final validation. A well-measured, properly zoned plan ensures functional, buildable, and aesthetically pleasing interior spaces.
Step by step space planning visualization is the systematic process of measuring, zoning, drafting scaled floor plans, and generating 3D models to optimize a room’s function and flow before a single piece of furniture moves. Professionals call this discipline spatial planning and visualization, and it sits at the foundation of every successful interior design project. Done right, it prevents costly mistakes: buying a sofa that blocks a doorway, creating a traffic path that forces guests to squeeze past the dining table, or zoning a home office so poorly that natural light never reaches the desk. This guide walks you through every stage, from raw measurements to photorealistic 3D renders.
What are the tools and prerequisites for step by step space planning visualization?
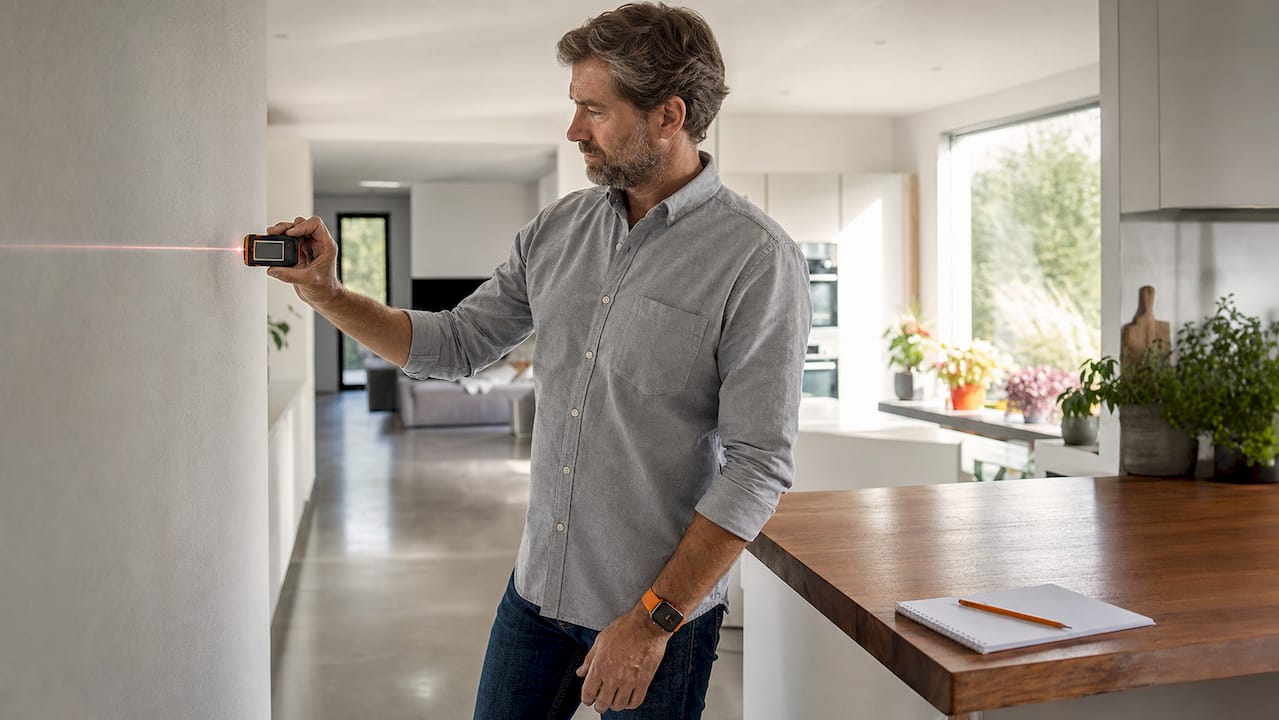
Precision starts before you open any software. Measuring at floor level with a laser measurer accurate to 1/8 inch is the professional standard. That level of accuracy matters because baseboards, wall bowing, and uneven corners can throw off a measurement by several inches, which is enough to make a fitted wardrobe impossible to install.
Beyond the laser measurer, you need graph paper or a digital equivalent to record dimensions, plus notes on every architectural detail: window sills, radiators, electrical outlets, and door swing directions. These fixed elements constrain your layout before you place a single piece of furniture.
The four main tool categories for space planning visualization:
- Manual tools: Tape measures, graph paper, pencils. Best for initial site surveys and quick sketches.
- 2D CAD software: Programs like AutoCAD or RoomSketcher. Best for producing accurate scaled floor plans.
- 3D visualization platforms: Services like Rendimension that convert 2D plans into photorealistic renders and walkthroughs.
- AI layout tools: Platforms that automate furniture placement by scanning floor plans, generating instant 3D models, and integrating furniture catalogs for rapid iteration.
| Tool Type | Best Use Case | Accuracy Level |
|---|---|---|
| Tape measure | Initial room survey | Low to medium |
| Laser measurer | Precise wall and ceiling dimensions | High (±1/8 inch) |
| 2D CAD software | Scaled floor plan drafting | High |
| 3D visualization service | Client presentations, design validation | Very high |
| AI layout tools | Rapid layout testing, clearance checks | Medium to high |
Pro Tip: Measure every wall at least twice and record the narrowest dimension. Rooms are rarely perfectly square, and using the largest measurement leads to furniture that simply will not fit.
How do you draft a scaled floor plan and zone a room effectively?
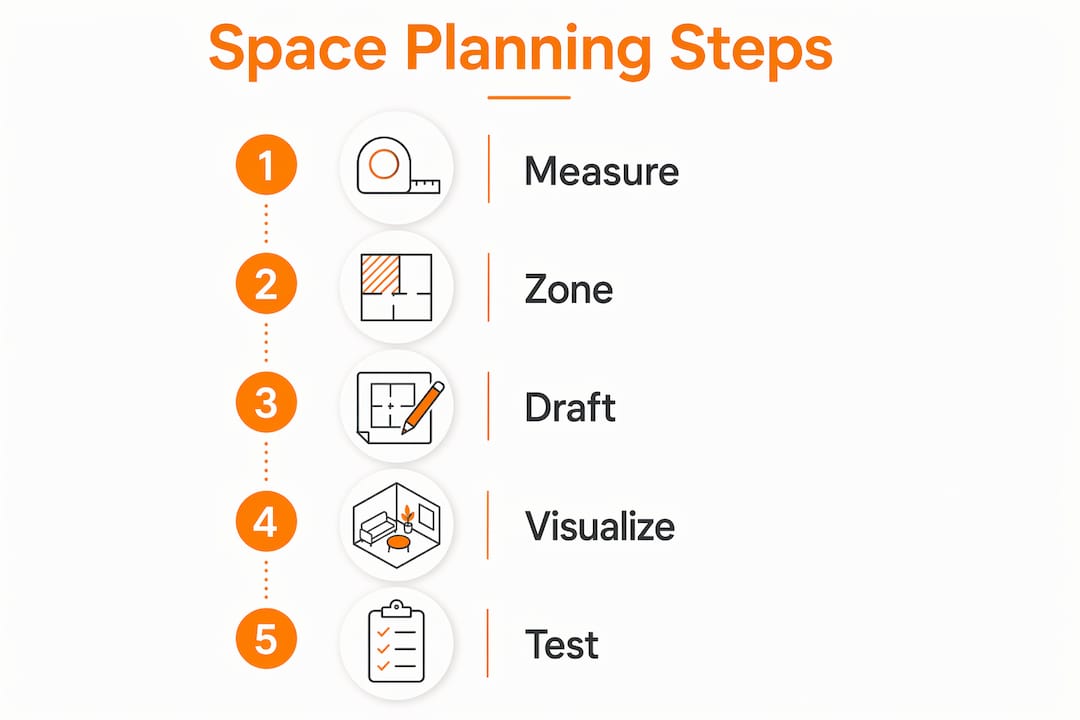
The professional workflow follows five core steps: measure the room accurately, define the room’s purposes, map circulation routes, draft a scaled 2D plan, and generate 3D visualizations to test flow and scale. Each step builds on the last. Skipping the zoning phase and jumping straight to furniture placement is the most common mistake homeowners make.
Here is how to execute each step with precision:
- Transfer measurements to a scaled plan. Use a scale of 1/4 inch to 1 foot on paper, or set the same ratio in your 2D software. Draw every wall, window, door, and fixed element before adding any furniture.
- Identify fixed architectural constraints. Mark door swings immediately. Door swing zones consume 9–12 square feet of floor space and create dead zones that cannot hold furniture. Ignoring them at this stage causes problems later.
- Define activity zones. A living room typically contains a conversation zone, a media zone, and a circulation path. A primary bedroom needs a sleeping zone, a dressing zone, and a clear path to the bathroom. Label each zone on your plan before placing any furniture.
- Establish focal points. Every room needs one dominant focal point, whether that is a fireplace, a window view, or a feature wall. Orient the primary seating or work surface toward it.
- Map traffic flow. Draw arrows showing how people will move through the space. Primary paths need 36–48 inches of clearance, and secondary paths need 24–30 inches. If your arrows pass through a furniture zone, the layout needs adjustment.
Pro Tip: Print your scaled floor plan at full scale using a tiling print function, tape the sheets together, and lay them on the floor. Walking the actual plan reveals circulation problems that a screen never shows.
A comparison of common zoning errors versus correct practice:
| Common Zoning Mistake | Correct Approach |
|---|---|
| Placing sofa against every wall | Float furniture to define zones and improve flow |
| Ignoring door swing radius | Mark swing arcs on plan before placing furniture |
| Mixing activity zones without buffers | Use rugs, lighting, or furniture orientation to separate zones |
| Centering furniture on the room, not the focal point | Anchor the primary piece to the room’s focal point first |
What are the best practices for 3d visualization in space planning?
Moving from a 2D floor plan to a 3D model is where space planning becomes genuinely powerful. Peer-reviewed research confirms that 3D visualizations significantly improve user performance and perceived utility over 2D plans in complex spatial tasks. That finding has a direct implication: clients and household members who review a 2D plan will miss problems that a 3D render makes obvious.
The transition from 2D to 3D does not require you to master complex software. The most effective workflow for design professionals and homeowners is to produce the accurate 2D plan yourself, then hand it to a professional visualization service. Rendimension, for example, converts scaled floor plans into photorealistic 3D renders and immersive walkthroughs that show exactly how light, scale, and material interact in the finished space.
Three visualization formats and when to use each:
- Photorealistic still renders: Best for evaluating furniture scale, material choices, and lighting. A single render of the primary seating arrangement tells you immediately whether the sofa is too large for the room.
- 3D walkthroughs: Best for testing circulation. Walking through a virtual model reveals whether the path from the front door to the kitchen feels natural or forced.
- AR apps: Best for quick on-site checks. Apps like IKEA Place let you drop a single piece of furniture into a live camera view, though they lack the accuracy of a full 3D model built from measured plans.
AI visualization tools reduce layout iteration time and improve client communication through immediate, accurate 3D models. For design professionals managing multiple projects, that speed translates directly into more design options presented per client meeting.
“Space planning is the vital bridge between design intent and actual function. Poor planning leads to costly spatial bottlenecks and underutilization that no amount of decoration can fix.”
The benefits of 3D visualization for architects extend beyond aesthetics. A photorealistic render of a space plan lets you verify that a king-size bed does not visually crush a bedroom, that a kitchen island leaves enough room for two people to work simultaneously, and that a home office layout does not feel claustrophobic once the desk, shelving, and chair are all in place.
How do you test and refine your layout before committing?
Digital modeling catches most problems, but physical verification catches the rest. The painter’s tape test is the most reliable final check: tape the exact footprint of every piece of furniture onto the actual floor, then walk through the space as you would use it. This step is not optional. It reveals spatial friction that even accurate 3D models sometimes underrepresent.
Follow this verification sequence before purchasing or moving any furniture:
- Tape furniture footprints on the floor. Use painter’s tape to mark the exact dimensions of every major piece. Include the chair pull-out zone behind dining and desk chairs, which requires 36–44 inches of clearance.
- Walk every traffic path. Move through the space as you would during a normal day. Open every door fully and check that nothing blocks the swing arc.
- Sit and stand at every workstation. Pull out a dining chair, sit down, and check that the person behind you can pass comfortably. Stand at the kitchen counter and open every cabinet door.
- Check secondary paths. The route from the bed to the bathroom at night, the path from the sofa to the kitchen, and the access to storage all need to meet the 24–30 inch minimum clearance standard.
- Photograph the taped layout. Compare the photos to your 3D renders. Discrepancies between the two usually indicate a measurement error that needs correcting before you commit.
Pro Tip: Live in the taped layout for 48 hours before finalizing. Daily routines reveal friction points that a single walkthrough misses, especially in kitchens and home offices.
Tactile physical testing remains essential even as digital tools improve. The painter’s tape method costs nothing and takes under an hour. It has prevented more expensive furniture returns than any software tool.
Key takeaways
Effective space planning visualization requires precise measurement, systematic zoning, scaled drafting, 3D modeling, and physical verification before any furniture is purchased or moved.
| Point | Details |
|---|---|
| Measure at floor level | Use a laser measurer accurate to 1/8 inch and record every architectural constraint before drafting. |
| Zone before furnishing | Define activity zones and traffic paths on your scaled plan before placing a single piece of furniture. |
| Use 3D to validate decisions | Photorealistic renders and walkthroughs reveal scale and circulation problems that 2D plans miss. |
| Verify clearance standards | Primary paths need 36–48 inches; secondary paths need 24–30 inches; chair pull-out zones need 36–44 inches. |
| Run the painter’s tape test | Tape furniture footprints on the actual floor and live with the layout for 48 hours before committing. |
Why function must come before visualization
At Rendimension, we have worked on over 1,000 projects globally, and the pattern is consistent: the projects that go smoothest are the ones where the client arrives with a clear functional brief, not a mood board. Decoration is the last step. Visualization is the second-to-last step. Function is the first.
The mistake we see most often is clients who want to start with the 3D render. They have a beautiful image in mind and want us to make it real. That works fine for marketing visuals, but for actual space planning, it creates problems. A render built on an unmeasured, unzoned floor plan will look stunning and function poorly.
What actually works is the sequence this article describes: measure precisely, zone deliberately, draft accurately, then visualize. When clients bring us a well-measured, properly zoned 2D plan, the 3D render we produce is not just beautiful. It is buildable, livable, and accurate to within fractions of an inch.
The other insight worth sharing is about AI tools. They are genuinely useful for rapid iteration, particularly for testing multiple furniture configurations in minutes rather than hours. But they are not a substitute for the foundational measurement and zoning work. An AI tool fed a bad floor plan produces a bad layout faster. Feed it a precise, well-zoned plan and it becomes a powerful accelerator.
The professionals who get the best results from visualization workflows are the ones who treat precision measurement as non-negotiable, define function before they open any software, and use physical verification as the final check before execution. That combination of discipline and digital capability is what separates a space that photographs well from one that actually works.
— Rendimension
See your space plan come to life with Rendimension
A precise floor plan deserves an equally precise visualization. Rendimension transforms your measured, zoned layouts into photorealistic 3D renders and immersive virtual walkthroughs that let you validate every design decision before committing to furniture, finishes, or construction. Our team works directly from your scaled plans, applying exact dimensions and material specifications to produce renders that reflect reality, not approximations.

Whether you are a design professional presenting to a client or a homeowner planning a renovation, Rendimension’s architectural visualization services give you the confidence to move forward. Explore our portfolio and request a project consultation to see what your space can look like before a single item is purchased.
FAQ
What is step by step space planning visualization?
Step by step space planning visualization is the process of measuring a room, defining functional zones, drafting a scaled floor plan, and generating 3D models to test layout and circulation before implementation. It combines traditional measurement techniques with digital tools to prevent costly design errors.
How accurate does a floor plan need to be for 3d visualization?
A floor plan should be accurate to within 1/8 inch for professional 3D visualization. Laser measurers deliver this level of precision, and measurements should be taken at floor level to account for wall bowing and baseboards.
What clearance standards apply to furniture layout?
Primary walkways require 36–48 inches of clearance, secondary paths require 24–30 inches, and the pull-out zone behind occupied chairs requires 36–44 inches. These standards apply to both residential and commercial spaces.
When should you use a 3d walkthrough versus a still render?
Use a still render to evaluate furniture scale, material choices, and lighting in a single view. Use a 3D walkthrough to test circulation routes and spatial flow, since moving through a virtual model reveals bottlenecks that static images miss.
Does AI replace professional space planning visualization?
AI tools accelerate layout iteration and automate clearance checks, but they require a precise, well-zoned floor plan as input. Professional 3D visualization services like Rendimension add photorealistic accuracy and design expertise that automated tools cannot replicate.