TL;DR:
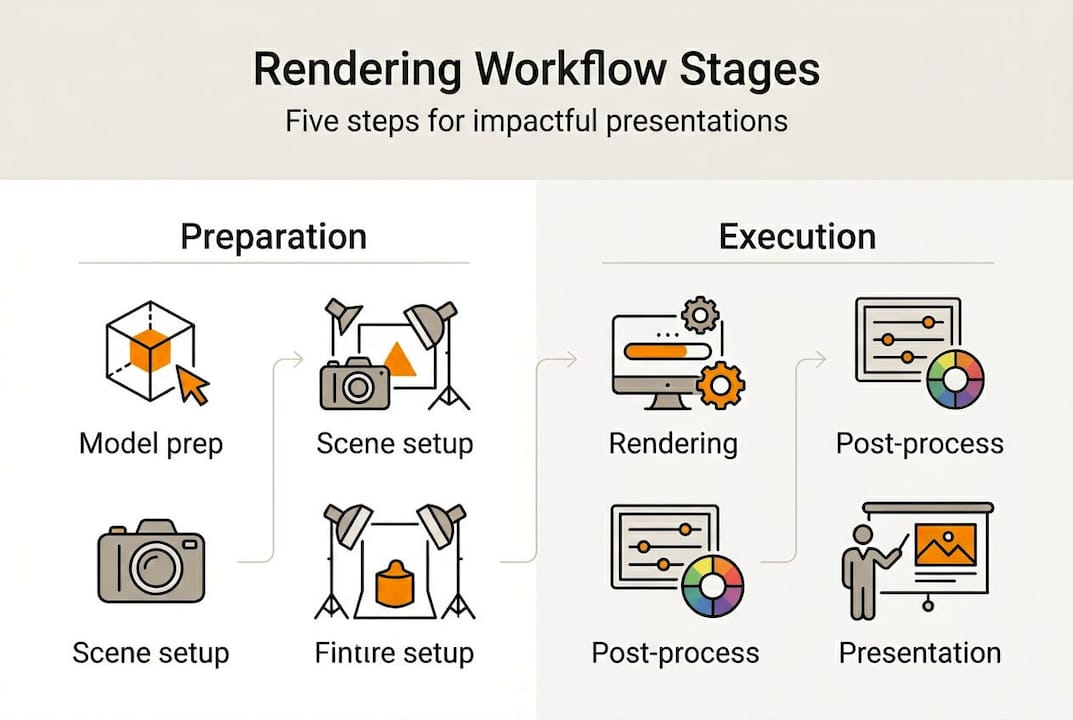
- A solid workflow includes model prep, tool selection, rendering, post-processing, and presentation.
- Consistency in lighting, color, and annotations across views enhances professionalism and client trust.
- AI and cloud rendering can save time and costs, but process refinement remains crucial for quality results.
Transforming a complex 3D model into a board-ready visual that wins investor approval is harder than it looks. Clients expect photorealistic quality, fast turnaround, and pixel-perfect consistency across every deliverable. In 2026, that pressure has only intensified: presentation standards have risen sharply, and the gap between a mediocre render and a compelling one can determine whether a development moves forward or stalls. This guide walks you through a refined, modern workflow covering everything from model prep and tool selection to post-processing and final board integration, so your presentations land every time.
Table of Contents
- Essentials for modern rendering workflows
- Step-by-step rendering workflow for impactful presentations
- Expert tips: Consistency, phasing, and error reduction
- Validation: Troubleshooting and presenting results that wow
- Beyond the checklist: What experts get wrong about rendering workflows
- Power your presentations with advanced rendering solutions
- Frequently asked questions
Key Takeaways
| Point | Details |
|---|---|
| 5-stage workflow | Professional rendering for presentations follows a five-step process, from model prep to final board integration. |
| Speed with AI & cloud | Modern AI tools and cloud GPU farms dramatically cut presentation timelines compared to traditional workflows. |
| Consistency is crucial | Maintaining style consistency across assets raises trust and project approval rates in architecture and real estate. |
| Photorealism boosts results | High-quality, photorealistic renders can directly increase pre-sales and client engagement. |
| Customize your process | The best workflow balances advanced tools with hands-on adjustments tailored to your team and project. |
Essentials for modern rendering workflows
Before you touch a render button, your pipeline needs to be solid. Rendering workflows for architects and real estate developers typically follow a 5-stage pipeline: model preparation, tool and settings selection, rendering, post-processing, and presentation integration. Skipping or rushing any stage compounds errors downstream and costs far more time than it saves.
Your asset checklist matters more than most studios admit. You need:
- Clean geometry with no overlapping faces, reversed normals, or unresolved boolean errors
- High-resolution textures at 4K PNG minimum for materials that hold up at large print or screen sizes
- Organized CAD models with logical layer naming and grouped objects for easy scene management
- Licensed material libraries (e.g., Quixel, Poliigon) with physically based rendering (PBR) maps
- Lighting references such as HDRI sky maps matched to the project’s geographic location and time of day
Hardware is where studios often make expensive mistakes. GPU vs CPU rendering benchmarks show a clear split: a GPU like the RTX 5090 dominates real-time and interactive rendering, while high-core-count CPUs such as a 96-core Threadripper outperform in complex offline batch renders. The critical constraint for GPUs is VRAM. Scenes with dense geometry, layered displacement maps, and large texture sets can exceed 24GB of VRAM and force a fallback to slower CPU rendering mid-project.
Cloud rendering is the practical escape valve here. A 100 GPU-hour farm run typically costs $200 to $400, which is far cheaper than the delay of rendering locally overnight on an undersized workstation.
| Hardware | Best for | Key limitation |
|---|---|---|
| RTX 5090 GPU | Real-time, interactive, fast iteration | VRAM ceiling in complex scenes |
| 96-core Threadripper CPU | Offline batch, large scene rendering | Slower iteration cycles |
| Cloud render farm | Deadline-critical or VRAM-heavy jobs | Ongoing cost per project |
For a deeper look at what separates good from great output, review the photorealistic rendering essentials that consistently define professional-grade work.
Step-by-step rendering workflow for impactful presentations
With your assets and hardware sorted, the workflow itself becomes a repeatable system. Here is how a professional pipeline runs from start to finish:
- Model preparation (2 to 4 hours): Audit geometry, purge unused objects, apply material IDs, and set up camera positions with saved views. Lock cameras before handing off to the render stage.
- Tool and settings selection (30 to 60 minutes): Choose your renderer based on output goal. V-Ray and Corona remain the industry benchmarks for photoreal offline work. ArchiVinci and similar AI tools work well for rapid concept renders and early-phase client previews.
- Rendering (1 to 8 hours depending on complexity): Set sampling rates, enable denoising (NVIDIA AI denoiser or Intel Open Image Denoise), and define output resolution. For presentations, 4K minimum is standard.
- Post-processing (15 to 45 minutes per image): Color grading, exposure correction, lens effects, and entourage compositing happen here. This stage is non-negotiable. AI-accelerated pipelines can compress the full workflow from days to hours, but artifacts from AI tools still require manual cleanup.
- Presentation integration (1 to 2 hours): Export final images, apply consistent annotation styles, and assemble boards with a unified layout grid.
Pro Tip: Save a master Photoshop or Affinity Photo template for your post-processing pipeline. Consistent adjustment layers, color lookup tables (LUTs), and text styles across every project cut your post-processing time by 30 to 40 percent.
The business case for this investment is clear. Photoreal renders boost pre-sales by 25 to 35 percent in real estate marketing, which means the time spent on a polished workflow pays back directly in faster sales cycles and stronger investor confidence.
| Stage | Recommended tool | Time estimate |
|---|---|---|
| Model prep | 3ds Max, Revit, SketchUp | 2 to 4 hours |
| Rendering | V-Ray, Corona, ArchiVinci | 1 to 8 hours |
| Post-processing | Photoshop, Affinity Photo | 15 to 45 min/image |
| Board integration | InDesign, Canva Pro | 1 to 2 hours |
For a detailed breakdown of what makes this investment worthwhile, explore the photorealistic render benefits that drive real project outcomes, and review the full photorealistic render process to align your team.
Expert tips: Consistency, phasing, and error reduction
Knowing the workflow is one thing. Executing it with polish and minimal rework is where most studios either build a reputation or lose one.
Visual consistency across a presentation is not just aesthetic. It signals professionalism and builds client trust. When lighting angles shift between exterior and interior views, or when annotation fonts change from sheet to sheet, clients notice even if they cannot articulate why. The result is doubt.
Prioritize consistency across views and assets for professional presentations. Use level of detail (LOD) and phasing strategically: real estate developers typically need exterior renders and massing animations early in the sales cycle, while detailed interior renders come later as finishes are confirmed.
Here is a practical consistency checklist:
- Color palette: Lock your material colors to a project-specific swatch library before rendering begins
- Lighting setup: Save and reuse the same HDRI and artificial light configurations across all views
- Camera settings: Standardize focal length (typically 24mm to 35mm for architectural exteriors) across all saved views
- Annotation style: Use one font family, one line weight standard, and one callout style across every board
- Output resolution and format: Agree on specs with your client before the first render, not after
Pro Tip: Build a project-specific style guide document at the start of every engagement. It takes 20 minutes to create and eliminates hours of revision requests later.
Common rendering errors and fast fixes:
Fireflies (bright noise spots): Increase sample count or enable adaptive sampling. In AI-denoised renders, lower the denoiser strength slightly to preserve edge detail.
Dark interior scenes: Check for light leaks in the model geometry and verify that artificial light intensities are calibrated to real-world lumen values.
Texture stretching: Re-apply UV mapping to problem surfaces and ensure texture scale matches the real-world dimensions of the material.
For a broader look at why these standards matter to clients and investors, see why use photorealistic renders for the full strategic picture.
Validation: Troubleshooting and presenting results that wow
With your visuals polished, the final step is ensuring nothing undermines the impact of your hard work before it reaches the client.
Run every deliverable through this review checklist before sending:
- Resolution check: Confirm all images export at the agreed specification, typically 300 DPI for print boards and 72 to 150 DPI for digital presentations
- Color profile: Verify sRGB for screen delivery and Adobe RGB or CMYK conversion for print
- Artifact scan: Zoom to 100 percent on each image and check corners, shadow edges, and reflective surfaces for noise or banding
- Board alignment: Check that all elements align to the grid and that margins are consistent across every sheet
- File naming and versioning: Use a clear naming convention (e.g., ProjectName_View_v02_Final) so clients and team members always know which file is current
The impact of getting this right is measurable. Photoreal renders boost pre-sales by 25 to 35 percent, which means a thorough validation process is not just quality control, it is a direct revenue driver.
For client presentations, consider these delivery strategies:
- Present renders in a darkened room or on a calibrated monitor to maximize visual impact
- Walk clients through each view with a brief narrative explaining design intent, not just aesthetics
- Offer a versioning structure: show two or three material or lighting options to give clients a sense of agency
- Use animated walkthroughs or turntable sequences for complex spatial relationships that static images cannot fully convey
For developers looking to directly connect rendering quality to sales performance, the guide on enhancing property sales with 3D renders provides concrete strategies for 2026 market conditions.
Beyond the checklist: What experts get wrong about rendering workflows
Here is something most workflow guides will not tell you: chasing the newest hardware or the latest AI rendering tool is one of the least reliable ways to improve your presentations.
We have seen studios invest in top-tier workstations only to produce mediocre results because their scene setup, lighting logic, and post-processing habits were never refined. The tool does not fix the judgment gap.
Benchmarks provide a reliable baseline, but you must test your own scenes, because VRAM limits and denoising behavior vary significantly by project type. A complex mixed-use tower with layered glazing and dense urban context will behave very differently from a clean residential exterior.
The studios that consistently produce outstanding presentations share one habit: they iterate on process, not just output. They run small tests, gather client feedback early, and adjust their pipeline to fit the specific demands of each project type. A small tweak to lighting temperature or camera height has, in our experience, done more for client approval rates than a hardware upgrade ever did. Explore the photorealistic rendering guide to build that kind of iterative discipline into your own practice.
Power your presentations with advanced rendering solutions
If you are ready to move beyond trial and error and build a workflow that consistently delivers presentation-grade results, Rendimension’s team is here to help.

With over 1,000 projects completed globally, we specialize in turning complex architectural concepts into photorealistic visuals that drive decisions and close deals. Whether you need a single hero render or a full presentation package, our 3D rendering services are built around your project timeline and quality standards. Start with our step-by-step visualization guide or go deeper with the 3D rendering guide to align your team on best practices before your next pitch.
Frequently asked questions
What hardware is best for architectural rendering workflows?
High VRAM GPUs like the RTX 5090 excel in real-time rendering, while high-core-count CPUs suit complex offline batch jobs. Cloud render farms fill the gap when local hardware hits its limits on VRAM-heavy scenes.
How much faster is AI-enhanced rendering for presentations?
AI tools compress the workflow from model preparation to final presentation from several days down to a matter of hours. Manual cleanup of AI-generated artifacts is still required, but the overall time savings are significant.
What is the typical cost for cloud-based rendering?
A 100 GPU-hour render farm run typically costs between $200 and $400 for architectural visualization projects, making it a practical option for deadline-critical or hardware-limited jobs.
How do photorealistic renders impact pre-sales or approvals?
Photorealistic renders boost pre-sales by 25 to 35 percent in real estate marketing, giving developers a measurable return on their visualization investment.