Rendering Pipelines Explained for Architectural Visualization

TL;DR:
- The rendering pipeline’s configuration impacts image quality more than the choice of software.
- Optimizing each pipeline stage, especially fragment shading, enhances realism and performance.
- Choosing the appropriate pipeline type depends on project deliverables, balancing speed and visual fidelity.
Most architects and developers assume that switching to better software is what separates a mediocre rendering from a stunning one. That assumption is understandable but incomplete. The rendering pipeline is the actual engine behind every photorealistic image and smooth walkthrough you’ve ever seen, and most visual quality problems trace back to how that pipeline is configured, not which application runs it. Understanding this process gives you direct control over presentation speed, image realism, and client engagement. This article breaks down what a rendering pipeline is, how its stages work, what types exist, and how you can apply this knowledge to your next architectural project.
Table of Contents
- What is a rendering pipeline?
- Core stages of the rendering pipeline
- Different types of rendering pipelines: Real-time, offline, and hybrid
- Advanced techniques and expert considerations
- Practical application: Choosing and optimizing rendering pipelines for architecture
- What the standard rendering pipeline miss—and how experts get an edge
- How Rendimension can help elevate your next project
- Frequently asked questions
Key Takeaways
| Point | Details |
|---|---|
| Rendering pipeline fundamentals | A rendering pipeline transforms 3D models into impactful 2D visuals through a series of critical stages. |
| Choosing the right pipeline | Real-time pipelines excel at interactive walkthroughs, while offline or hybrid approaches deliver top realism for stills. |
| Optimize for project needs | Adapting the pipeline to project goals and scale boosts visual quality and workflow efficiency. |
| Expert insight matters | Advanced features and targeted optimizations can set your presentations apart when chosen strategically. |
What is a rendering pipeline?
A rendering pipeline is a sequence of processing stages that transforms 3D scene data, including geometry, materials, lights, and camera position, into a final 2D image. Think of it as an assembly line inside your GPU and CPU, where raw model data enters at one end and a finished, viewable frame exits at the other. Every architectural visualization you create passes through this process, whether you realize it or not.
Understanding rendering’s role in architecture means recognizing that visual quality is not a single decision but a chain of decisions made at each stage of this pipeline. Miss an optimization at one stage and the entire output suffers, regardless of how good your model is.
“A rendering pipeline is a sequence of processing stages that transforms 3D scene data (geometry, materials, lights, camera) into a final 2D image.”
The five foundational stages in most pipelines are:
- Application stage: The CPU prepares scene data, handles physics, and sends draw calls to the GPU.
- Vertex processing: 3D coordinates are transformed into screen space, defining where geometry appears on screen.
- Rasterization: Geometry is converted into discrete pixels, or fragments, ready for coloring.
- Shading (fragment processing): Each pixel receives its final color based on material properties, light sources, and camera angle.
- Output and blending: Depth testing and transparency blending combine final pixels into the frame you display.
For architects and real estate developers, understanding these steps means you can see examples of rendering from a technical standpoint. You stop asking “why does this look flat?” and start diagnosing exactly which pipeline stage needs attention.
Core stages of the rendering pipeline
Core stages in modern programmable pipelines such as OpenGL, Vulkan, and DirectX include vertex processing, primitive assembly, rasterization, fragment shading, and per-sample operations. Each stage has a specific job, and together they define everything visible in your final frame.
Here is a numbered breakdown of the key stages, mapped to what they mean in practice:
- Vertex shader: Positions every point of your model in the camera’s view. A poorly optimized mesh here slows everything downstream.
- Primitive assembly: Groups vertices into triangles, the basic building blocks your GPU works with.
- Geometry shader (optional): Can generate additional geometry on the fly, useful for adding detail without inflating your base model.
- Rasterization: Converts triangles to screen pixels. This is where resolution begins to matter.
- Fragment shader: The creative workhorse. It applies textures, computes lighting, and produces the final pixel color.
- Per-sample operations: Depth testing removes hidden surfaces; stencil and alpha blending handle transparency and overlays.
To see how this maps to stages of 3D rendering for real architectural projects, review the table below:
| Pipeline stage | Architectural visualization task | Optimization focus |
|---|---|---|
| Vertex processing | Positioning walls, columns, furniture | Reduce polygon count on distant objects |
| Rasterization | Converting geometry to screen pixels | Resolution scaling for interactive views |
| Fragment shading | Lighting, material realism, reflections | Use efficient shader programs |
| Per-sample operations | Glass transparency, shadow rendering | Manage draw order for transparent surfaces |
The most common bottleneck in architectural scenes is the fragment shader. Complex material networks and multiple dynamic lights compound quickly, especially in large interior spaces with glazing and reflective surfaces. Knowing this tells you exactly where to optimize first.
Different types of rendering pipelines: Real-time, offline, and hybrid
Not every visualization project needs the same pipeline. Choosing correctly is one of the highest-leverage decisions you can make before a project starts.
Real-time pipelines power interactive walkthroughs and live presentations. Engines like Unity and Unreal Engine use rasterization-first approaches optimized for speed. Unity pipelines include the Built-in Pipeline, the URP (Universal Render Pipeline) for performance-focused forward rendering, and the HDRP (High Definition Render Pipeline) for high-fidelity deferred rendering with ray tracing support.
Offline pipelines prioritize accuracy over speed. Tools like V-Ray, Corona, or Arnold compute global illumination, caustics, and physically accurate shadows without real-time constraints. These are the engines behind hero shots used in marketing campaigns.
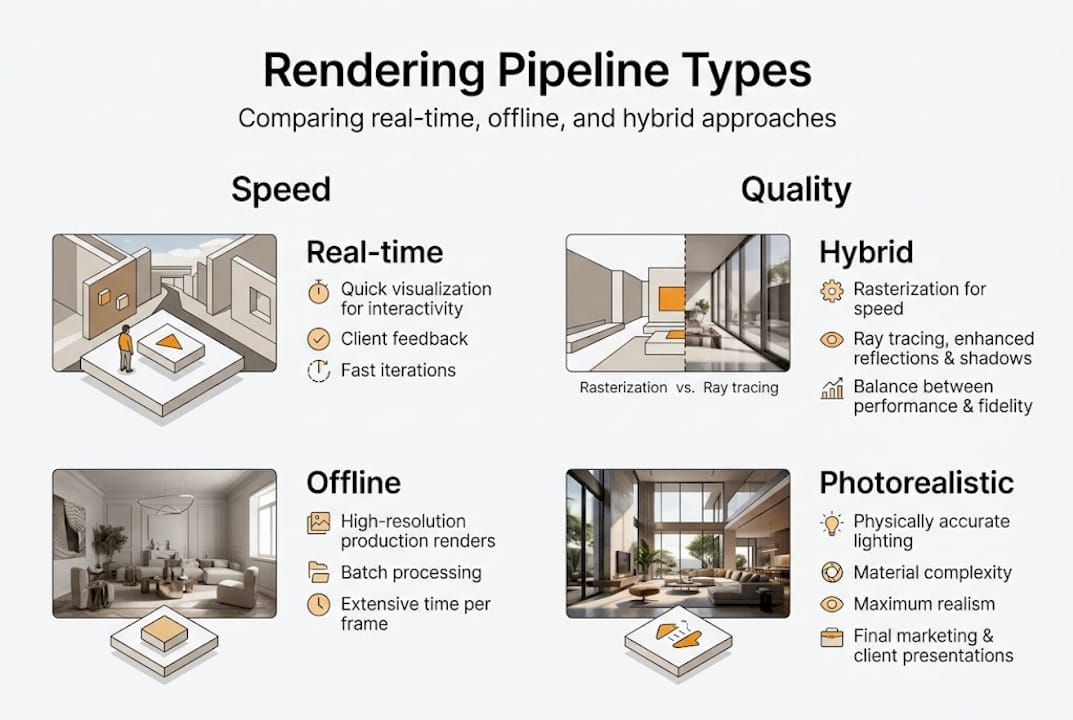
Hybrid pipelines combine both. Ray tracing handles reflections and shadows while rasterization handles scene geometry, blending quality and performance intelligently.
For real-time walkthroughs, clients can move through a space naturally, triggering genuine emotional responses. For approved design phases, offline rendering produces the marketing-grade images that close deals.
| Pipeline type | Speed | Image quality | Best use case |
|---|---|---|---|
| Real-time (URP) | Very fast | Good | Interactive client sessions |
| Real-time (HDRP) | Moderate | High | Polished walkthroughs |
| Offline | Slow | Exceptional | Marketing hero shots |
| Hybrid | Moderate | Very high | Flexible studio workflows |
Pro Tip: Use HDRP for client presentations where visual quality matters but interactivity is still needed. Save full offline rendering for final deliverables submitted for marketing or stakeholder approval.
Advanced techniques and expert considerations
Once you understand the pipeline types, the next frontier is mastering the techniques inside them. These details separate average visualizations from those that stop a client mid-sentence.
Deferred versus forward rendering is a foundational choice. Deferred rendering decouples geometry processing from lighting, making it far more efficient when many dynamic lights fill a scene, as is typical in large commercial interiors. Forward rendering processes lighting per object and works better for transparent materials like glass facades, a common need in modern architecture.
Key advanced techniques include:
- Tessellation: Dynamically subdivides surfaces to add geometric detail close to the camera, ideal for curved architectural elements without inflating the base model polygon count.
- Occlusion culling: Instructs the GPU to skip rendering objects hidden behind walls or other surfaces, a critical performance tool for large mixed-use developments or city models.
- Level of detail (LOD): Automatically reduces mesh complexity for objects far from the camera, maintaining frame rates during walkthroughs without visual sacrifice.
The evolution of pipeline technology from fixed-function hardware before 2004, through unified programmable shaders, and now to hybrid rasterization plus ray tracing, means modern teams have unprecedented control. Vulkan’s explicit state management delivers low-overhead rendering that was unimaginable a decade ago.
For advanced 3D rendering stages, the gap between knowing these techniques and ignoring them is measurable in both hours saved and client satisfaction earned.
Pro Tip: For large building or campus models, enable occlusion culling and set aggressive LOD transitions early in production. These two steps alone can cut rendering times significantly and prevent frame rate collapse during live presentations.
When scoping professional project rendering, always audit your scene for unnecessary transparency layers and overlapping shadow casters before submitting for final output.
Practical application: Choosing and optimizing rendering pipelines for architecture
Knowing the theory is valuable. Applying it under deadline pressure is where it counts. Here is a straightforward process for making the right pipeline decisions on real projects.
- Define your deliverable first. Client walkthrough or static hero image? This single question determines your pipeline choice before anything else.
- Audit your scene complexity. Count light sources, transparent surfaces, and total polygon count. High numbers in any category signal the need for deferred rendering or LOD implementation.
- Choose your pipeline based on deliverable and scene. For interactive walkthroughs, Unity URP or HDRP are proven choices. For photorealistic stills, use an offline renderer with global illumination enabled.
- Implement draw call optimization. Group repeated elements like window frames, railings, and facade tiles using GPU instancing. This single technique can reduce draw calls dramatically in large architectural scenes.
- Profile before finalizing. Use your engine’s built-in performance profiler to identify bottlenecks at the fragment shading stage before submitting renders for client review.
- Build a material library early. Standardizing PBR (physically based rendering) materials across a project avoids shader inconsistencies and reduces rework.
Pro Tip: When working with creating professional architectural renderings, create a project pipeline template at the start of each engagement. Locking in LOD settings, shadow quality, and instancing rules upfront prevents expensive technical debt mid-project.
Real estate developers specifically benefit from agreeing on pipeline type with their visualization team before modeling begins. Changing from an offline to a real-time pipeline halfway through a project is one of the most expensive mistakes in architectural visualization production.
What the standard rendering pipeline miss—and how experts get an edge
Most guides about rendering pipelines focus on technical specs and stop there. They list stages, explain shader programs, and compare software. What they consistently overlook is the human side of the pipeline, meaning the client’s experience of the final output.
Experienced visualization teams design their pipeline not around maximum rendering horsepower but around rapid iteration. A client who requests three lighting variations and two material options needs fast turnaround far more than they need perfect ray tracing on the first pass. Seasoned studios build pipelines that support fast previews, targeted adjustments, and clean final exports, not pipelines that are technically impressive but operationally rigid.
The real competitive edge is bridging technical depth with presentation storytelling. A hybrid pipeline that lets you show a client a near-photorealistic walkthrough during a meeting, then deliver polished hero shots the next morning, wins more projects than a technically superior system that takes two days per iteration. Reviewing real visualization examples from successful projects reveals this pattern clearly. The output is always calibrated to the client’s decision-making moment, not to the limits of the hardware.
Understanding and customizing the pipeline means smarter investments, faster approvals, and presentations that genuinely move stakeholders.
How Rendimension can help elevate your next project
Now that you understand the potential and nuances of rendering pipelines, here’s how Rendimension can partner with you to deliver visual impact.

Rendimension’s team works with architects and developers at every scale, from single residential units to large commercial developments, using optimized rendering pipelines tailored to each project’s goals. Whether you need interactive walkthroughs that hold up under client scrutiny or photoreal marketing images that close deals, the team selects and configures the right pipeline from the start. Explore Rendimension’s 3D rendering services for a clear picture of what’s possible, or review the full scope of architectural visualization expertise to find the solution that fits your next project timeline and presentation strategy.
Frequently asked questions
What is the most important stage in the rendering pipeline for realistic architectural visualization?
The fragment shading stage is most critical, as it controls lighting, material effects, and realism in the final image. Every material decision you make in your software is ultimately executed here.
What’s the difference between rasterization and ray tracing in architectural visualization?
Rasterization is fast and ideal for real-time walkthroughs, while ray tracing simulates light paths for true-to-life accuracy but requires significantly more computation time. Most modern workflows use both depending on the deliverable stage.
How do I choose the right rendering pipeline for my architectural project?
Start with your deliverable type. Real-time pipelines like Unity URP or HDRP work best for interactive presentations, while offline pipelines deliver the detail quality needed for final marketing images.
What pipeline optimizations matter most for large architectural scenes?
Optimizing draw calls and applying GPU instancing for repeated elements are the highest-impact techniques for maintaining smooth performance across large building or campus models.
What’s a common mistake architects and developers make with rendering pipelines?
Ignoring performance tweaks for large scenes and leaving default settings in place consistently leads to slower renders, frame rate issues during walkthroughs, and less-engaging client presentations.