The architectural visualization industry has transformed dramatically in recent years, with 3D rendering of a house becoming an essential tool for architects, developers, and homeowners alike. This technology allows stakeholders to visualize properties before construction begins, offering unprecedented clarity in design decisions and marketing presentations. Whether you're planning a custom home, developing residential properties, or showcasing architectural concepts, understanding the 3D rendering process provides significant competitive advantages in today's market.
Understanding 3D House Rendering Technology
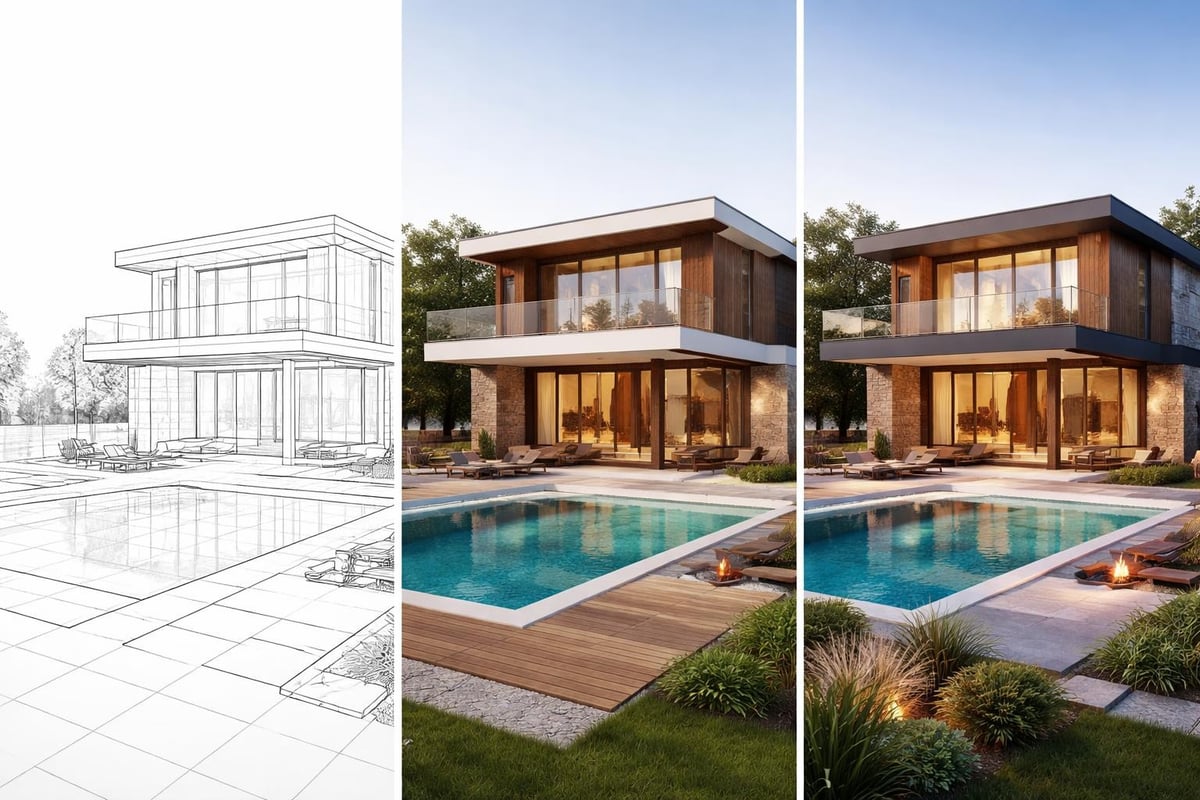
3D rendering of a house involves creating photorealistic images or animations from architectural models using specialized software and rendering engines. This process translates blueprints, sketches, and technical drawings into lifelike visualizations that communicate design intent with remarkable clarity.
Modern rendering technology leverages sophisticated algorithms to simulate how light interacts with materials, creating images that rival professional photography. The process begins with 3D modeling, where digital artists construct virtual representations of buildings, complete with accurate dimensions, materials, and environmental context.
Core Components of House Rendering
The foundation of any quality 3D rendering of a house includes several technical elements working together seamlessly. Geometry forms the basic structure, defining walls, roofs, windows, and architectural details. Materials and textures add realism through surface properties like wood grain, stone patterns, and glass reflectivity. Lighting simulation replicates natural sunlight, artificial fixtures, and ambient illumination.
Advanced renderers incorporate global illumination techniques that calculate how light bounces between surfaces, creating authentic shadows and color bleeding effects. Camera settings mirror real photography principles, controlling depth of field, exposure, and perspective to achieve professional results.
Essential Software and Tools
Professional 3D rendering of a house requires robust software platforms that handle modeling, texturing, and final rendering. The choice of tools significantly impacts workflow efficiency and output quality.
| Software Category | Popular Options | Primary Use |
|---|---|---|
| 3D Modeling | SketchUp, Revit, ArchiCAD | Building geometry and structure |
| Rendering Engines | V-Ray, Corona, Lumion | Final image generation |
| Post-Processing | Photoshop, GIMP | Image enhancement and correction |
| Asset Libraries | Evermotion, CGTrader | Furniture and environmental elements |
Many professionals start with SketchUp for basic modeling due to its intuitive interface and architectural focus. More complex projects often require Autodesk Revit for BIM integration or Blender for complete creative control.
Selecting the Right Rendering Engine
The rendering engine determines final image quality and production time. V-Ray remains an industry standard for architectural visualization, offering exceptional photorealism and material libraries specifically designed for building exteriors. Corona Renderer provides user-friendly interfaces with physically accurate results, making it popular among solo practitioners and small studios.
Real-time engines like Lumion and Twinmotion enable instant feedback during the design process, allowing clients to explore spaces interactively. These tools sacrifice some rendering quality for speed but continue improving with each version release.
The 3D House Rendering Workflow
Creating a professional 3D rendering of a house follows a systematic process that ensures accuracy and visual appeal. Each phase builds upon the previous work, refining details until achieving photorealistic results.
Phase 1: Reference Gathering and Planning
Successful renderings begin with comprehensive reference materials. Collect architectural drawings, site photographs, material samples, and inspiration images that define the project vision. Understand the target audience and rendering purpose, whether for marketing, design approval, or construction documentation.
Site analysis determines environmental factors like sun angles, surrounding buildings, and landscape features. These contextual elements dramatically affect final rendering believability and emotional impact.
Phase 2: 3D Modeling
The modeling phase translates architectural drawings into three-dimensional digital structures. Start with accurate measurements from floor plans, ensuring walls, openings, and structural elements match specifications precisely.
Building the shell:
- Create exterior walls with correct thickness and height
- Model roof structure including pitches, dormers, and overhangs
- Add windows and doors with proper framing details
- Include foundation and grading elements
Adding architectural details:
- Trim work, moldings, and decorative elements
- Railings, columns, and exterior features
- Gutters, downspouts, and roof accessories
- Outdoor structures like decks, patios, and pergolas
For those learning the fundamentals, resources like this Blender house modeling tutorial provide excellent starting points for developing essential skills.
Phase 3: Material Application and Texturing
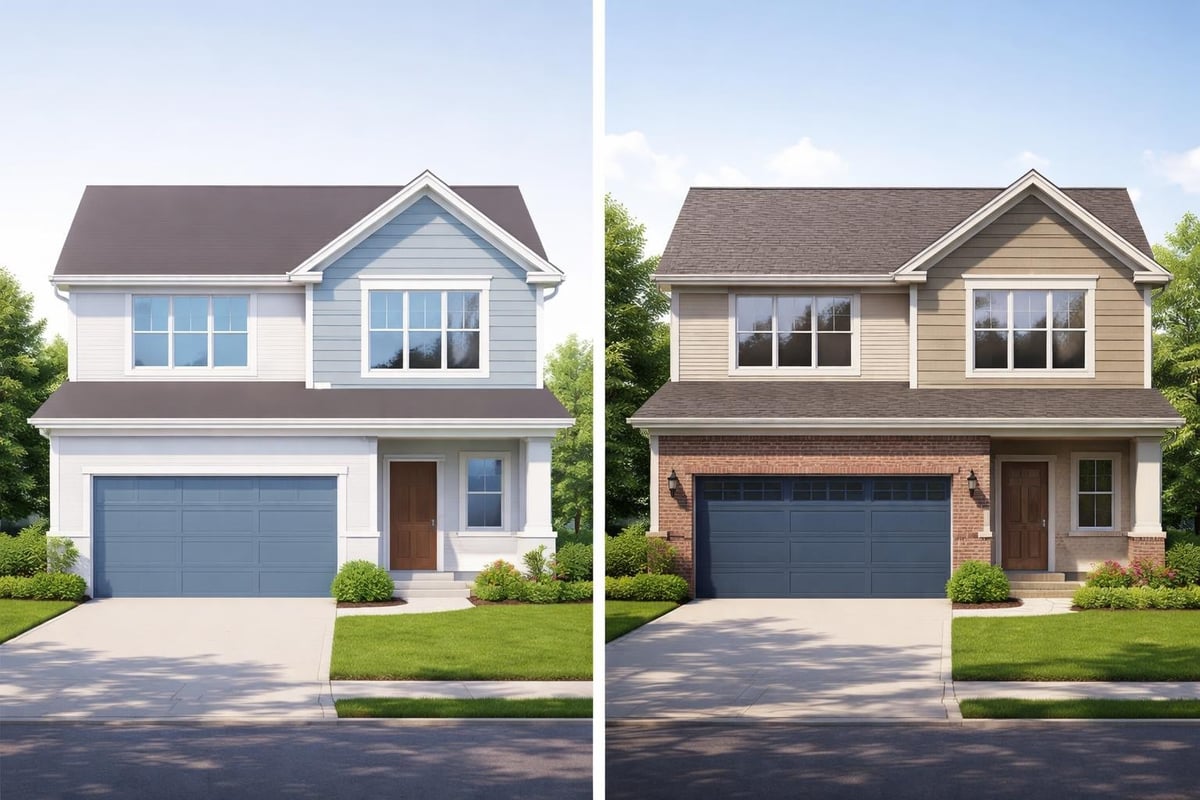
Materials bring 3D models to life by defining how surfaces look and interact with light. A 3D rendering of a house requires careful selection and configuration of materials to achieve realism.
High-quality texture maps include diffuse color, bump or normal maps for surface detail, specular maps for shininess, and displacement maps for actual geometry variation. Procedural textures generate patterns mathematically, ensuring seamless application across large surfaces like siding or roofing.
Scale accuracy matters tremendously. Brick patterns, wood planks, and stone coursing must match real-world proportions to maintain believability. Reference photographs from similar projects help calibrate these details correctly.
Lighting Techniques for Exterior House Renders
Lighting determines mood, highlights architectural features, and establishes time of day in any 3D rendering of a house. Mastering both natural and artificial lighting techniques separates amateur work from professional visualizations.
Natural Light Simulation
The sun serves as the primary light source for exterior renderings. Position the sun accurately based on geographic location, season, and time of day. Morning light creates long shadows and warm golden tones, while midday sun produces neutral colors with shorter, harder shadows.
Sky models complement direct sunlight by providing ambient illumination and realistic color gradients. Physical sky systems calculate atmospheric scattering, creating authentic blue tones and horizon glow. Overcast conditions require different approaches, using dome lights or HDR environments to simulate soft, diffused illumination.
Artificial Exterior Lighting
Evening and night renderings showcase architectural lighting design through exterior fixtures, landscape lighting, and interior glow from windows. Photometric lights use real luminaire data to accurately represent fixture output and distribution patterns.
Layering multiple light sources creates depth and visual interest:
- Entry lighting highlighting architectural features
- Path and landscape lighting defining outdoor spaces
- Window illumination suggesting interior warmth
- Accent lighting emphasizing textures and materials
Camera Composition and Perspective
Strategic camera placement transforms technical models into compelling imagery. Understanding photographic principles elevates any 3D rendering of a house beyond simple documentation into persuasive marketing tools.
Choosing Effective Angles
Two-point perspective creates natural-looking images without the distortion of wide-angle lenses. Position cameras at human eye height (approximately 5-6 feet) for relatable views, or elevate slightly for better roof visibility and reduced foreground obstruction.
Popular exterior views include:
- Front facade showcasing main entry and architectural character
- Three-quarter views revealing multiple sides simultaneously
- Contextual shots showing site integration and landscaping
- Detail vignettes highlighting materials and craftsmanship
Avoid extreme wide angles that distort proportions or overly tight compositions that hide context. Professional exterior rendering techniques emphasize balanced framing that tells complete stories about properties.
Depth of Field and Focus
Shallow depth of field mimics professional photography by blurring backgrounds and foregrounds while keeping the house sharp. This technique draws attention to primary subjects and adds cinematic quality to renderings.
Control focus distance, aperture (f-stop), and focal length to achieve desired effects. Architectural photography typically uses f/8 to f/11 for sufficient sharpness throughout the frame while maintaining slight background softening.
Environmental Context and Landscaping
Isolated buildings lack the context that makes renderings believable and emotionally engaging. A complete 3D rendering of a house integrates thoughtful environmental elements that ground structures in realistic settings.
Landscape Design Integration
Professional landscaping transforms empty lots into inviting properties. Include mature trees for scale and seasonal interest, foundation plantings that soften building edges, and lawn areas defining outdoor spaces.
Essential landscape elements:
- Trees with species-appropriate forms and foliage
- Shrubs and perennials adding color and texture
- Hardscape features like walkways and driveways
- Retaining walls and grading showing site adaptation
Digital vegetation libraries provide ready-made models, but customization ensures appropriate plant selections for climate and design style. Vary plant sizes, spacing, and maturity levels to avoid repetitive, artificial appearances.
Adding Atmospheric Effects
Environmental effects inject realism and mood into renderings. Atmospheric haze adds depth by slightly obscuring distant objects, mimicking how air particles scatter light. Weather conditions like light rain on pavement or morning dew on grass create specific moments in time.
Populate scenes with contextual elements such as parked vehicles, outdoor furniture, or people to suggest scale and lifestyle. These additions should support rather than compete with architectural subjects.
Rendering Settings and Optimization
Technical rendering settings balance image quality against production time. Understanding these parameters helps achieve professional results efficiently.
Resolution and Output Specifications
Image resolution depends on intended use. Marketing materials typically require 3000-4000 pixels on the long edge for flexibility in print and digital applications. Web-only images can use lower resolutions around 1920-2400 pixels wide.
Anti-aliasing smooths jagged edges by sampling multiple rays per pixel. Higher anti-aliasing values produce cleaner images but extend render times significantly. Most professional work uses settings between 16-32 samples for optimal quality-to-time ratios.
Render Passes and Post-Processing
Rendering separate passes provides maximum post-production flexibility. Output individual layers for direct lighting, reflections, shadows, and ambient occlusion, then composite in image editing software for fine-tuned control.
| Render Pass | Purpose | Adjustment Options |
|---|---|---|
| Beauty | Full rendered image | Overall tone and color |
| Lighting | Illumination only | Brightness and contrast |
| Reflections | Mirror and gloss effects | Intensity and clarity |
| Ambient Occlusion | Contact shadows | Depth and definition |
| Alpha Channel | Transparency mask | Background replacement |
This approach allows brightening windows, enhancing sky drama, or adjusting material properties without re-rendering entire scenes. Professional studios working on 3D rendering of a house projects routinely use multi-pass workflows for maximum creative control.
Common Challenges and Solutions
Even experienced artists encounter obstacles during rendering projects. Recognizing typical issues and their solutions accelerates production and improves outcomes.
Material Realism Issues
Flat, unconvincing materials result from insufficient texture detail or improper scaling. Solution: Use high-resolution texture maps with appropriate bump and normal mapping. Reference real-world materials to match reflectivity, roughness, and color variation accurately.
Glass often appears too transparent or lacks proper refraction. Configure refractive index values correctly (typically 1.52 for architectural glass) and enable transparency with slight tinting for authenticity.
Lighting Problems
Harsh shadows create unflattering, unrealistic appearances. Solution: Soften direct sunlight using larger light sources or supplemental fill lights. Sky domes provide natural ambient illumination that reduces contrast ratios.
Overexposed or underexposed areas require exposure adjustment through camera settings or tonemapping. Bracket exposures during rendering, then blend in post-production for optimal dynamic range.
Performance and Render Times
Complex scenes with excessive geometry slow rendering to impractical speeds. Solution: Optimize models by removing unseen faces, using instancing for repeated elements, and employing proxy objects for distant details.
Distribute rendering across network machines using render farm services for deadline-critical projects. Cloud rendering platforms offer scalable computing power without significant capital investment.
Industry Applications and Benefits
The versatility of 3D rendering of a house technology serves multiple stakeholders across the real estate and construction industries.
For Architects and Designers
Renderings communicate design intent more effectively than technical drawings alone. Clients grasp spatial relationships, material choices, and aesthetic qualities immediately, facilitating faster approvals and reducing revision cycles.
Design iteration becomes cost-effective when exploring alternatives digitally rather than through physical mockups or post-construction modifications. Test multiple exterior finishes, roof styles, or landscape schemes before finalizing specifications.
For Real Estate Developers
Pre-construction marketing leverages renderings to sell properties before completion. Buyers commit to purchases based on compelling visualizations that showcase finished homes in idealized conditions.
Investor presentations benefit from professional imagery that communicates project quality and market positioning. High-quality renderings differentiate properties in competitive markets and justify premium pricing.
For Homeowners and Renovators
Custom home clients visualize their dream properties during the design phase, making confident decisions about features, finishes, and layouts. Renderings reduce uncertainty and ensure expectations align with delivered results.
Renovation projects show before-and-after transformations, helping homeowners evaluate options and contractors communicate scope. Municipal approval processes often require visual documentation that renderings provide efficiently.
Future Trends in Architectural Rendering
Technology continues advancing rapidly, introducing new capabilities that enhance 3D rendering of a house workflows and outputs.
Real-Time Rendering Evolution
Game engine technology increasingly powers architectural visualization, enabling interactive experiences where clients explore properties in real-time. These platforms maintain photorealistic quality while allowing dynamic lighting changes, material swaps, and viewpoint adjustments instantly.
Virtual reality integration transforms static renderings into immersive walkthroughs. Clients experience spaces at full scale, understanding room sizes and circulation patterns more intuitively than traditional presentations allow.
Artificial Intelligence Integration
AI-powered tools accelerate various rendering tasks. Automated material application analyzes geometry and applies appropriate textures based on surface characteristics. Denoising algorithms clean noisy renders faster than traditional sampling methods, reducing production time significantly.
Generative design systems explore thousands of variations automatically, identifying optimal solutions based on defined parameters. These technologies augment rather than replace human creativity, handling repetitive tasks while designers focus on aesthetic and functional decisions.
Sustainability Visualization
Environmental performance visualization integrates energy analysis directly into renderings. Display solar gain patterns, shading effectiveness, and thermal performance graphically, supporting sustainable design decision-making.
Lifecycle visualization shows how buildings age and landscape matures over time, helping clients understand long-term property evolution. These forward-looking renderings inform maintenance planning and material selection strategies.
Best Practices for Professional Results
Consistent quality in 3D rendering of a house projects requires attention to detail and systematic approaches that prevent common pitfalls.
Accuracy first: Verify all dimensions against architectural drawings before proceeding beyond basic modeling. Corrections become exponentially more difficult after applying materials and lighting.
Reference constantly: Maintain libraries of reference photographs showing similar architectural styles, materials, and lighting conditions. Regular comparison against reality keeps renderings grounded and believable.
Iterate strategically: Render low-resolution test images frequently during development to catch composition and lighting issues early. Reserve full-quality renders for final approved versions only.
Maintain organized files: Structure project folders logically with clear naming conventions for models, textures, and render outputs. Professional workflows prevent lost assets and facilitate collaboration across team members.
Seek feedback: External perspectives identify issues that familiarity blinds you to after extended project immersion. Colleagues and clients offer valuable insights that improve final deliverables.
Learning from structured resources like this 3D house modeling guide helps develop systematic approaches that yield consistent professional results across projects.
Mastering 3D rendering of a house requires technical skill, artistic sensibility, and systematic workflows that balance quality with efficiency. These visualizations have become indispensable tools for communicating architectural vision, marketing properties, and facilitating design decisions across the building industry. Whether you're developing custom residences, marketing real estate projects, or exploring design alternatives, professional rendering services transform concepts into compelling visual experiences. Rendimension specializes in creating photorealistic architectural visualizations that bring your projects to life with stunning clarity and precision, helping you communicate design intent and captivate audiences with award-winning imagery.


One thought on “3D Rendering of a House: Complete Guide for 2026”