Ready to master three js rendering for next-generation visuals in 2026? The demand for advanced 3D rendering is skyrocketing across web development, gaming, architecture, and virtual reality.
By unlocking the full potential of three js rendering, you can achieve photorealistic results, boost performance, and create truly immersive digital experiences.
This guide is your definitive resource for three js rendering in 2026. Here, you will find everything from foundational principles to expert optimization strategies and the latest rendering advancements.
We will walk through core rendering concepts, step-by-step scene setup, performance tips, advanced features, troubleshooting, and future trends shaping the world of Three.js.
Core Concepts of Three.js Rendering
Understanding the core concepts behind three js rendering is essential for anyone aiming to achieve next-generation visuals. By mastering these fundamentals, you will be able to create scenes that are not only visually stunning but also highly optimized for performance.
What is Three.js Rendering?
At its core, three js rendering refers to the process of converting 3D data into a 2D image that can be displayed in a browser. Three.js acts as a layer on top of WebGL, making advanced rendering techniques accessible without the need to write complex GPU code.
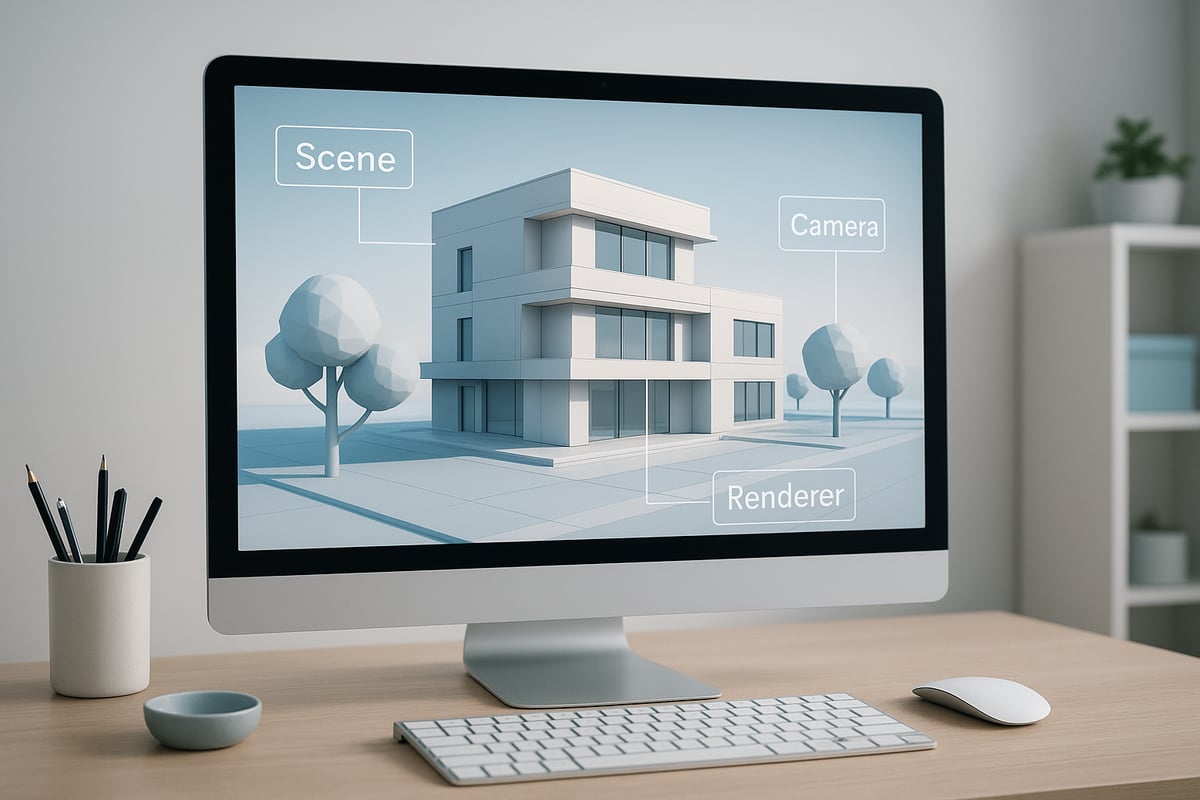
The rendering pipeline in three js rendering consists of three main components:
| Component | Description |
|---|---|
| Scene | Holds all 3D objects, lights, and cameras |
| Camera | Defines the viewpoint for rendering the scene |
| Renderer | Processes the scene and camera to produce the final image |
Three js rendering is real-time, meaning scenes are drawn rapidly to reflect user interaction, unlike offline rendering used for precomputed images. Real-time rendering enables interactive experiences in games, architectural visualization, and virtual reality.
Draw calls are a critical concept in three js rendering. Each draw call instructs the GPU to render a set of objects. Fewer draw calls generally mean better performance, especially on mobile devices.
Shaders and materials control how surfaces look and react to light. Three.js provides built-in materials and supports custom shaders for advanced effects.
Key terms to know:
- Meshes: 3D objects combining geometry and materials
- Geometries: The shape or structure of meshes
- Lights: Illuminate the scene and affect material appearance
- Frustum: The visible area from the camera’s perspective
- Culling: The process of skipping objects outside the camera’s view to optimize three js rendering
Three.js abstracts many WebGL complexities, allowing you to focus on creative aspects. For a deeper foundation, see What is 3D Rendering.
A basic rendering flow in code:
// Three.js rendering pipeline example
const scene = new THREE.Scene();
const camera = new THREE.PerspectiveCamera(75, window.innerWidth/window.innerHeight, 0.1, 1000);
const renderer = new THREE.WebGLRenderer();
renderer.setSize(window.innerWidth, window.innerHeight);
document.body.appendChild(renderer.domElement);

function animate() {
    requestAnimationFrame(animate);
    renderer.render(scene, camera);
}
animate();
Rendering Engines and Compatibility in 2026
The evolution of three js rendering engines has been significant. In 2026, developers can choose between the classic WebGLRenderer and the cutting-edge WebGPURenderer. WebGPU brings higher performance and richer visuals, shaping the future of three js rendering.
Browser support for three js rendering is now robust across most platforms. WebGPURenderer is supported in all major browsers, and hardware compatibility continues to improve, enabling high-fidelity 3D graphics on desktops, tablets, and smartphones.
Three js rendering also seamlessly integrates with VR and AR platforms. WebXR support allows immersive scenes to be experienced in headsets and mobile devices, expanding the reach of interactive 3D content.
Cross-platform rendering is essential. Three js rendering adapts to various devices, but scene complexity and visuals must be tailored to different screen sizes and capabilities.
Below is a comparison of rendering outputs:
| Platform | Renderer | Visual Fidelity | Performance |
|---|---|---|---|
| Desktop | WebGPU / WebGL | High | Excellent |
| Mobile | WebGPU / WebGL | Medium-High | Good |
| VR Headset | WebGPU / WebGL | Immersive | Optimized |
As you explore three js rendering, understanding these engines and compatibility factors will guide you in creating experiences that look great everywhere.
Step-by-Step: Setting Up a Three.js Scene for Optimal Rendering
Achieving high-quality visuals and efficient performance in three js rendering starts with a well-organized scene setup. By following a structured approach, you can ensure both visual fidelity and smooth interaction, whether you build for web, mobile, or immersive platforms.
1. Initializing the Renderer and Canvas
The first step in any three js rendering project is choosing the appropriate renderer for your needs. In 2026, developers can select between WebGLRenderer and the newer WebGPURenderer, each with distinct advantages. WebGLRenderer is broadly compatible, while WebGPURenderer offers enhanced speed and features on supported devices.
Setting up your HTML canvas is equally crucial. Always match the canvas resolution to your display size and consider device pixel ratio for crisp visuals. For instance:
const renderer = new THREE.WebGLRenderer({ antialias: true });
renderer.setSize(window.innerWidth, window.innerHeight);
renderer.setPixelRatio(window.devicePixelRatio);
document.body.appendChild(renderer.domElement);
A proper canvas setup ensures your three js rendering output looks sharp and runs efficiently on all devices.
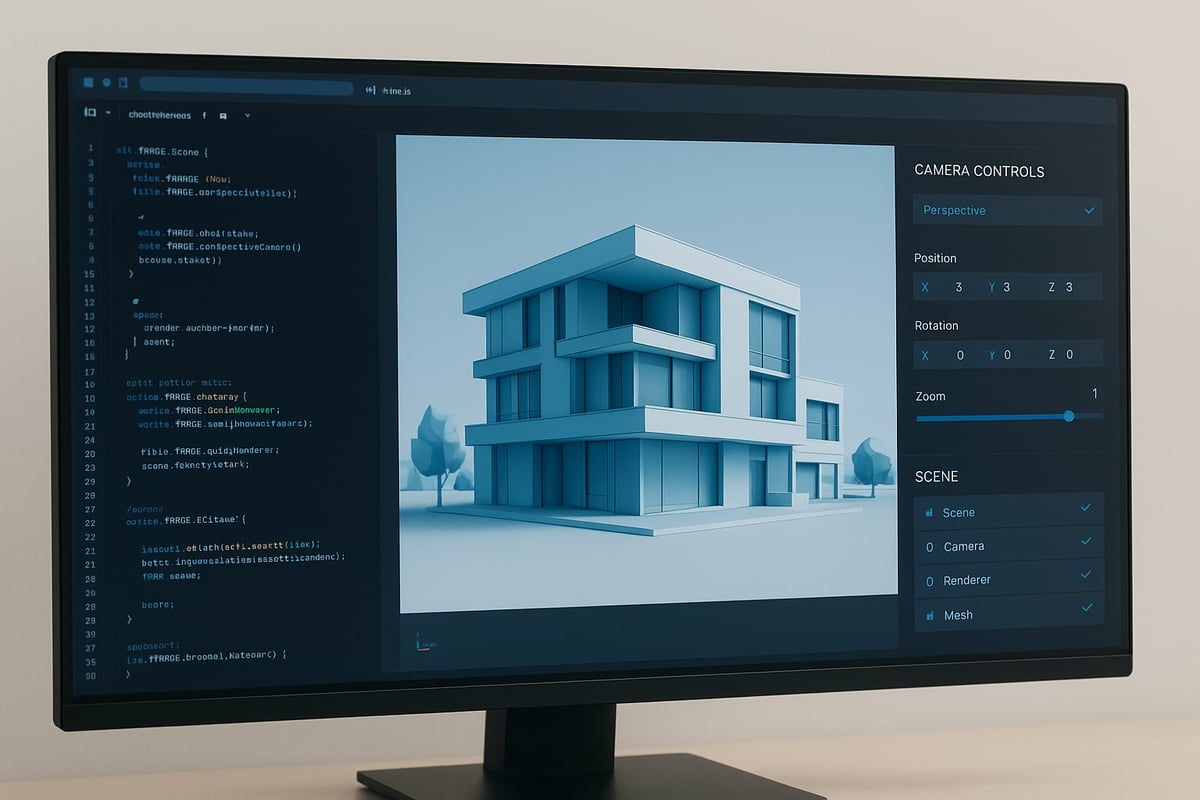
2. Configuring Camera and Scene
Selecting the right camera type is vital for effective three js rendering. Perspective cameras mimic human vision, making them ideal for most 3D scenes, while orthographic cameras suit technical or architectural views.
| Camera Type | Use Case | Distortion | Realism |
|---|---|---|---|
| Perspective | Games, VR, product demos | Yes | High |
| Orthographic | CAD, maps, diagrams | No | Low/Medium |
Adjust camera parameters like field of view and aspect ratio to balance clarity and performance. Organize your scene using a structured scene graph, grouping related objects for easier management.
For an in-depth walkthrough of scene setup, refer to this Architectural Visualization Step-by-Step Guide, which aligns closely with best practices in three js rendering for 2026.
3. Adding and Managing Objects
Efficient object management is key for scalable three js rendering. Start by combining geometry and material to create meshes, then add them to your scene. When handling hundreds or thousands of objects, leverage instancing with InstancedMesh to reduce overhead.
Group objects by functionality or spatial relationship. For example, all furniture in a room can be grouped for easy manipulation. Layering helps in organizing complex scenes and controlling render order.
Instancing allows you to render many objects with a single draw call, dramatically improving three js rendering performance in dense environments.
4. Lighting and Materials
Lighting defines the mood and realism of your three js rendering. Three.js offers several light types:
- AmbientLight: Soft, global illumination
- DirectionalLight: Sunlight or parallel light sources
- PointLight: Localized, bulb-like lighting
- SpotLight: Focused beams, ideal for highlights
Material selection further shapes your scene's appearance. Use MeshBasicMaterial for unlit surfaces, MeshStandardMaterial for physically-based rendering, or custom shaders for unique effects. The right combination balances realism and performance.
Experiment with lighting and materials to see how different setups affect your three js rendering. Compare results under various lighting scenarios to find the optimal look for your project.
5. Rendering Loop and Animation
The rendering loop is the heartbeat of every three js rendering application. Using requestAnimationFrame, you ensure smooth updates and efficient resource usage:
function animate() {
  requestAnimationFrame(animate);
  // Update objects, handle input
  renderer.render(scene, camera);
}
animate();
Differentiate between static and dynamic scenes. For mostly static scenes, consider pausing the render loop when no updates are needed, which saves processing power. For animated or interactive scenes, keep the loop running to maintain responsiveness.
Thoughtfully managing the render loop ensures your three js rendering stays performant, even as scene complexity grows.
Performance Optimization Strategies for High-Fidelity Visuals
Achieving high-fidelity visuals with three js rendering requires a strategic approach. Every decision, from geometry structure to camera configuration, directly affects performance and visual quality. The following strategies outline how to elevate efficiency while maintaining stunning results.
Minimizing Draw Calls and Geometry Complexity
One of the most significant factors in three js rendering performance is the number of draw calls. Each draw call represents a command sent to the GPU to render a set of objects with the same material and geometry. Excessive draw calls can quickly bottleneck rendering, especially in complex scenes.
To minimize draw calls:
- Use
InstancedMeshfor repeated objects, such as chairs or trees, to render many items in a single call. - Merge geometries when possible, combining static objects that share materials.
- Limit the number of unique materials and geometries.
For example, architectural scenes with hundreds of identical elements benefit from instancing. Consider the following code snippet for object instancing:
const geometry = new THREE.BoxGeometry();
const material = new THREE.MeshStandardMaterial();
const mesh = new THREE.InstancedMesh(geometry, material, 1000);
// Position each instance as needed
Optimizing geometry also means reducing polygon count where detail is not needed. Use simplified meshes for distant objects or background elements. For an in-depth list of best practices, explore these Three.js performance optimization tips.
These steps collectively ensure three js rendering remains smooth, even as scenes scale in complexity.
Culling and Level of Detail (LOD) Techniques
Efficient three js rendering relies heavily on culling and LOD. Frustum culling automatically skips objects outside the camera’s view, reducing GPU workload. Three.js handles this by default, but you can further optimize by organizing your scene hierarchy and ensuring bounding volumes are correct.
Occlusion culling, which hides objects blocked by others, is less developed in browsers but can be implemented for static environments. Level of Detail (LOD) involves swapping high-resolution models for simpler versions at a distance. This technique is vital for expansive scenes such as cityscapes or large interiors.
A sample workflow:
- Attach
THREE.LODobjects to complex meshes. - Define model switches at specific camera distances.
- Continuously update LOD levels within the render loop.
Combined, these practices help maintain high frame rates and visual clarity, making three js rendering suitable for both desktop and mobile experiences.
Texture and Material Optimization
Textures and materials play a central role in three js rendering quality and speed. Large textures consume memory and slow down load times. To optimize:
- Use texture atlases to combine multiple images into a single file, reducing draw calls.
- Compress and resize textures to the smallest acceptable resolution.
- Limit the number of material variants, and use physically-based materials only when necessary.
Shader complexity also impacts performance. Whenever possible, use built-in materials like MeshStandardMaterial instead of custom shaders. For scenes demanding photorealism, balance advanced materials with efficient texture usage.
Implementing these optimizations ensures that three js rendering delivers crisp visuals without sacrificing speed, even on lower-end devices.
Renderer and Camera Settings
Fine-tuning renderer and camera settings can dramatically affect three js rendering results. Antialiasing smooths jagged edges but increases GPU load. Enable it only when needed. Shadow settings, tone mapping, and exposure all influence scene realism and performance.
Camera configuration also matters. Set the near and far planes to tightly enclose your scene, which enhances culling efficiency and reduces unnecessary draw calls. For example, reducing the camera’s far value can immediately improve performance in large environments.
Create a table to track renderer settings for different project types:
| Setting | High-Fidelity | Performance |
|---|---|---|
| Antialiasing | On | Off |
| Shadows | Soft, high-res | Off/low |
| Tone Mapping | Filmic | Linear |
Careful adjustment of these parameters ensures three js rendering looks impressive while remaining responsive.
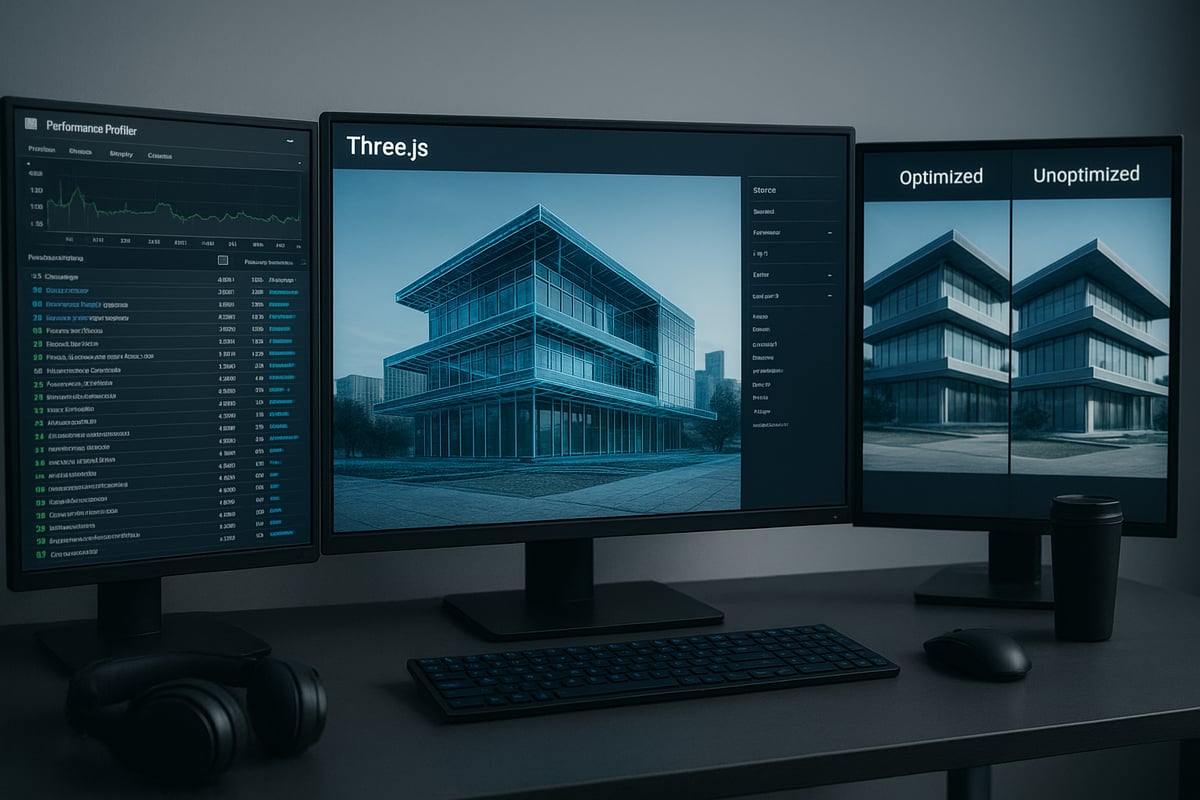
Profiling and Debugging Tools
Effective three js rendering optimization is impossible without reliable profiling. Use the THREE.Stats module to monitor frame rate, draw calls, and memory usage in real time. Chrome DevTools provides GPU and JavaScript performance insights.
When performance drops, isolate problem areas by disabling scene elements and monitoring changes. Look for spikes in draw calls or shader compilation times. Tools like DrawCallInspector help identify bottlenecks visually.
Adopting a systematic profiling routine ensures three js rendering projects are both visually stunning and technically robust.
Advanced Rendering Features and Techniques in Three.js
Pushing the boundaries of three js rendering opens the door to photorealistic visuals, immersive effects, and interactive experiences. Modern workflows rely on advanced techniques that transform ordinary scenes into next-generation masterpieces. In this section, discover the critical features, methods, and best practices that define high-quality three js rendering in 2026.
Physically-Based Rendering (PBR) and Realism
Physically-based rendering (PBR) is at the core of next-level three js rendering. PBR materials in Three.js simulate how real-world surfaces interact with light, producing lifelike reflections and textures. By leveraging environment maps and HDR textures, artists achieve stunning realism with minimal setup.
Consider the difference PBR makes: a simple metallic object transforms from flat to photorealistic with just a few material adjustments. For those seeking a deeper dive into photorealistic techniques, the Guide to Photorealistic Rendering Success offers a comprehensive resource.
Experimenting with different light sources and environment maps allows for quick iteration and precise control over the scene’s mood. This approach elevates three js rendering to professional standards.
Shadows, Reflections, and Transparency
Shadows and reflections are vital for convincing three js rendering. Three.js supports several shadow types, including basic, soft, and real-time. Each type affects both visual quality and performance, so choose settings appropriate for your project’s needs.
Reflections are created using cube maps or planar mirrors, which can add depth and realism to interior or product visualizations. Managing transparency, however, requires careful attention to material settings and rendering order to avoid visual artifacts.
A typical workflow might involve enabling soft shadows for interior renders, using a cube map for reflective surfaces, and adjusting transparency sorting for glass objects. These techniques ensure that three js rendering delivers both realism and clarity across diverse scenarios.
Post-Processing and Visual Effects
Post-processing is where three js rendering truly shines, allowing artists to add cinematic effects and polish. The EffectComposer in Three.js enables a flexible post-processing pipeline, supporting effects like bloom, depth of field, motion blur, and color grading.
Adding a bloom effect, for example, can make architectural scenes glow with natural light, while depth of field directs the viewer’s attention. However, post-processing can impact performance, so always profile your scene and enable only necessary effects.
A sample code block to add bloom:
const composer = new EffectComposer(renderer);
composer.addPass(new RenderPass(scene, camera));
composer.addPass(new UnrealBloomPass(resolution, strength, radius, threshold));
With thoughtful post-processing, three js rendering achieves a polished, cinematic look.
Custom Shaders and GPU Programming
Custom shaders allow full creative control over three js rendering. By writing GLSL code, developers implement unique visual styles, interactive effects, or real-time data visualizations. Three.js provides interfaces for vertex and fragment shaders, making it accessible for both beginners and experts.
Use cases for custom shaders include stylized rendering, animated materials, or advanced scientific visualization. For example, a shader can animate color gradients based on user input, creating dynamic interactivity.
When developing custom shaders, always test for performance and compatibility across devices. This ensures your three js rendering remains efficient and visually impressive.
Virtual and Augmented Reality Integration
Three js rendering is at the forefront of VR and AR experiences. With WebXR support, Three.js enables immersive walkthroughs, architectural tours, and interactive product demos. Optimizing for VR/AR involves careful management of scene complexity, materials, and frame rates.
Best practices include using instanced meshes for repeated objects, optimizing textures, and ensuring smooth camera movement. For architectural visualization, a VR walkthrough allows clients to experience a space before it is built, increasing engagement and understanding.
By following these strategies, three js rendering can power truly next-generation virtual environments.
Troubleshooting and Debugging Rendering Issues
When working with three js rendering, even experienced developers encounter issues that can disrupt visuals or impact performance. Understanding common pitfalls and mastering debugging workflows ensures your scenes look and run as intended. Let us break down the most frequent problems, effective troubleshooting steps, and where to find reliable community support.
Common Rendering Problems
Three js rendering projects often run into a handful of recurring issues. The most frequent include:
- Blank or missing objects: This can happen if the camera is not positioned correctly, if objects are outside the viewing frustum, or if lights and materials are misconfigured.
- Performance drops: Excessive draw calls, heavy shaders, or oversized textures can slow down frame rates.
- Lighting and shadow errors: Incorrect light placement, missing shadows, or improper shadow bias settings can create unrealistic results.
- Transparency and rendering order: Overlapping transparent objects may render out of order, causing visual glitches.
For example, if only one wall is visible in your scene, check first if the camera is inside the geometry, the wall's material opacity is set correctly, and if the correct lights are enabled. Addressing these basics is crucial for smooth three js rendering.
Step-by-Step Debugging Workflow
A systematic approach helps resolve three js rendering issues efficiently:
- Check your renderer, camera, and scene setup. Ensure the renderer is initialized and attached to the DOM, the camera parameters make sense, and the scene contains all objects.
- Use debugging tools: Three.js provides built-in helpers like
AxesHelper,CameraHelper, andStats.jsfor monitoring scene state and performance. - Isolate problematic objects or materials: Hide or remove objects one by one to find the source of the error.
- Leverage browser DevTools: Inspect WebGL errors in the console and use the performance tab to identify slow frames.
For instance, if performance suddenly drops during camera rotation, enable performance stats and check for spikes in draw calls. This structured workflow ensures you spot issues early and maintain optimal three js rendering.
Community and Resources for Support
When troubleshooting three js rendering becomes challenging, the community offers vital resources:
- Official documentation and migration guides: Stay updated with the latest features and best practices.
- Forums and Q&A platforms: Places like discourse.threejs.org and Stack Overflow are excellent for advice and real-world solutions.
- Open source tools: Utilities such as DrawCallInspector and browser-based profilers help visualize and diagnose issues quickly.
Suppose you face persistent culling problems. In that case, posting a minimal code example on the forum often yields targeted help from experienced contributors. Relying on these resources ensures you keep pace with evolving three js rendering standards and resolve challenges efficiently.
The Future of Three.js Rendering: Trends and Innovations for 2026
The landscape of three js rendering is rapidly evolving as we move further into 2026. Developers and creators are witnessing groundbreaking advancements that transform how 3D content is built, optimized, and experienced across platforms. Let us explore the trends and innovations shaping the future of three js rendering, from cutting-edge graphics APIs to sustainability.
WebGPU and Next-Gen Rendering Technologies
WebGPU is reshaping three js rendering by providing immense speed and visual quality improvements over previous standards. In 2026, mainstream browsers now widely support WebGPU, enabling Three.js developers to leverage near-native GPU performance for their scenes.
Performance benchmarks show that the transition to WebGPU can result in up to 15x gains compared to WebGL, as highlighted by recent WebGPU adoption statistics 2026. This evolution allows for more complex geometries, advanced lighting, and real-time effects, making three js rendering more immersive on both desktop and mobile devices.
AI and Procedural Content in Rendering
Artificial intelligence is revolutionizing three js rendering workflows through automated optimization and content generation. AI-driven tools can now analyze scene complexity, automatically adjust level of detail, and generate textures or materials on the fly.
Procedural geometry and material creation further reduce manual labor, letting developers focus on creative direction. As three js rendering becomes more intelligent, scenes adapt dynamically, and assets are generated in real time, supporting larger, more interactive environments.
Real-Time Collaboration and Cloud Rendering
Three js rendering is no longer limited to single-user workflows. Cloud-based solutions and real-time collaboration tools enable multiple designers and stakeholders to interact with the same scene simultaneously.
Teams can review models, make changes, and visualize updates instantly from anywhere in the world. This approach is especially valuable in architectural visualization and product design, where feedback loops are critical. Cloud rendering also scales resources, ensuring high fidelity even for complex three js rendering projects.
Sustainability and Green Rendering Practices
Eco-conscious development is influencing three js rendering strategies in 2026. With the growing demand for sustainable technology, developers are optimizing rendering pipelines to minimize energy consumption.
Techniques such as adaptive level of detail, efficient culling, and texture compression reduce computational overhead. By lowering resource usage, three js rendering can help decrease the carbon footprint of large-scale 3D projects, aligning with global sustainability goals.
Keeping Up with Three.js and Industry Standards
To stay competitive, professionals must follow the latest advancements in three js rendering and related technologies. Regular updates to Three.js introduce new features, performance enhancements, and compatibility improvements.
Engagement with the community and industry resources, like the Future of 3D Rendering, ensures developers remain at the forefront of innovation. By contributing to open source and adopting emerging standards, teams future-proof their workflows and deliver cutting-edge 3D experiences.
Rendimension: Elevating Architectural Visualization with Three.js
Rendimension stands at the forefront of architectural visualization, combining design expertise with advanced three js rendering techniques. Their team delivers photorealistic visuals that immerse clients in their projects before construction even begins.

By leveraging optimized three js rendering pipelines, Rendimension creates high-impact scenes for architecture, real estate, and product presentations. Clients benefit from fast, interactive walkthroughs and stunning detail that elevate every proposal.
Discover how Rendimension’s professional 3D rendering services help architects, developers, and designers achieve award-winning results. For next-level visualization, explore their portfolio and see the difference expertise makes.